Follow along with the video below to see how to install our site as a web app on your home screen.
Note: This feature currently requires accessing the site using the built-in Safari browser.
We noticed you are blocking ads. DO THE TON only works with community supporters. Most are active members of the site with small businesses. Please consider disabling your ad blocking tool and checking out the businesses that help keep our site up and free.
Fair enough. My work is seasonal and is sucking most of my time. I have made it to the garage 2-3 times in the last couple of months. When I have been working on bikes it has been spent on my XS650. Swapped a motor from a donor bike. For some reason I could not get it to fire. Frustrated the hell out of me. Finally a friend brought his over and we took his apart to copy everything. Fired right up. Not sure if we even changed anything. It seems like a good runner. Just in time for some nice weather. My garage attention is now back on the Triton.
Just getting into winter mode. The bike is on the bench and parts are on order to get this thing finished. Ordered a set of alloy Manx style fenders and a rear frame loop today from Frank at Clubman Racing. Wheels have been built and the rear is only at a working tension. Starting the dry build and getting everything lined up. Working on getting rearsets as well. I have a little money and it's going fast!
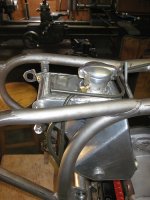
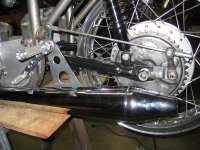
Yep, have not been good at posting on this. Ran into a few issues and now waiting for parts to arrive before we can continue. The rear swing arm is a early Featherbed, The only major difference I can find is it uses a torque arm on the brake plate instead of the nub that slides into the swingarm. I found a new brake plate on eBay but I am waiting for it to arrive from Israel. Once this arrives we can start to align the rear wheel.
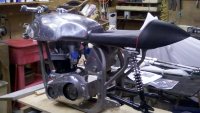
Was not super happy with the exhaust I ordered. I was looking for up swept style and purchased a '82 replacement Bonneville push over style without a crossover so we could have a little more flexibility in fitting. The aftermarket is not the same as the original. It does not up sweep as much. Ordered a extension with sweep and waiting to see how this works. Most likely will interfere with the rearsets. I have peashooter pipes waiting.
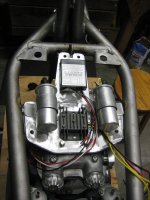
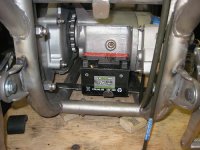
I am really happy with the way the head-steady turned out. Designed with lots of room to place electrical stuff like coils, boyer etc....see photo.
The wiring is about done except for a few loose ends like the amp meter.
The central oil tank has been a mess. This was a eBay purchase a few years ago. The oil cap did not align with the seat opening. Cut the top off and re-positioned the cap and had someone re-weld the top. I purchased the wrong oil line out fitting. For some reason I purchased a Triumph when a Norton fitting was required. Once I had the Norton fitting I discovered the threads were distorted when it was welded in place. This will get re-tapped this week.
The need to buy list is pretty short right now and hope to have the frame to power coat in the next couple of weeks.
Looks awesome - I know it's early but I thought I'd mention when I put my Boyer module and the regulator/rectifier on my bike I used some thin closed cell foam under each of them to reduce the vibrations they endure.
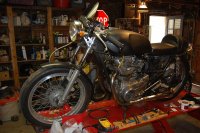
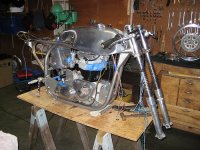
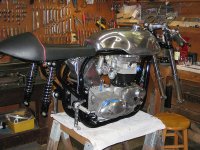
Here is the bike as it currently sits. The front forks have been changed. Figured out I had Commando for tubes in a Domi fork. I ordered Domi tubes and the gap is now corrected. Inside the fork it has spacers to adjust the ride height. New spacers will most likely be made to change the ride height once it sits on the ground. The front wheel is getting it's final true this week as well. Getting closer to tires at this point.
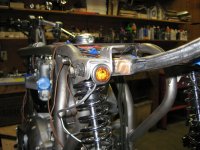
Wish I could take credit for this but by friend came up with a slick indicator light for the rear. You hardly notice it once the seat is on. They are LED marker lights. I do a fair amount of night riding and you need indicators at night here to be legal.
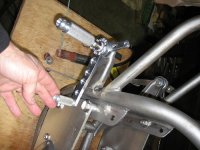
So the rear brake has been a bit of a pain. The swingarm I happen to have uses a torque arm and finding a brake plate to match has been a bit of a challenge. I purchased one on eBay from Israel that looked the part and it was the only thing I could find. Even local parts hoarders had never seen such a thing. When fitted the tab for the torque arm connected on the plate was in the wrong spot. It was advertised as a ES2 or Domi. It was just a modified Atlas. Changed the tab location and made it work. The good news is the cam on the inside of the one from Israel was not bent like the one that came with the wheel. Still need to connect the torque arm but the wheel is ready for alignment.
Had to make some compromise with the exhaust and rearsets as well as fitting linkage. I wanted to up sweep the exhaust more but this had interference with the muffler. I changed the position of the rearsets again and brought them up to give more foot room under the shifter. Although not cheep the fully adjustable rearsets are worth every penny.
Wouldn't surprise me if it was used by BSA and Triumph as well. It's also the same as early Commando. I used a Commando hub and the plate that came with that was the same other than the torque arm used instead of a nub that slides into the swingarm.
Back from paint. Final build over the next few weeks. We are at that point like a TV show, they just start hanging parts on the frame and everything fits! All the hard issues have been figured out and it looks easy at this point. Could not have made this kind of headway on this project with my buddy Rob. He is a truly talented man and deserves all the credit.
This site uses cookies to help personalise content, tailor your experience and to keep you logged in if you register.
By continuing to use this site, you are consenting to our use of cookies.