
We noticed you are blocking ads. DO THE TON only works with community supporters. Most are active members of the site with small businesses. Please consider disabling your ad blocking tool and checking out the businesses that help keep our site up and free.
You are using an out of date browser. It may not display this or other websites correctly.
You should upgrade or use an alternative browser.
You should upgrade or use an alternative browser.
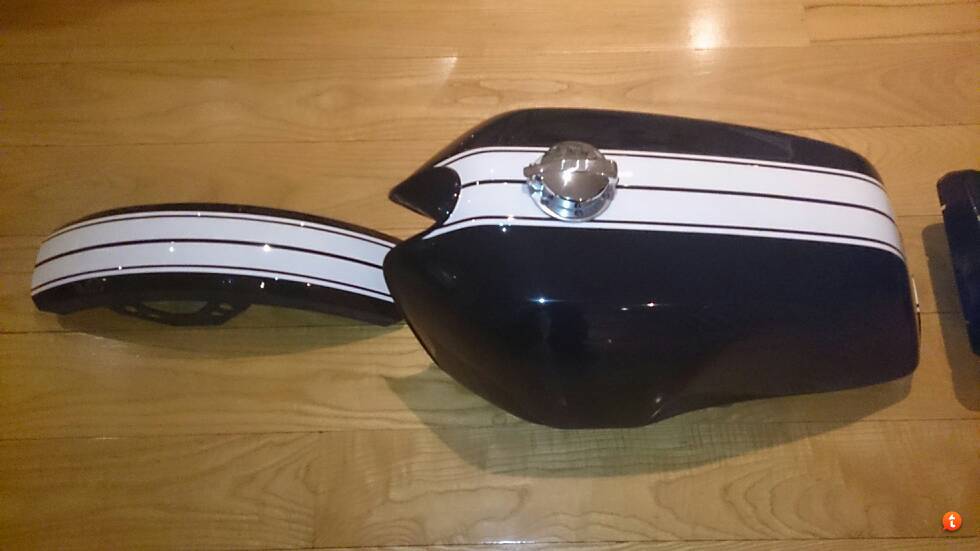
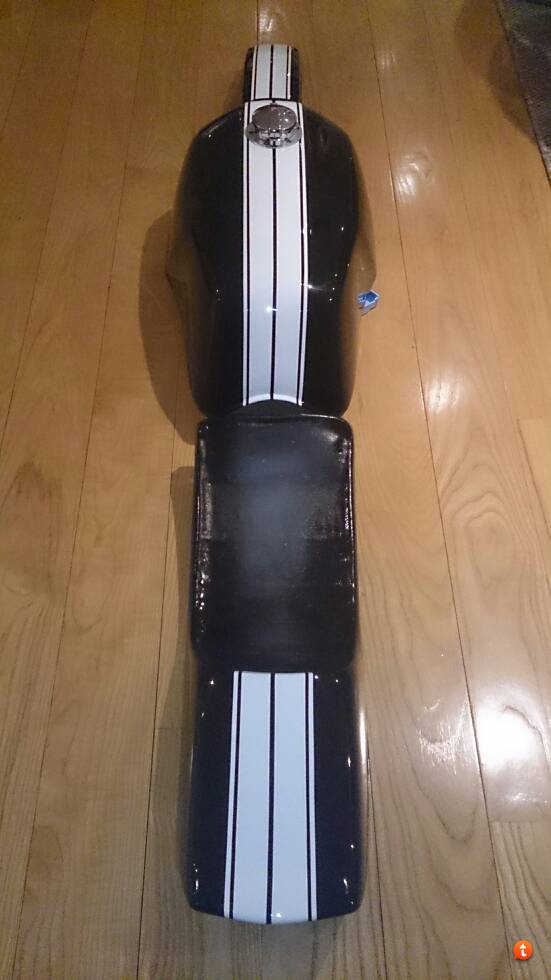
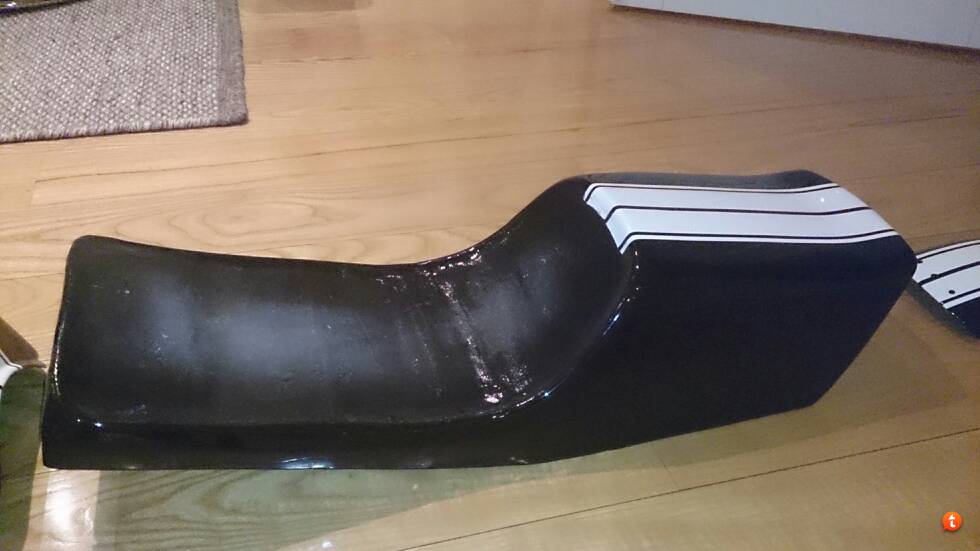
Working on my 1983 Kawa KZ1000R
- Thread starter tommyboah
- Start date
tommyboah
Active Member
Re: Re: Working on my 1983 Kawa KZ1000R
I will let you know how it works out.
Sent from my C6603 using Tapatalk
I have someone looking at it. I think the material around the holes are of decent thickness. I believe they will just cut out some parts and fill them in with new material.spotty said:that looks most excellent. well done
how are you going to sort the frame?
I will let you know how it works out.
Sent from my C6603 using Tapatalk
Hoosier Daddy
Earache my eye...
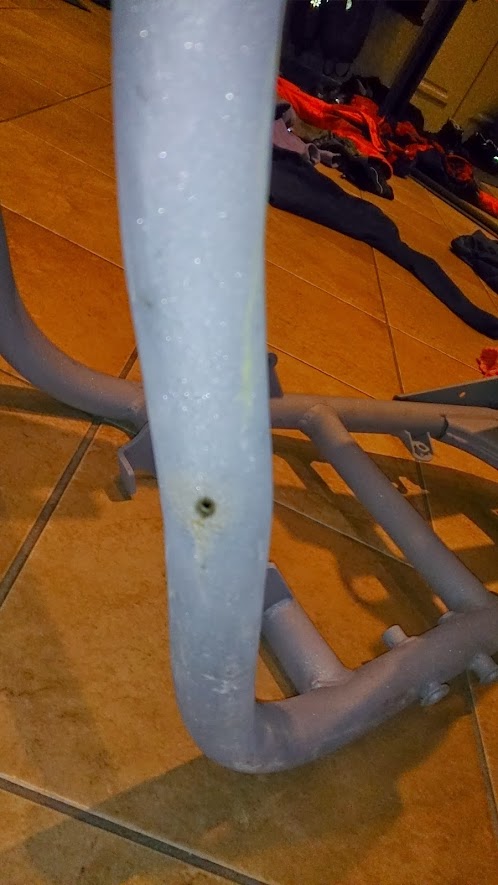
I am not sure this one isn't a factory drain hole. On some of my frames (Honda) they were there intentionally to keep water from collecting in the lowest part of the frame. While the others you've shown are weak points that need repaired, If your frame is laying on it down tubes in this pic and you are showing the bottom of the frame, it may be OK.
redwillissuperman
Keep it simple- engine, wheels, bars
Looks like an awesome project!
With the pin holes in the frame, take a small dremel and work out from the center of the hole making a rounded slot shape. Where the slot runs inline with the frame rail. Do this until you get to a good thickness/no more oxidized metal. Depending on the size and location you can either leave it (lighter = faster), or fill the hole and finish the welds back to shape.
If the hole is on the bottom of a rail (like where water would have collected) leaving open will prevent future water from collecting. I would also take the opportunity to blast inside the rail in that location with sand or soda.
Holes (preferably slots) in the frame will not weaken the rail considerably until they exceed 30% of the DIAMETER. For example, a 1/4-inch wide slot in a 1-inch diameter tube. Handlebars do this all the time for internal wiring.
Hoosier Daddy said:I am not sure this one isn't a factory drain hole. On some of my frames (Honda) they were there intentionally to keep water from collecting in the lowest part of the frame. While the others you've shown are weak points that need repaired, If your frame is laying on it down tubes in this pic and you are showing the bottom of the frame, it may be OK.
Whilst it almost looks like an intentional hole, it's not in the right spot to be an effective drain hole. It should be directly underneath the tube or angled more towards the side stand.
tommyboah
Active Member
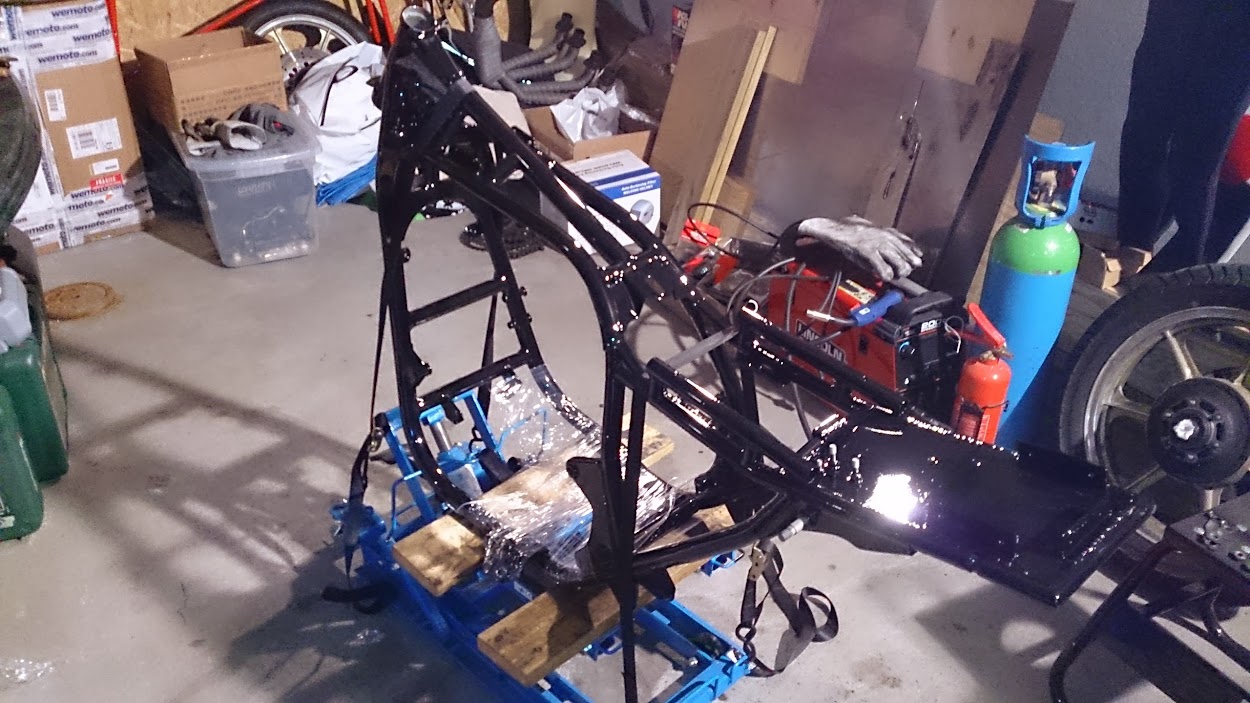
It's been a while since I posted the last time, and things have been moving a long. I got the holes in the frame drilled out, to verify that the these were only spots and not big areas that were rusted out. I had the holes welded back up and the frame powder coated. I finally got it picked up from the coater and that was sweet ") :
:

Since I had this issue with moisture that had been trapped in my frame creating this rust spots, I decided to rust wash the inside of the frame. I bought some cans of rust rinse (directly translated from Norwegian) and drilled a whole in each side of the frame so that I could pour this stuff into the frame and have it flow into the lower tubings. Don't have a picture of this I let the rinse sit in there for 45 minutes and poured it out. A lot of brown sludge coming out. I did a second rust rinse just to be sure, same procedure.
After letting the frame dry out for a couple of days I got me some rust prevention liquid. This is a type of waxy substance that is penetrating and leaves a waxy residue when it dries. I poured this into the same holes that I used for the rinse and slushed it all around in the frame and let it sit and dry. I believe that this treatment will help some with preventing further rust on the inside of the frame, letting my girl have many years left for the road 8)
Now it was time to put back the steering races and bearings. I thought i could just knock the races in with a mallet, but it showed that it was not that easy. I created myself a DIY tool for this, which worked out quite good also for the swing arm needle bearings by just using different socket sizes:
A trick is actually to do one side at a time, using only one socket. Using both sockets trying to press both races at the same time was not easy. Just a tip.
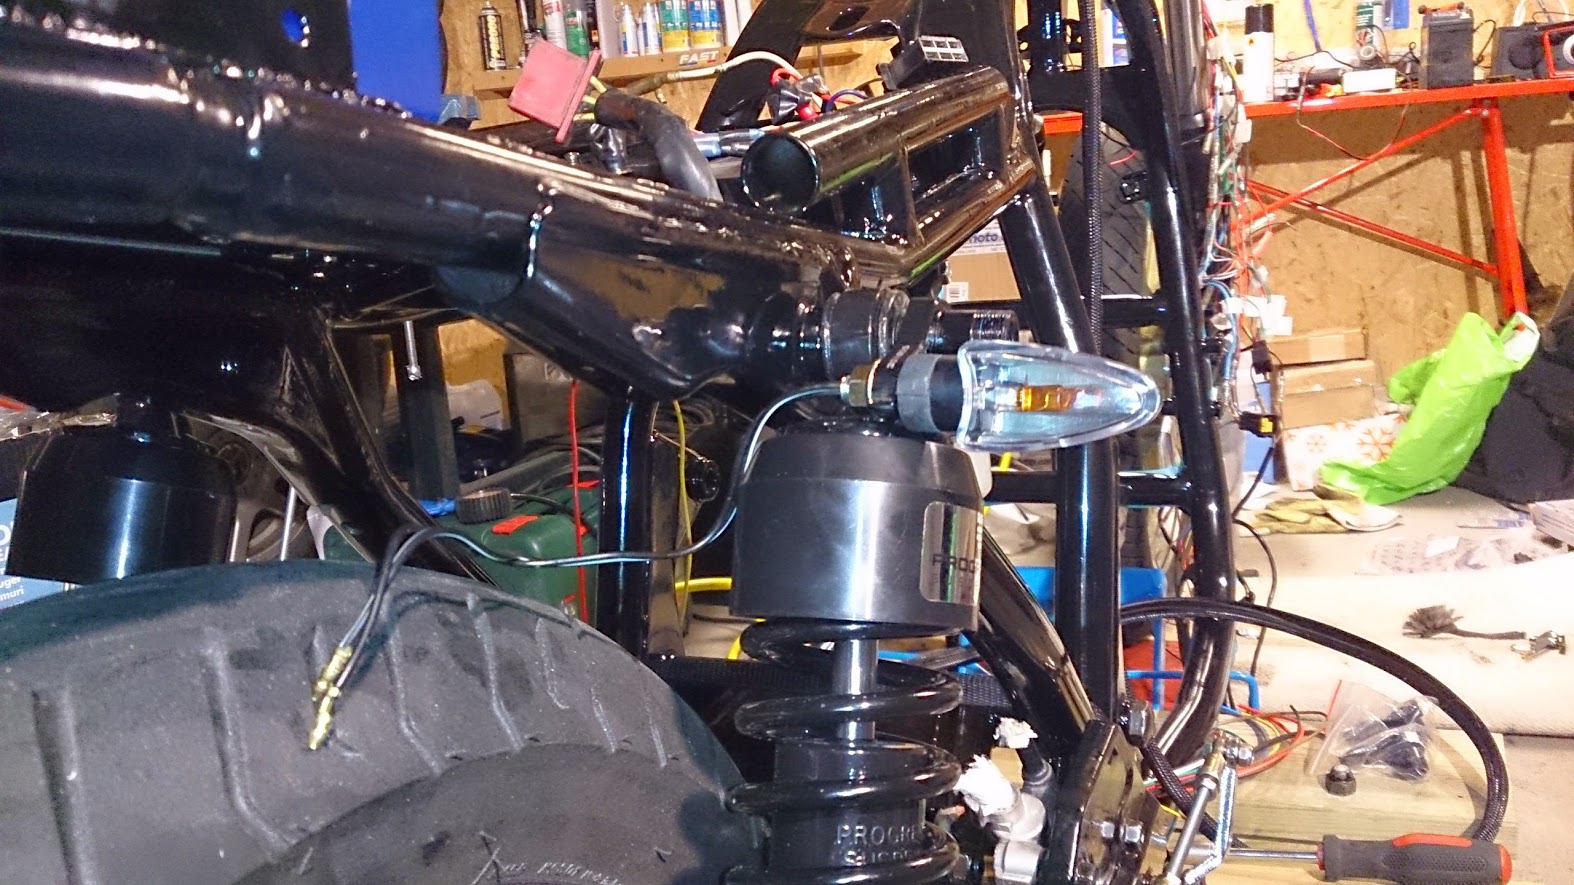
I got the swing arm mounted with the shocks:
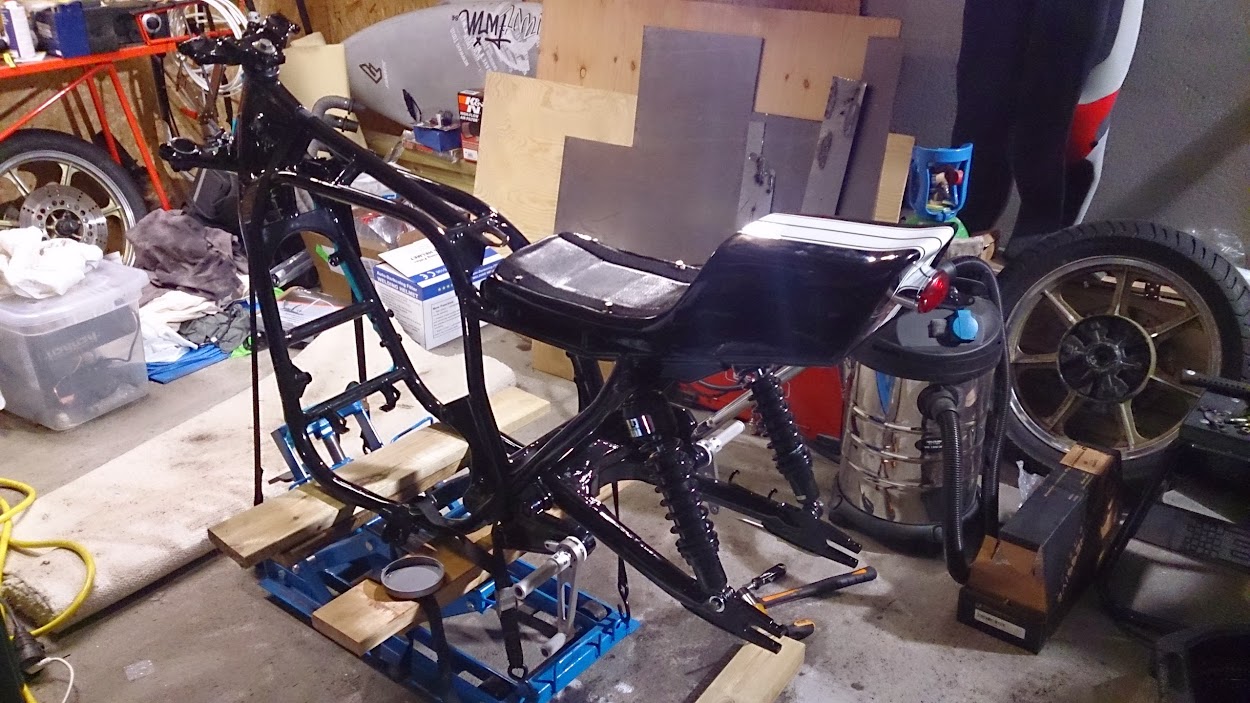
Another shot:
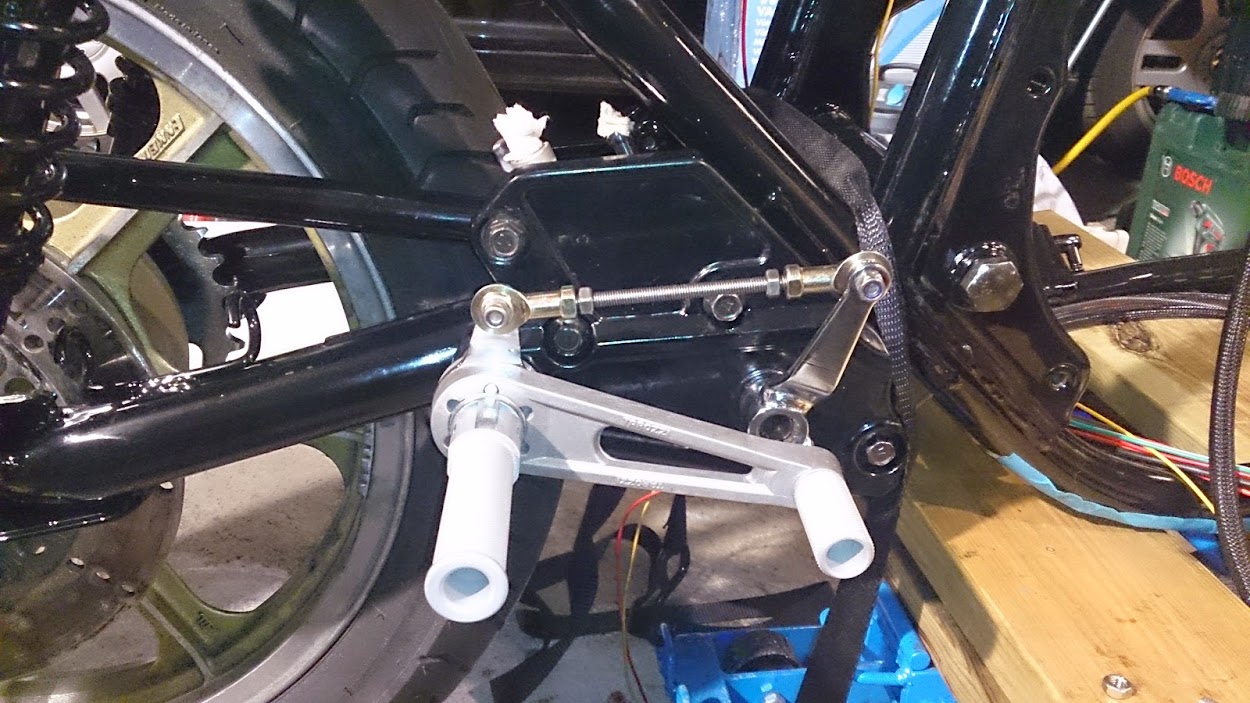
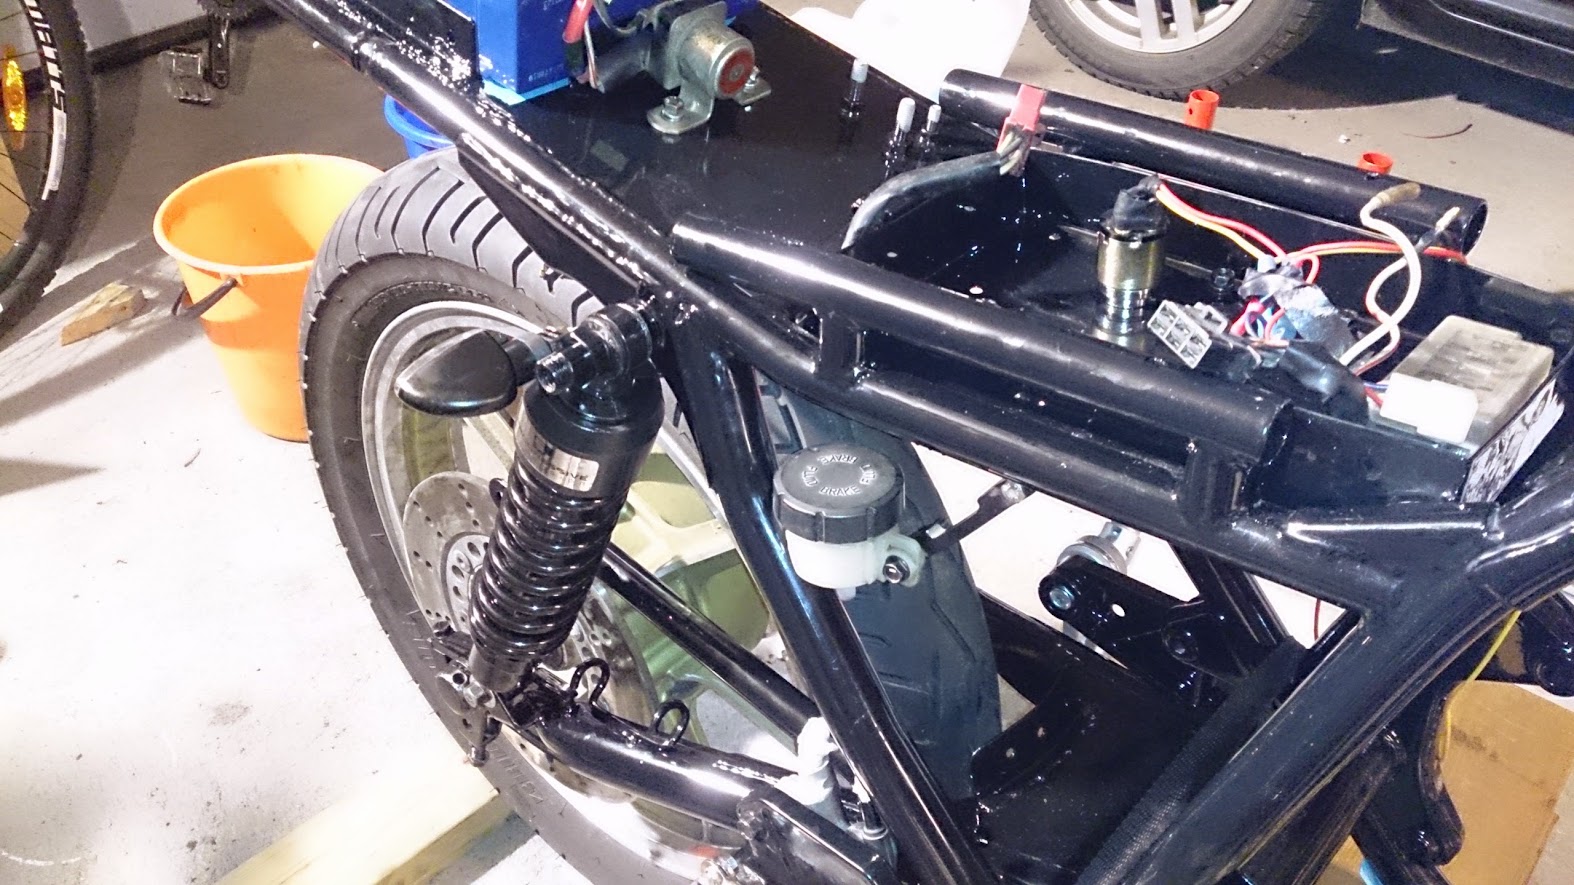
Worked out the linkage for my rear brake. I have made the rear set by modifying the stock brackets, cutting of the parts which are not needed. Put on some Tarozzi foldable pegs. I think the rear set came out ok:
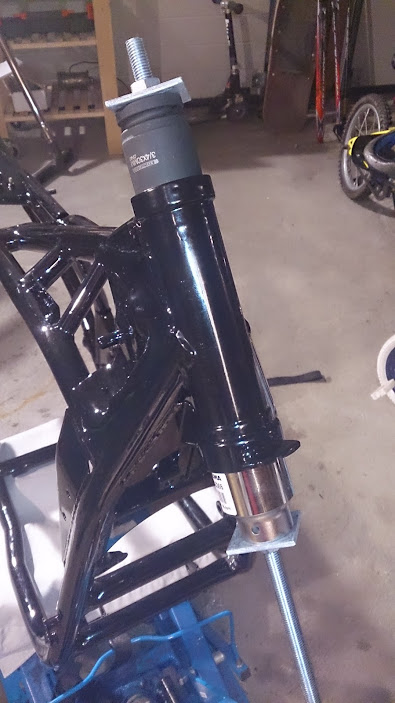
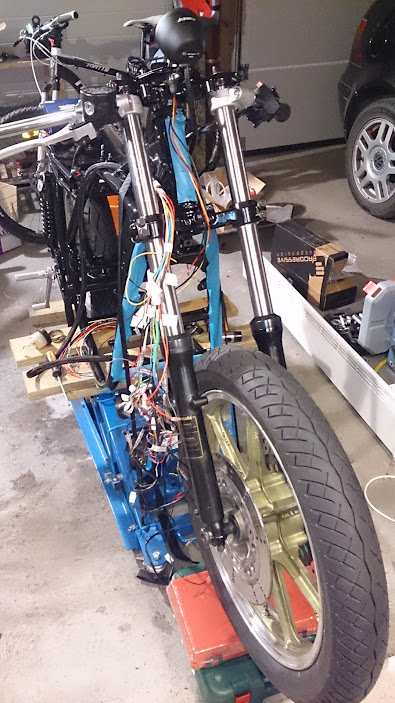
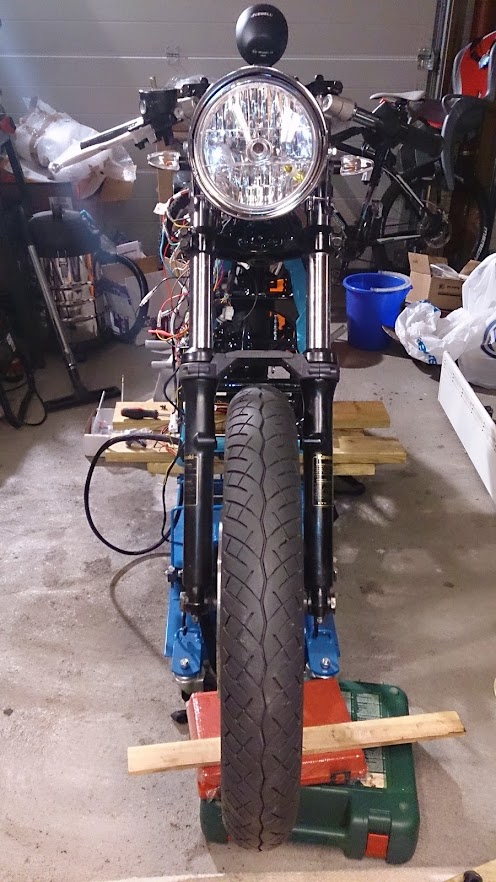
Mounted my newly serviced fork. Changed the stanchions and put in new progressive springs:
Now I am going to do some wiring while I am waiting to get back my engine from the shop.
:
Since I had this issue with moisture that had been trapped in my frame creating this rust spots, I decided to rust wash the inside of the frame. I bought some cans of rust rinse (directly translated from Norwegian) and drilled a whole in each side of the frame so that I could pour this stuff into the frame and have it flow into the lower tubings. Don't have a picture of this
I let the rinse sit in there for 45 minutes and poured it out. A lot of brown sludge coming out. I did a second rust rinse just to be sure, same procedure.After letting the frame dry out for a couple of days I got me some rust prevention liquid. This is a type of waxy substance that is penetrating and leaves a waxy residue when it dries. I poured this into the same holes that I used for the rinse and slushed it all around in the frame and let it sit and dry. I believe that this treatment will help some with preventing further rust on the inside of the frame, letting my girl have many years left for the road 8)
Now it was time to put back the steering races and bearings. I thought i could just knock the races in with a mallet, but it showed that it was not that easy. I created myself a DIY tool for this, which worked out quite good also for the swing arm needle bearings by just using different socket sizes:
A trick is actually to do one side at a time, using only one socket. Using both sockets trying to press both races at the same time was not easy. Just a tip.
I got the swing arm mounted with the shocks:
Another shot:
Worked out the linkage for my rear brake. I have made the rear set by modifying the stock brackets, cutting of the parts which are not needed. Put on some Tarozzi foldable pegs. I think the rear set came out ok:
Mounted my newly serviced fork. Changed the stanchions and put in new progressive springs:
Now I am going to do some wiring while I am waiting to get back my engine from the shop.
tommyboah
Active Member
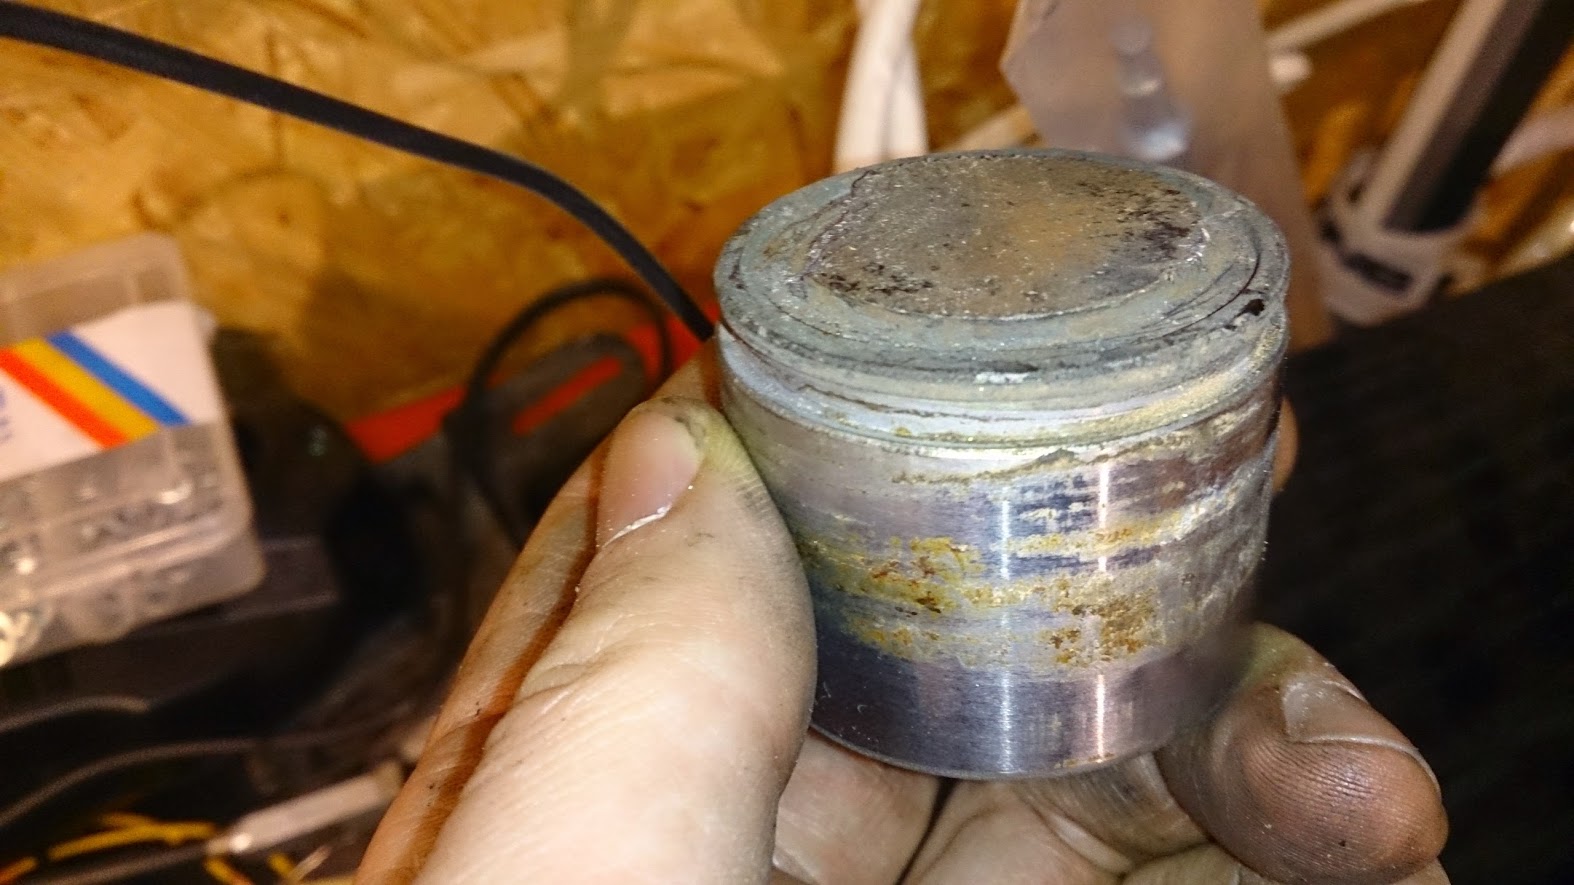
I got some work done last night, servicing my brake calipers. When you make something go faster, it might also be a good idea to make sure you can stop well. I am taking a part all calipers and rebuilding them, also with new pistons. Dunno really if the new pistons were really necessary, but when ordering the rebuild kit, it was easy to add them to the basket:
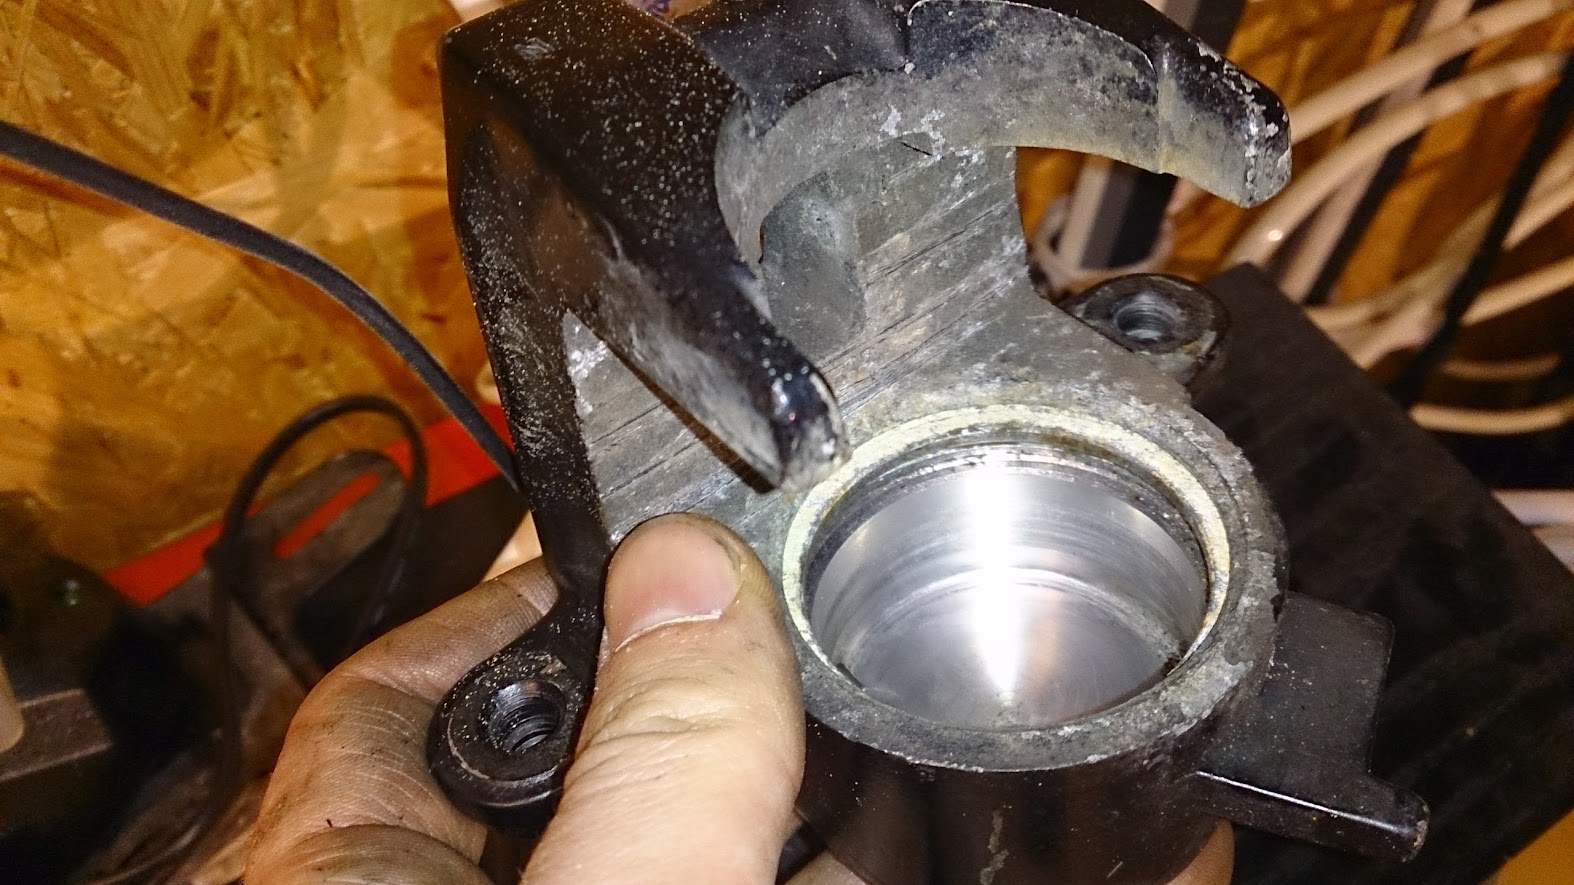
One of the pistons top was worn and a part was chipped away. Probably not a problem, but I will be replacing them:
I will also be painting the calipers, either black like original or silver. Since the bike is all black, I thought silver might be good and match also some of the silver parts that will be on the engine.
Next thjing I did last night was trying to find a way to mount the rear brake fluid reservoir. I kind of cocked up not making a bracket before powedercoating the frame. I was looking through some brackets I had lying around and found a couple of caliper spacers from my mountain bike that I am not using. They fit well for mounting the reservoir, without the need to drill the frame B)
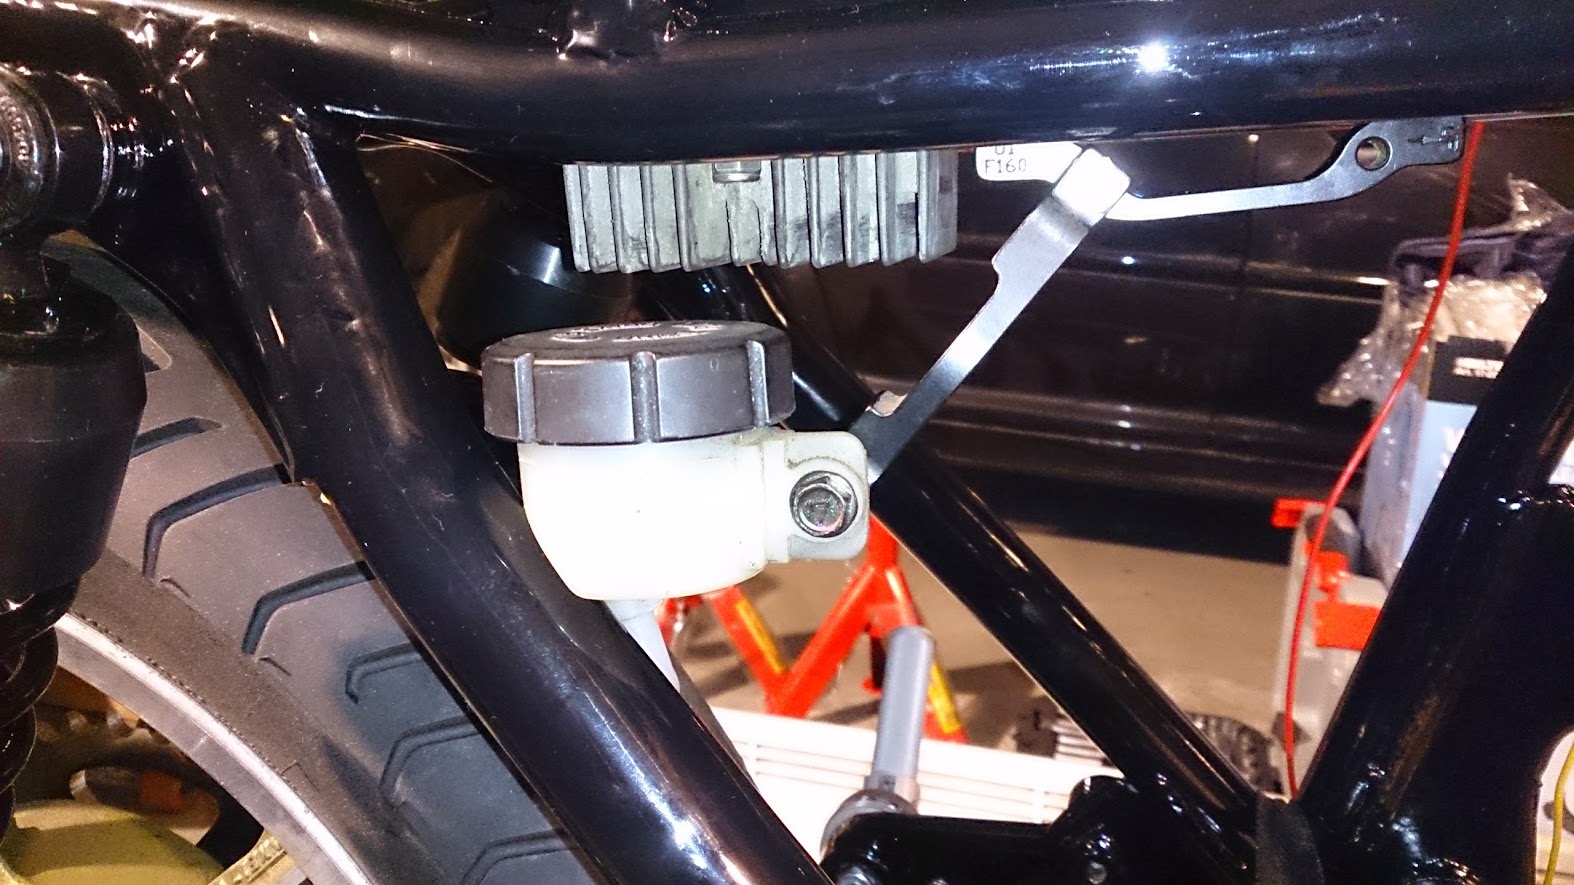
Doesn't come out too shabby I think?
While I was at it, I needed a way to mount my rear blinkers. I also cocked up not making any tabs on the frame before powdercoating and needed a place to mount them. On the shock mounts is a good position, and I needed a bracket. I came across a rear derailleur hanger, also from my mountain bike. With a slight mod. it will fit like a glove:
So this is how the reservoir and blinkers will be mounted. Any other bright ideas on how to do this?
One of the pistons top was worn and a part was chipped away. Probably not a problem, but I will be replacing them:
I will also be painting the calipers, either black like original or silver. Since the bike is all black, I thought silver might be good and match also some of the silver parts that will be on the engine.
Next thjing I did last night was trying to find a way to mount the rear brake fluid reservoir. I kind of cocked up not making a bracket before powedercoating the frame. I was looking through some brackets I had lying around and found a couple of caliper spacers from my mountain bike that I am not using. They fit well for mounting the reservoir, without the need to drill the frame B)
Doesn't come out too shabby I think?
While I was at it, I needed a way to mount my rear blinkers. I also cocked up not making any tabs on the frame before powdercoating and needed a place to mount them. On the shock mounts is a good position, and I needed a bracket. I came across a rear derailleur hanger, also from my mountain bike. With a slight mod. it will fit like a glove:
So this is how the reservoir and blinkers will be mounted. Any other bright ideas on how to do this?
tommyboah
Active Member
DesertKZ said:Looking really good, nice job! I mounted my KZ turns on this little hollow piece of frame here, just an idea. You can slip a small nut through the opening if you're careful and also hide the wiring in there.
I was also considering this as an option, but found it to be PITA because of the small space to put the nut. I might consider it again, as I think it might look better to have the blinkers mounted where you did and not sticking out too far.
Thanks for the tip.
tommyboah
Active Member
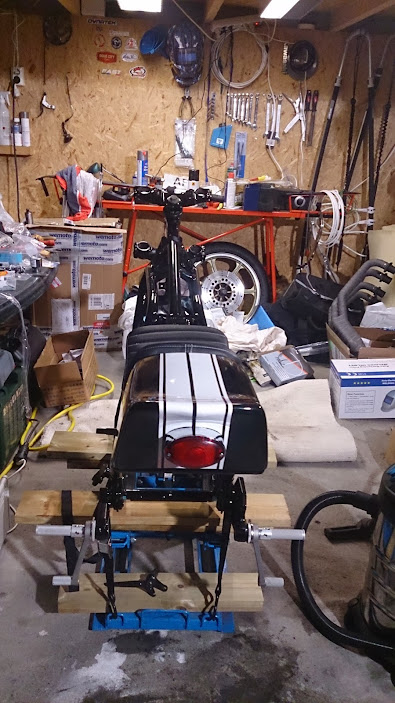
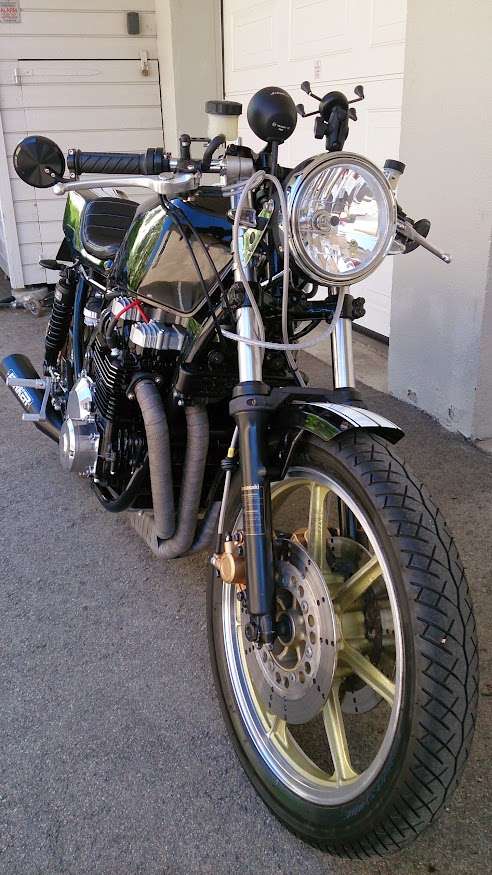
I mounted my headlamp the other day, along with a Tarozzi fork brace:
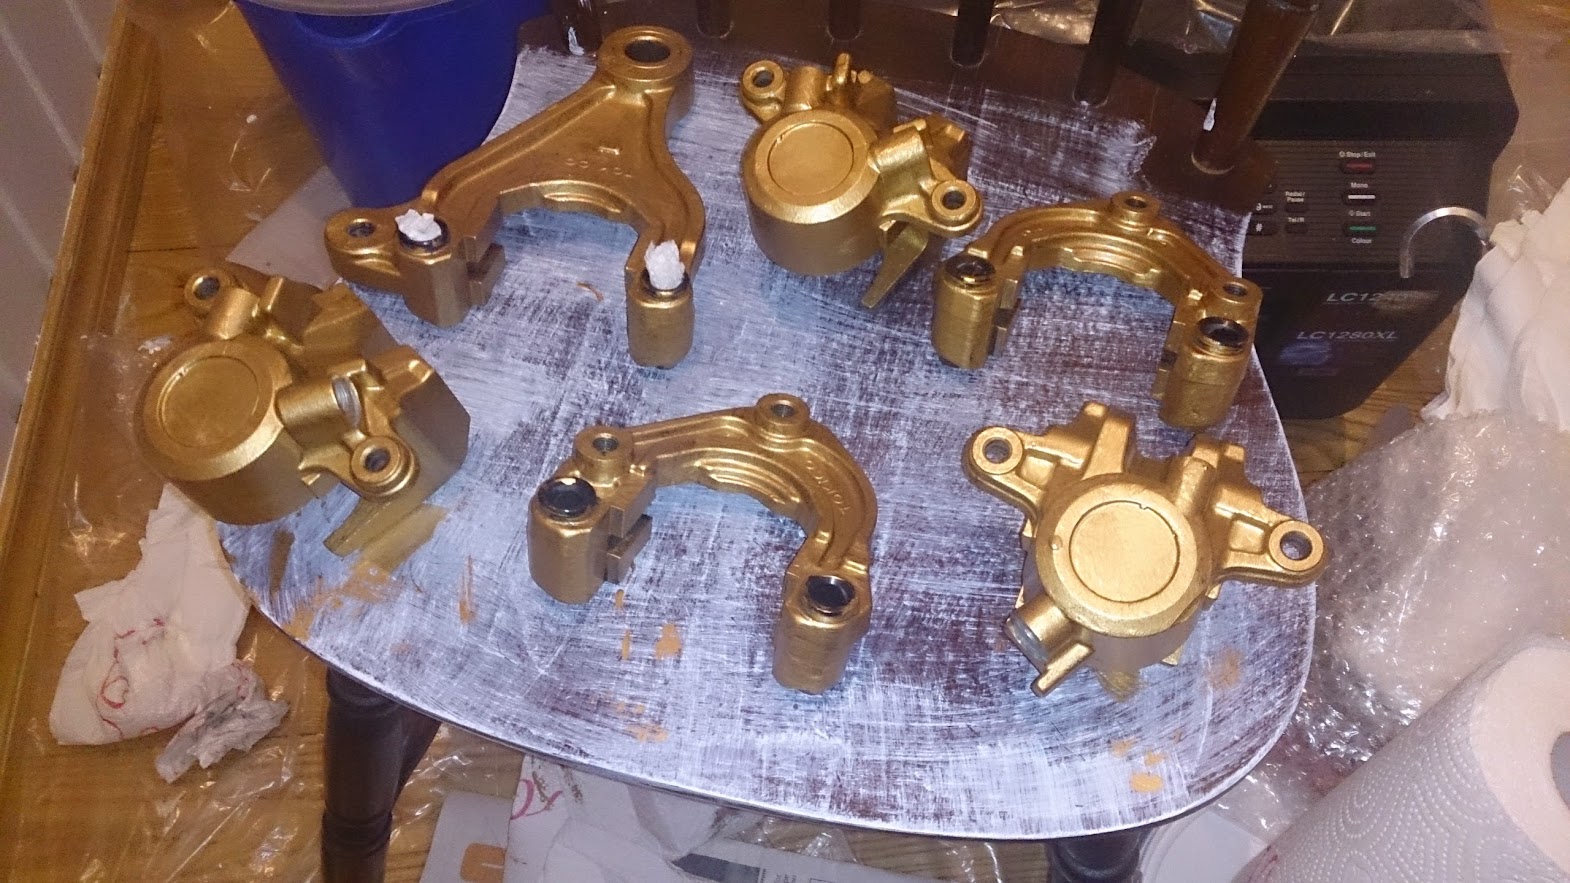
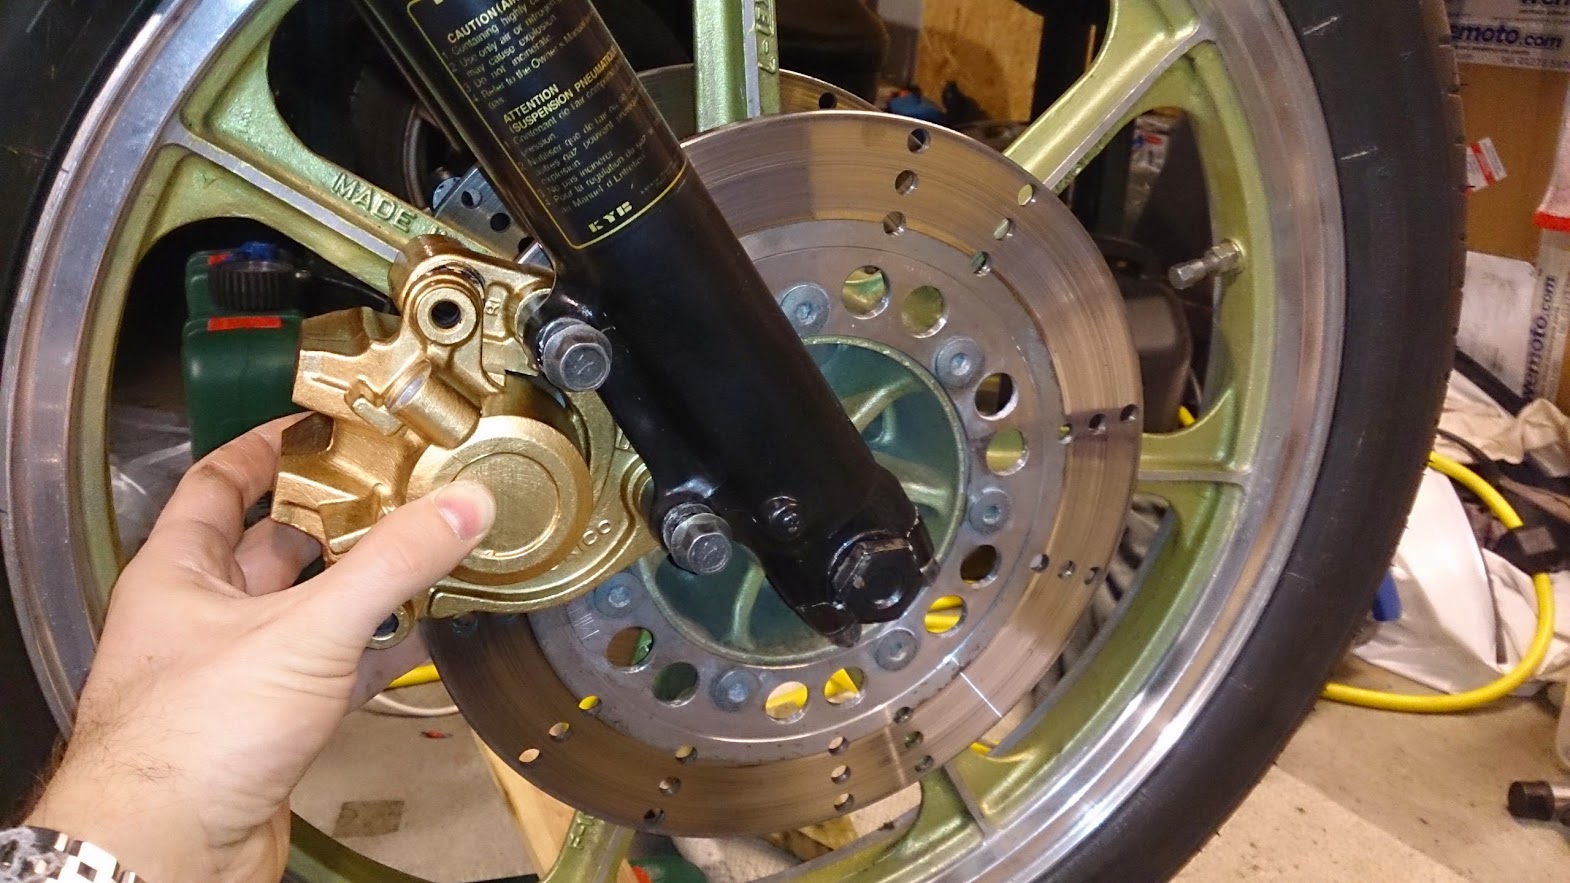
I also cleaned my calipers and put on a coat of paint. I was at first heistant to go for something other than the stock black. I was considering silver in order to do something that would stand out a bit from the otherwise black bike. Looking at my stock wheels which are gold, a crazy idea crossed my mind and I went for it:
I hope it will look good with the stock wheel silver/gold combo 8)
tommyboah
Active Member
It's time for a quick update on the caliper paint job.
As I belive one of you mentioned the paint job on my calipers is slightly different than the paint job on my wheels. Painting is not my main business so i kind of thought that gold was gold and didn't really consider that there is a bunch of variations of gold paint. Therefore the calipers painted gold tends to be a little more towards bronze compared to the wheels. All in all i think it will work out OK:
Another picture:

As I belive one of you mentioned the paint job on my calipers is slightly different than the paint job on my wheels. Painting is not my main business so i kind of thought that gold was gold
and didn't really consider that there is a bunch of variations of gold paint. Therefore the calipers painted gold tends to be a little more towards bronze compared to the wheels. All in all i think it will work out OK:
Another picture:
tommyboah
Active Member
Time for one more update today
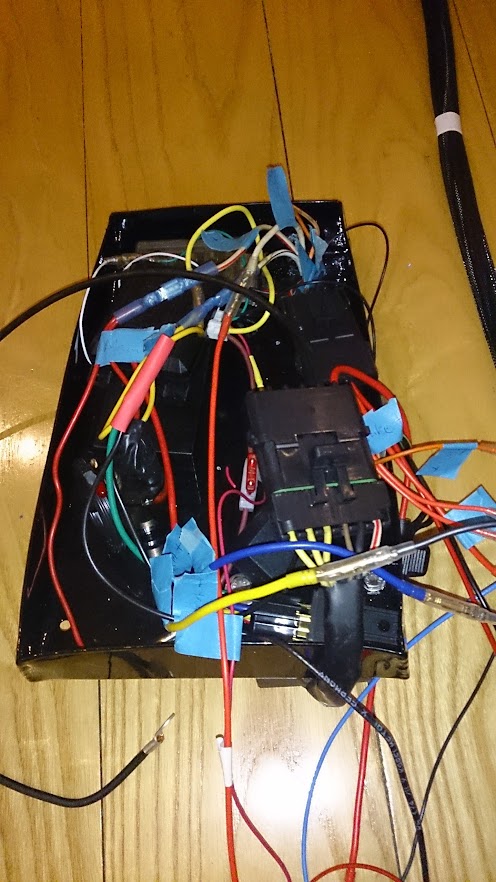
After hours and hours of wiring, measuring, beeping through wires, terminating connectors.... my wiring harness is 95% completed. Doesn't look all that pretty yet, need to put it on the bike and make sure that it's 100% before i tidy and wrap things up:
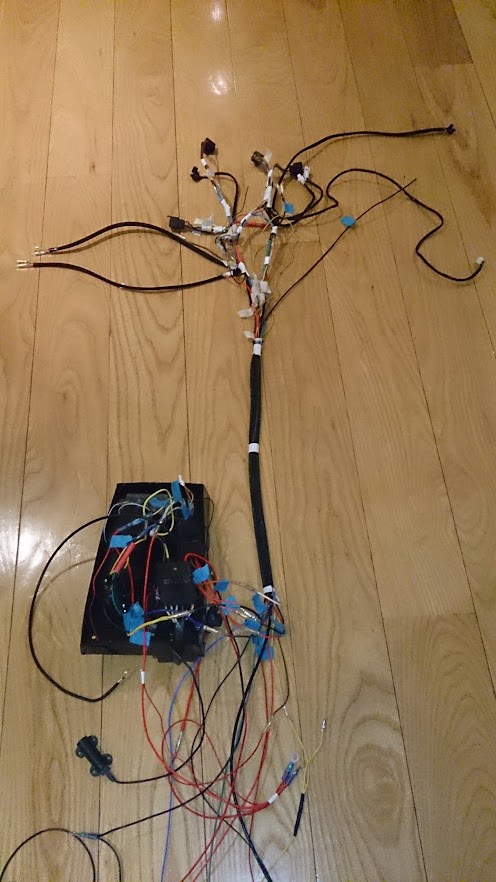
I've fit all the elctronics into my custom tray. Needs some tidying up in there, I will fasten the components which are not bolted down with some industrial velcro. I have in there my RF ID ignition circuit, my failover key ignition (in case the RF ID fails ), LED relay, engine kill relay (the switch on my controls are N.O. so I need a relay), stock rectifier/regulator underneath the tray for cooling and the stock fuse box:
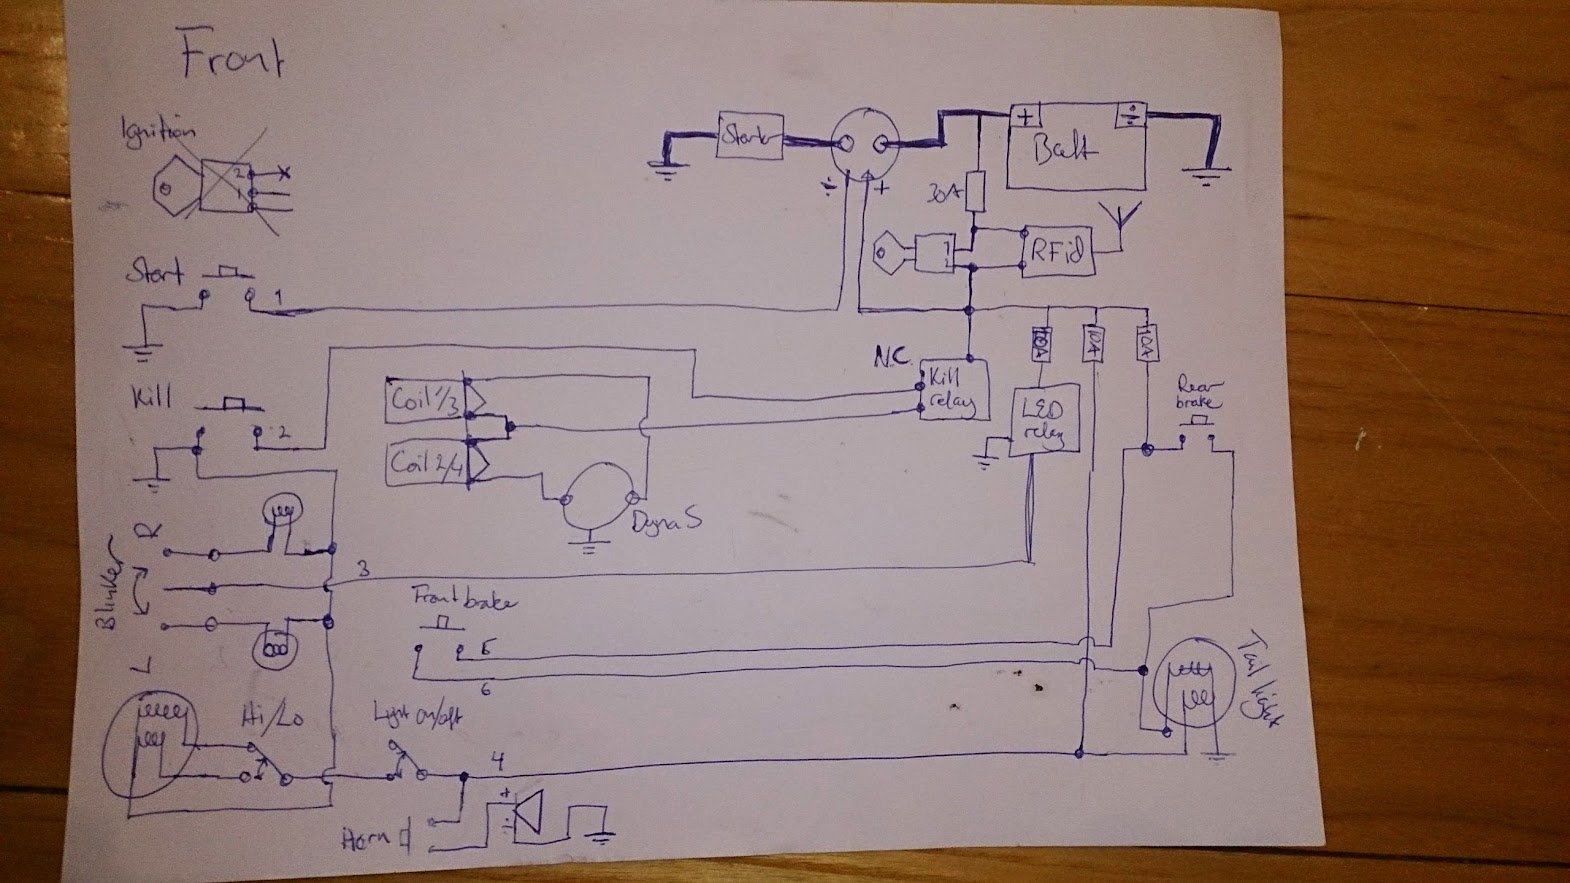
For the wiring I've made this basic diagram that I've followed. It might miss a couple of things, but these are my basic thoughts on the wiring:
I hope I've got it all sorted out. My initial on the bench tests seem to work. I will try putting it onto the bike in the next few days and test the basics, lights, blinkers, starter signals etc.
After hours and hours of wiring, measuring, beeping through wires, terminating connectors.... my wiring harness is 95% completed. Doesn't look all that pretty yet, need to put it on the bike and make sure that it's 100% before i tidy and wrap things up:
I've fit all the elctronics into my custom tray. Needs some tidying up in there, I will fasten the components which are not bolted down with some industrial velcro. I have in there my RF ID ignition circuit, my failover key ignition (in case the RF ID fails
), LED relay, engine kill relay (the switch on my controls are N.O. so I need a relay), stock rectifier/regulator underneath the tray for cooling and the stock fuse box:
For the wiring I've made this basic diagram that I've followed. It might miss a couple of things, but these are my basic thoughts on the wiring:
I hope I've got it all sorted out. My initial on the bench tests seem to work. I will try putting it onto the bike in the next few days and test the basics, lights, blinkers, starter signals etc.
Hoosier Daddy
Earache my eye...
Don't sweat the difference of the gold on the calipers. The brake fluid will probably take it off .
tommyboah
Active Member
Hi Guys,
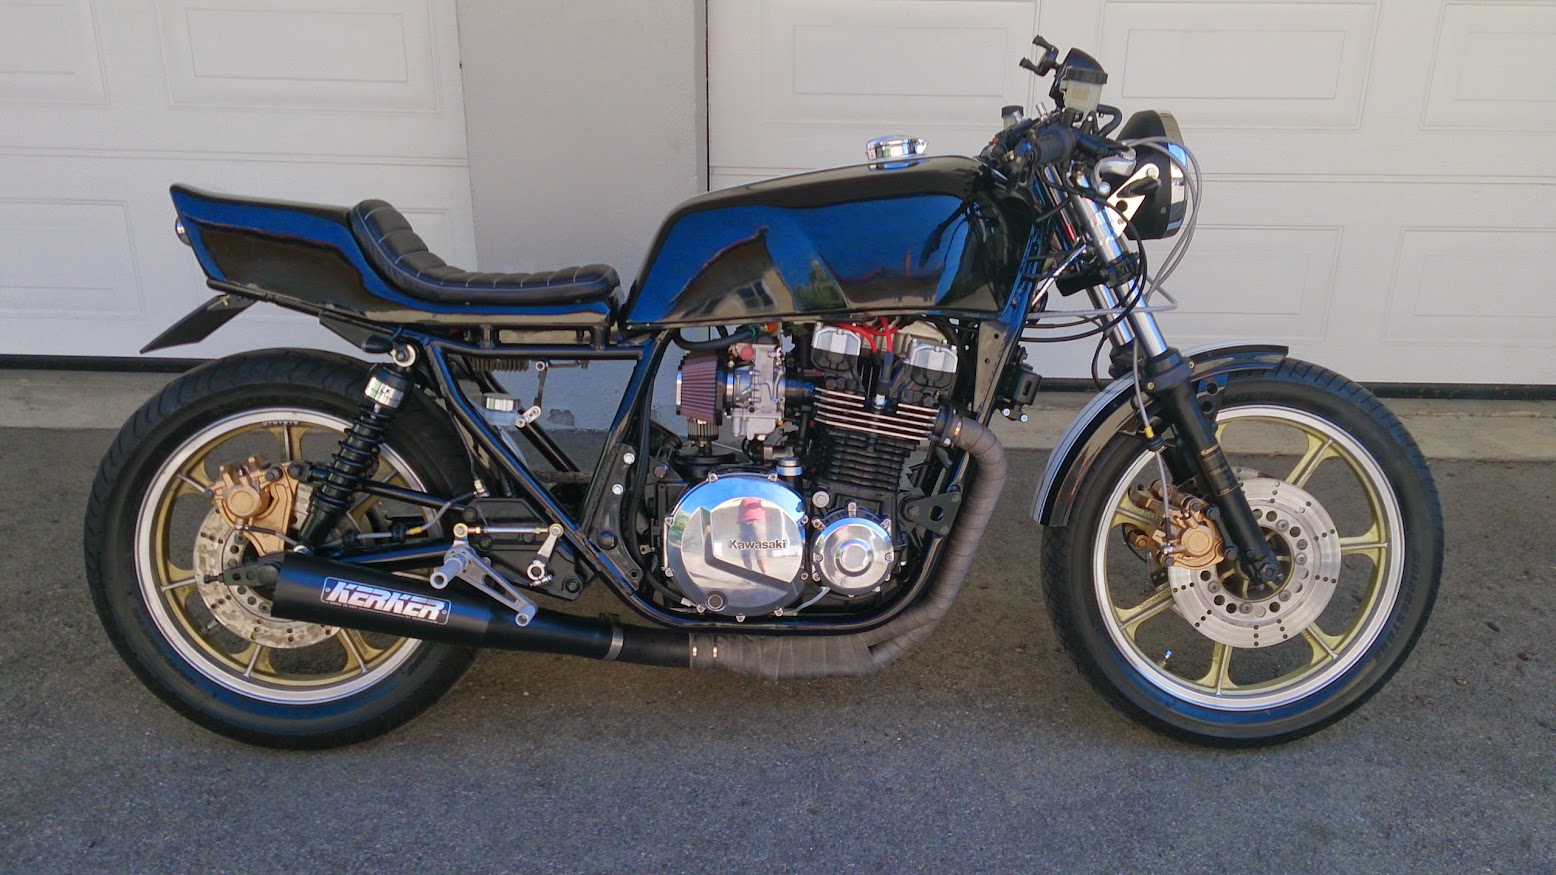
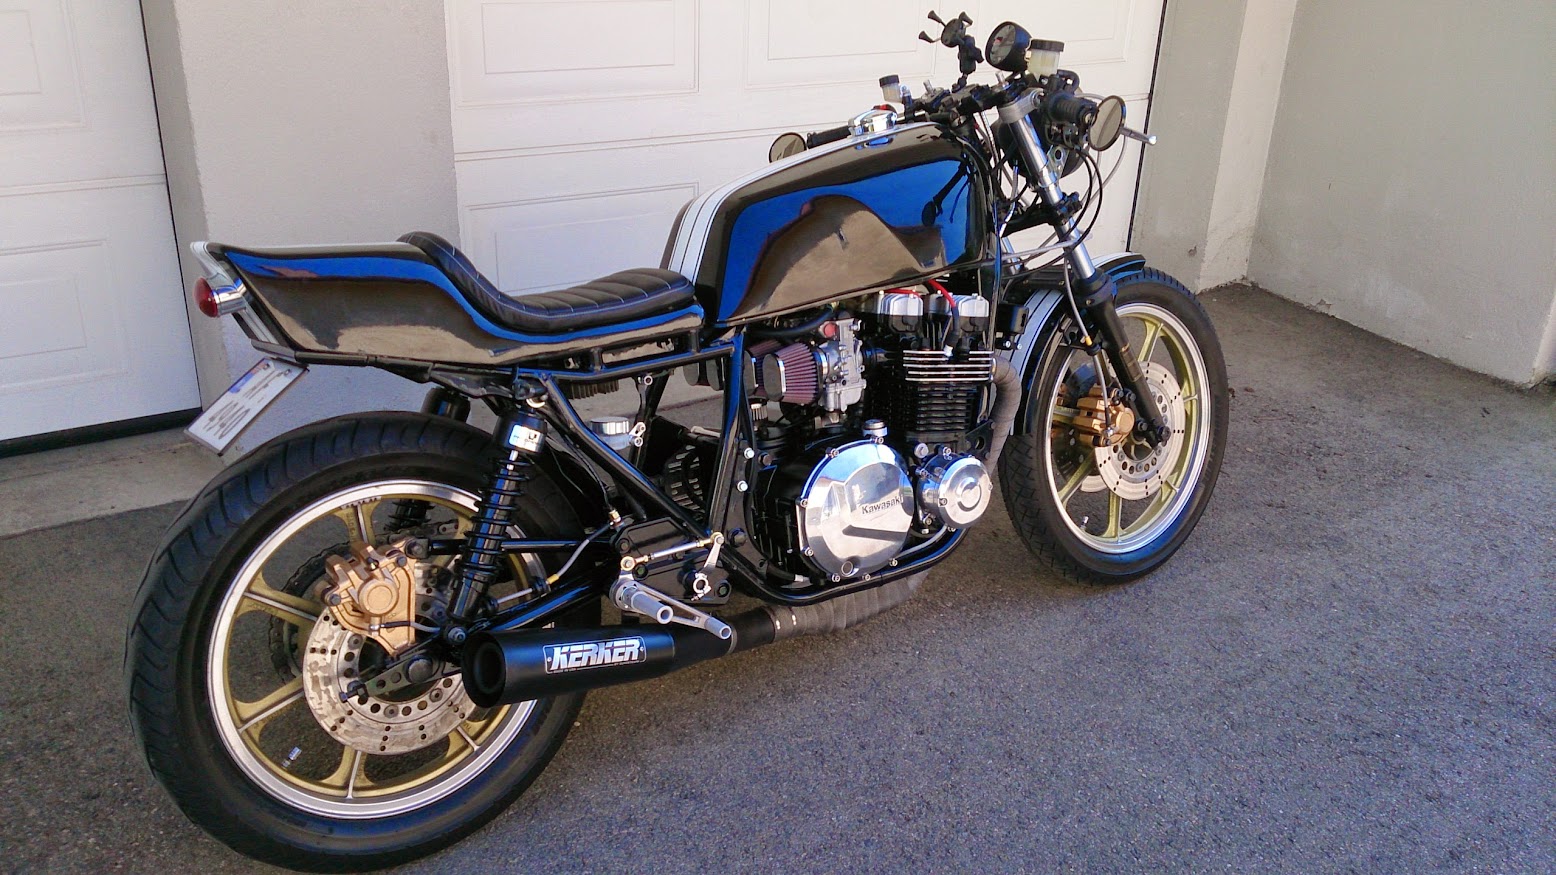
Finally an update to this thread ;-) I have been working long nights for the past week after getting my top back from the shop. Man, these Norwegian machine shop guys sure take their time. I had to wait one month for the guy to help me out
The install of Gpz1100 cams went smooth like a baby's butt (pure drop-in process), and everything after that. I got the bike finished yesterday and manned myself up to push the start switch. It actually fired. Woohooo!!! I have some adjustments to do on the carbs and the dyna ignition timing, will look at that today.
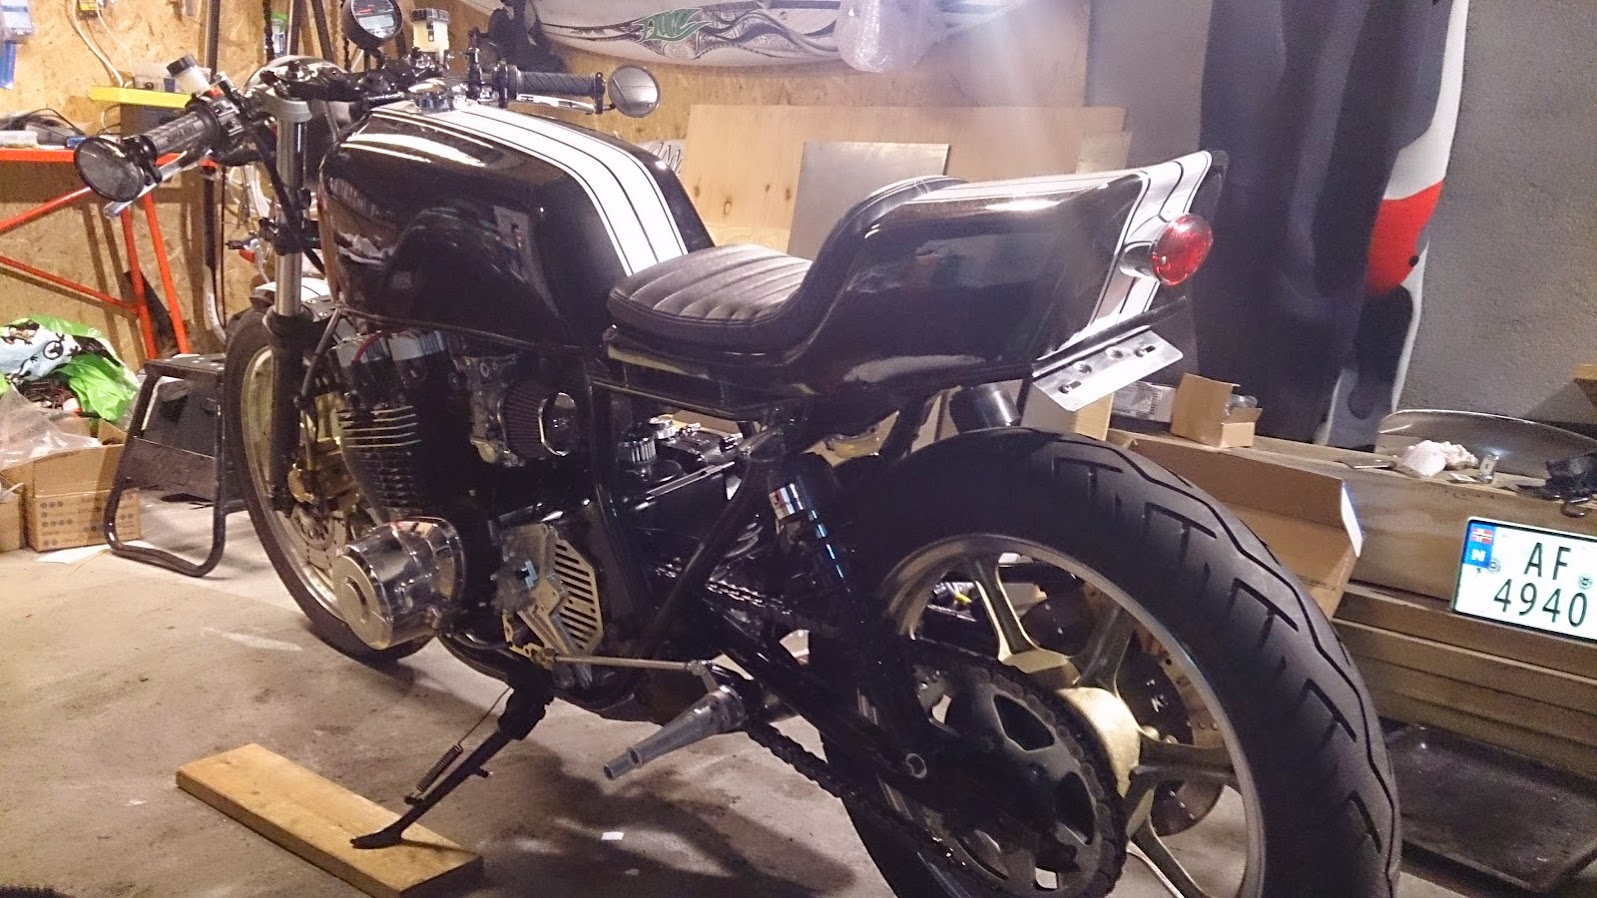
Here is a teaser pic of the bike, more will come as soon as I get it out of the garage and into the sunshine 8)
Finally an update to this thread ;-) I have been working long nights for the past week after getting my top back from the shop. Man, these Norwegian machine shop guys sure take their time. I had to wait one month for the guy to help me out
The install of Gpz1100 cams went smooth like a baby's butt (pure drop-in process), and everything after that. I got the bike finished yesterday and manned myself up to push the start switch. It actually fired. Woohooo!!! I have some adjustments to do on the carbs and the dyna ignition timing, will look at that today.
Here is a teaser pic of the bike, more will come as soon as I get it out of the garage and into the sunshine 8)
Hoosier Daddy
Earache my eye...
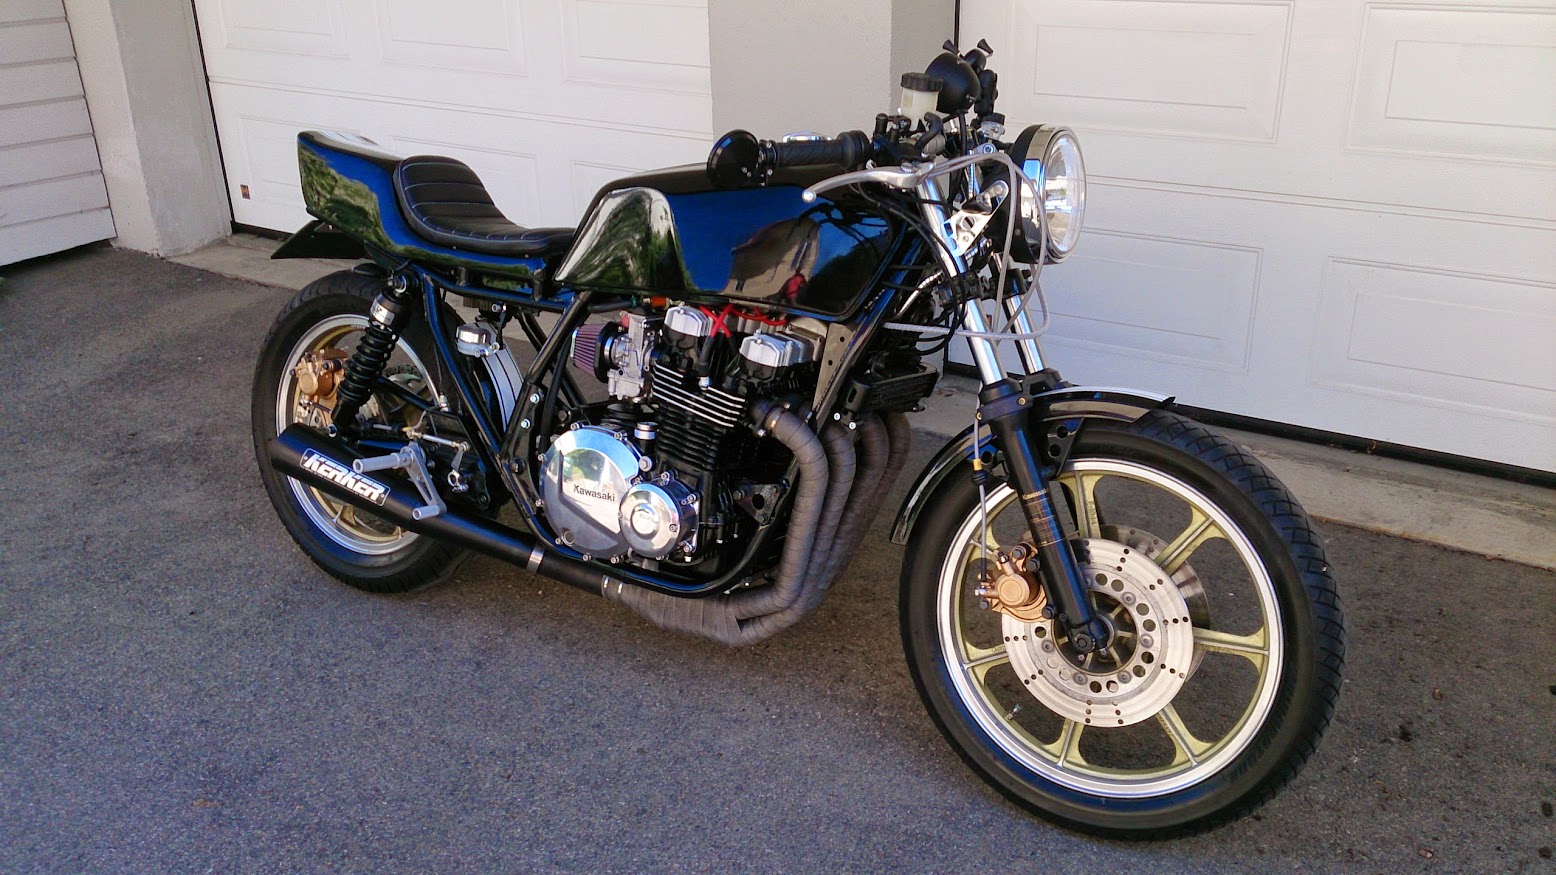
STUNNING!
I think you done good.
I think you done good.
Cuba Libre
Been Around the Block
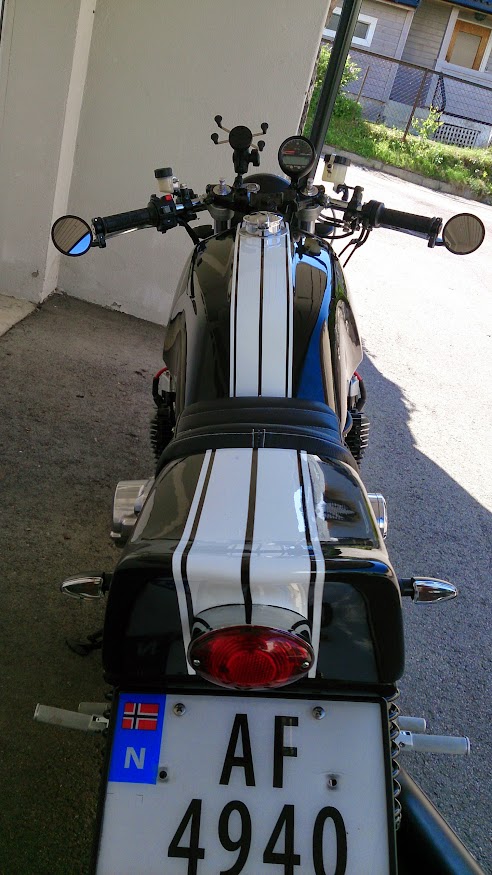
It is beautiful!
I love the seat/tail unit.
I think I'd go with lower clipons and clocks.
What's that think that looks like a spider next to your tacho?
Well done!
M.
I love the seat/tail unit.
I think I'd go with lower clipons and clocks.
What's that think that looks like a spider next to your tacho?
Well done!
M.


