XS850 - Monoshock & USD Fork (pics pg 13)

Alright... so I double checked my fuel height last night and they're actually all good. Checked my coil wiring and it's all good (couldn't have been that easy). Checked spark again and it's all good. I mean really good on all 3.

Man I'm confused :eek:

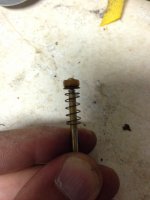
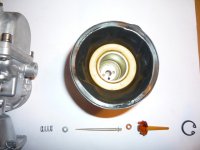
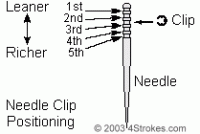
The only thing I hadn't done before last night was take apart the top half of the carbs... so I did that to check the needles. They were all the same, and the clips were all in the middle spot. However I did notice something strange... My needles have a shim and a spring under them while the image in the manual doesn't have either (see attached images for reference). I wonder if the shim and needle were added by a PO but shouldn't have been? And also, I should probably bump my needle up a clip position while I'm at it given the open intake and exhaust. Thoughts?
 

Attachments

  • IMG_4104.JPG
    IMG_4104.JPG
    135.1 KB · Views: 228
  • IMG_4103.JPG
    IMG_4103.JPG
    173.5 KB · Views: 224
Or maybe they were just lazy and left it out of the book. Here is an image from the MKII site showing all of the parts that I have...
 

Attachments

  • P1020760.jpg
    P1020760.jpg
    264 KB · Views: 670
Those look like all the normal parts. The springs purpose is to maintain the correct location of the needle without having it rigidly fixed. If it were bolted in rigidly, it would be hard to not have it bind up in the needle jet. It is definitely possible to have all this screwed up. Make sure that all the shims and washers are in the correct locations so that the springs are not binding and that the needles are loaded properly against their stops because this is what ultimately locates the needles in the correct position. I recently rebuilt a set of carbs that had this exact scheme and one of the carbs had wrong shims and washers in it, and both were assembled incorrectly. The bike could be started but ran very badly according to the owner. This was definitely the problem and I am told the bike (xs650 Yamaha) now runs perfectly. I didn't see anything else wrong with these carbs except a missing choke bushing and they were pretty clean so possibly this is an issue for you. And now that makes me recommend that you double check the needle numbers, etc since Compare the bad cylinder very carefully to the others. If I remember rightly it is possible for the needle to be assembled so that it is way to high in the assembly if that plastic cap gets misaligned - just from memory - I don't have one in front of me so take that with suspicion!
 
This all sounds right. I'll put them back together and carefully inspect them. Otherwise, I am at a complete loss.

Things I haven't done, because it acted like it was running well when I first started it up, check valves, and check compression.
 
Those last 2 things you mentioned are the typical FIRST things any shop will tell you to do. Since without those 2 things verified, everything else is a guess and you may by chance get it running. I'm annoyed I didn't suggest it earlier now that I type that ^^^ I had a typical customer bike come in , "carbs need cleaning" he says. I pull the carbs, clean them out, although I notice they aren't THAT bad. Proceed to install, fill with fuel and get ready to start the bike....just a whirring noise and the engine seems to be turning over awfully fast. Long story short, he forgot to mention it stopped running when he heard a pop...his cam chain snapped and bent every flippin valve on the bike. 3 of the 4 cylinders had ZERO compression, and one had I think 40psi or something stupid like that...you live and you learn though!

As for the needles, let's be on the same page with wording and say that you would put the clip higher in # position (#4 in your case) on the needle (towards the pointy end) to "raise the needle UP" which would allow for more fuel (richer) See picture taken randomly from the internet. (and also in another DTT member's post I think)
 

Attachments

  • needlepic.gif
    needlepic.gif
    2.9 KB · Views: 626
Yes, I would move the clip to #4.

I agree, compression is typically recommended as the first thing you do. However in my experience, I don't check it unless there's an issue. Maybe this is bad practice, but a old vet of this site who I think has gone MIA, Swapmeet Louie, once told me - "All compression tests do on a 35 year old bike is depress you. If the bike runs good, just ride it." I'm paraphrasing there, but you get the point. I don't completely agree with him, but I've just sort of gone by this ever since I started.

Regardless, I'll check compression and valves and go from there. I THINK the carbs are in good enough shape to run the bike. Electrical appears to be good... so I'm not sure what else it can be.
 
treitz said:
Yes, I would move the clip to #4.

"All compression tests do on a 35 year old bike is depress you. If the bike runs good, just ride it."

Some truth to that... and if I gave you five comp gauges you would give me five results from the same hole :eek:
 
Tune-A-Fish said:
Some truth to that... and if I gave you five comp gauges you would give me five results from the same hole :eek:

I've dealt with that before too. However in this case, given the plug results, I'd be interested in seeing if #1 is WAY off, or if 2 and 3 are way off. Either in compression numbers or valve clearance.
 
treitz said:
I've dealt with that before too. However in this case, given the plug results, I'd be interested in seeing if #1 is WAY off, or if 2 and 3 are way off. Either in compression numbers or valve clearance.
Right! The issue is not to see if it is up to race spec, just to see if there is some glaring anomaly in the problem cylinder. If there is, you find out what and solve that rather than endlessly frustrate over a non-existent carb issue. If on the other hand all is well, you can have confidence that going back to other possible sources of the problem is justified.
 
For sure...

After digging into the book, it turns out checking the valves on this bike is MUCH more complicated than most I have worked on (late 70's 400 twins). In the 850 apparently you have to take half the motor apart to do it. Bummer!

Anyway... I guess I better check the compression! The local Oreilly in Boise would loan me a compression tester, so I've never bought one. Of course none of the places here do that, which sucks. Guess I'll have to make the investment.
 
What? No.. you simply take the valve cover off and use the feeler gauge! Also timing cover to rotate the crank.
 
datadavid said:
What? No.. you simply take the valve cover off and use the feeler gauge! Also timing cover to rotate the crank.

That's not what the book said... but I'll take your word for it! I'll have to see if I can find a simpler instruction online.
 
treitz said:
That's not what the book said... but I'll take your word for it! I'll have to see if I can find a simpler instruction online.

"Checking" valve clearance is simple "with a feeler gauge"... adjusting is a whole nuther deal... cams off shims under buckets... micrometer and notes of each lobe up skid mark feeler that "fits" under, if no fit use the 10 thousandths rule (my rule) and put a <10 thou shim in and re-check until you can get a feeler under the cam... with LOBE UP. All of this is very simple work and something I enjoy doing because a good valve adjustment can make a world of difference in perf on an old(r) cycle.

XS750 and XS850 Valve Clearance Adjustment
NOTE: The tighter specification is preferable for the best performance
XS750 Intake Valve Clearance (cold) 0.16 ~ 0.20mm
Exhaust Valve Clearance (cold) 0.21 ~ 0.25mm
XS850 Intake Valve Clearance (cold) 0.11 ~ 0.15mm
Exhaust Valve Clearance (cold) 0.21 ~ 0.25mm
For correct pad selection proceed as follows:
NOTE: For calculations use the mid-point of the specified clearance tolerance –
e.g., XS750 intake valve 0.16 ~ 0.20mm = 0.18mm, XS850 intake valve 0.11 ~
0.15mm = 0.0.13mm, and both XS750/XS850 exhaust valve 0.21 ~ 0.25mm =
0.23mm.
Example of Calculations:
XS750 Intake Exhaust
Actual measured clearance 0.50mm 0.41mm
Subtract specified clearance (mid-point) -0.18mm -0.23mm
---------- ----------
Equals excess clearance 0.32mm 0.18mm
Currently installed pad number 225 245
Add excess clearance + 32 + 18
----- -----
Equals new pad number 257 263
Round off to nearest pad number 255 260
Install the new pad into the lifter with the number facing down.
Recheck all valve clearances for correct
 
Right on. Yeah, I've seen all of these numbers before. Just didn't see a "how to check valve clearance" section in the manual. Maybe I need to look again! It went through the whole process of checking and adjusting, which I think is where it talked about pulling half the motor apart to do it. I'll look again. Otherwise I just need to pull the valve cover, find TDC and throw a feeler gauge in there I guess!
 
treitz said:
Right on. Yeah, I've seen all of these numbers before. Just didn't see a "how to check valve clearance" section in the manual. Maybe I need to look again! It went through the whole process of checking and adjusting, which I think is where it talked about pulling half the motor apart to do it. I'll look again. Otherwise I just need to pull the valve cover, find TDC and throw a feeler gauge in there I guess!

I must retract though... the shims are on top of the lifter: No need in pulling the cams (yaya!) you can use a tool that bolts down and holds the lifter down to get the shim out, You will want to have an air gun handy to "pop" the shims out on some that the oil sucks them down and wont come with a weak magnet.

valve_adjust23.jpg


ALSO! these are somewhat known to toss a shim if they get really loose, so error to the tight side on the shim choices.
 
One thing about the tool i might add, which took me some 6 months to figure out is that the tool must be installed to hold an already depressed valve, then you roll the cam lobe away from the tool.
Since i never got that i bent an old spoke and ground to shape so i could just hold down the followers and change pads. A bit fiddly.
 
So on bikes I have adjusted previously, you simply adjust the valve with a wrench and flathead. With all of this "shim" talk it sounds like that's not what I will be doing on this bike if the valves are off?
 
The intent is exactly the same. With screw adjusters you have infinitely variable adjustment, so you just screw the adjusters to the correct lash. Your bike is the same, except the adjusters are fixed (sort of non adjusters!) You have to swap them out as the valves wear and come out of tolerance. It is definitely more fiddly than screw adjusters as you have to have the correct thickness shims on hand to complete your work. Basically you measure the lash you have, and compare that to what you want. Then you roll the cam around to open that valve all the way, and then install the tool that holds the valve open. Then roll the cam around to the heel so you can extract the shim. Keep in mind that you are holding the valve open, so you can't indiscriminately turn the crank and cam around because at some point the piston will contact the open valve. Once you extract the shim, measure it and compare it to what you need. If your first measurement told you that yu needed .0015" less gap, add that to the shim you took out and get a shim that size. Install and move on to the next valve.

The problem is that if you don't have a big ol' box of shims, you are screwed! (I know - nice guy - but there really is no other way to put it) However there is a partial solution. If you go through the whole motor and determine what shims you need - and carefully record what is needed where AND what is in each spot now, you will likely have some of the correct shims in other locations already in your motor. So take those out and put them where they need to go, and then you can obtain the ones you need. It is a major pain if you don't have access to an inventory of shims, but it is the only way. The good news is that you don't have to do it very often!
 
Back
Top Bottom