
We noticed you are blocking ads. DO THE TON only works with community supporters. Most are active members of the site with small businesses. Please consider disabling your ad blocking tool and checking out the businesses that help keep our site up and free.
You are using an out of date browser. It may not display this or other websites correctly.
You should upgrade or use an alternative browser.
You should upgrade or use an alternative browser.
Yamaha SR250 - A clean standard build
- Thread starter JadusMotorcycleParts
- Start date
interceptor
Coast to Coast
Did you eat paint chips as a child?xb33bsa said:you should make a cooler that goes in that vacant area a deep freeze cryrowgenic type for transporting cut off fingers(industrial accidents) and afterbirth(human gene gnome syrup) and shit like that see,follow the bambalance-es
HerrDeacon
Over 1,000 Posts
Very neat work!
interceptor said:Did you eat paint chips as a child?
I just spat my coffee haha Yeah sorry xb, that one went over my head. Thanks for the compliments otherwise.
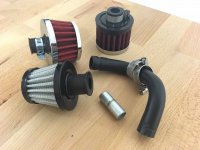
I didn't like any of the crankcase breather filters I had so I took the white/silver/chrome one and scuffed it up, masked it, then painted it black. I like it now. I think I'll use the original tube though to place the filter inside the triangle (behind the side covers) rather than straight onto the spigot on the engine.
Attachments
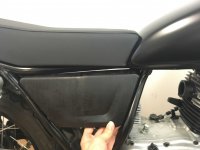
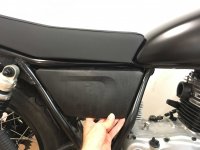
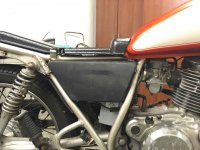
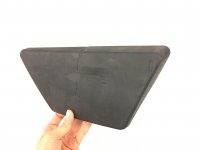
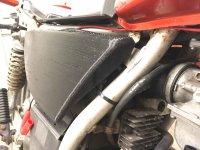
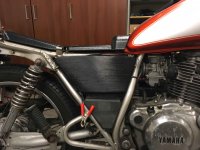
I've been saving this post for a few days because its a big one and I treated it like a bit of a project in of itself. The side covers...
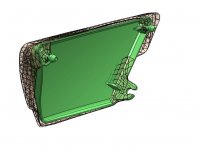
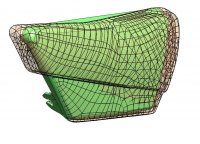
I modelled up a new cover based on the 3D file from the scanning. Then I made a prototype of that to check how everything fit up. There were quite a few small tweaks that needed to be made - mostly with the position of the fastening points but also with the fitment and alignment in the frame. I wanted to get it to fit a little tighter and flusher.
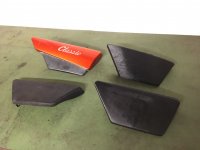
All along I thought that the side covers should just be flat (well, curved, but relatively plain) because that is what I feel Yamaha would have originally done with this entry level bike. Also, the stock ones on the Special models were just plain. But after seeing this prototype I thought I could/should do better.
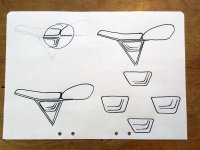
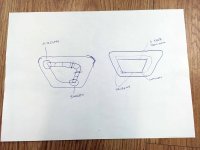
Then came some sketching and ideation. Whatever talent I have lacked as a designer in the area of sketching I have managed to make up for it elsewhere, but my abilities held me back here for sure haha. Given, some of the forms are somewhat hard to express in 3D with just a pen and pencil, and screw cracking out the markers! I limited myself to a few simple silhouette style 2D drawings to see if I could pull in some feature/line of the bike into a design feature in the actual cover. I always look for something to connect to somewhere else on the bike/product. So it 'makes sense' a bit. I also looked a lot at existing Yamaha side covers that I like a lot - certain models of RD350, XS650 and others.
The challenge I realised was that I wanted the cover to look pretty stock still, so a lot of the concepts ended up looking too aftermarket or even 'racey' which is not what the SR, or at least this one is about. So speed holes and channels were ruled out after seeing them.
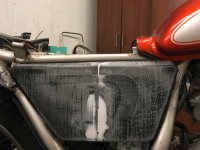
Then I decided I liked the idea of trying to pull in the nice curve at the rear of the tank and try to blend that into a smooth surface. I made a couple of prototypes of this idea with two different depths of the detail. When I modelled it up in 3D I did a sketch of how I would do it, I usually do this when I model things up, especially if there are mating surfaces involved and there needs to be continuity - then I need to plan a bit.
I found the first prototype was too shallow and needed to be exaggerated more for it to look intentional. Then with the second prototype glued and filled together I tested it on the bike. This time with the seat on too. Which I should have done from the beginning because it looked funky right away. Too busy and confused all in one area and not really lining up.
So I decided to try another one of the concepts - one where the line of the tank/seat junction continues into the cover and then flicks back rearward. Thats where I am at now and I like it a lot. I might tweak it slightly to see if the curve should be tightened or loosened and if it could line up any better.
I modelled up a new cover based on the 3D file from the scanning. Then I made a prototype of that to check how everything fit up. There were quite a few small tweaks that needed to be made - mostly with the position of the fastening points but also with the fitment and alignment in the frame. I wanted to get it to fit a little tighter and flusher.
All along I thought that the side covers should just be flat (well, curved, but relatively plain) because that is what I feel Yamaha would have originally done with this entry level bike. Also, the stock ones on the Special models were just plain. But after seeing this prototype I thought I could/should do better.
Then came some sketching and ideation. Whatever talent I have lacked as a designer in the area of sketching I have managed to make up for it elsewhere, but my abilities held me back here for sure
haha. Given, some of the forms are somewhat hard to express in 3D with just a pen and pencil, and screw cracking out the markers! I limited myself to a few simple silhouette style 2D drawings to see if I could pull in some feature/line of the bike into a design feature in the actual cover. I always look for something to connect to somewhere else on the bike/product. So it 'makes sense' a bit. I also looked a lot at existing Yamaha side covers that I like a lot - certain models of RD350, XS650 and others.The challenge I realised was that I wanted the cover to look pretty stock still, so a lot of the concepts ended up looking too aftermarket or even 'racey' which is not what the SR, or at least this one is about. So speed holes and channels were ruled out after seeing them.
Then I decided I liked the idea of trying to pull in the nice curve at the rear of the tank and try to blend that into a smooth surface. I made a couple of prototypes of this idea with two different depths of the detail. When I modelled it up in 3D I did a sketch of how I would do it, I usually do this when I model things up, especially if there are mating surfaces involved and there needs to be continuity - then I need to plan a bit.
I found the first prototype was too shallow and needed to be exaggerated more for it to look intentional. Then with the second prototype glued and filled together I tested it on the bike. This time with the seat on too. Which I should have done from the beginning because it looked funky right away. Too busy and confused all in one area and not really lining up.
So I decided to try another one of the concepts - one where the line of the tank/seat junction continues into the cover and then flicks back rearward. Thats where I am at now and I like it a lot. I might tweak it slightly to see if the curve should be tightened or loosened and if it could line up any better.
Attachments
-
 LastestIdea.jpg339.5 KB · Views: 260
 -
 NewConcept.jpg408.9 KB · Views: 246
 -
 CoverDevelopment.jpg348.4 KB · Views: 251
 -
 ThirdProto.jpg403.4 KB · Views: 258
 -
 PrototypeGluedFilled.jpg412.1 KB · Views: 253
 -
 Print2.jpg346.1 KB · Views: 259
 -
 Print1.jpg297.2 KB · Views: 263
 -
 SecondProto_Context.jpg377.5 KB · Views: 259
 -
 SecondProto.jpg260.3 KB · Views: 251
 -
 3D_Approach.jpg334 KB · Views: 268
 -
 SideCoverConcepts.jpg447.4 KB · Views: 255
 -
 PrintedSideCover3.jpg408.4 KB · Views: 258
 -
 PrintedSideCover2.jpg457.9 KB · Views: 264
 -
 PrintedSideCover1.jpg288.6 KB · Views: 255
 -
 Model2.JPG46 KB · Views: 578
 -
 Model1.JPG106.8 KB · Views: 573
I also like the under-seat platform idea!
RE: crankcase breather - there was an interesting technical article in the October 2016 edition of Motorcycle Consumer News by Dave Searle (former editor of MCN) talking about oil vapor breathers, separators, and some racing tricks. Mentioned were the use of both 1-way valves in the in the crankcase vents and vacuum pumps on crankcases to reduce pumping losses. Since a single-cylinder engine pumps a lot, I was thinking on trying out a 1-way PCV in-line with an automotive fuel filter acting as a catch can; probably suspended up under the seat.
RE: crankcase breather - there was an interesting technical article in the October 2016 edition of Motorcycle Consumer News by Dave Searle (former editor of MCN) talking about oil vapor breathers, separators, and some racing tricks. Mentioned were the use of both 1-way valves in the in the crankcase vents and vacuum pumps on crankcases to reduce pumping losses. Since a single-cylinder engine pumps a lot, I was thinking on trying out a 1-way PCV in-line with an automotive fuel filter acting as a catch can; probably suspended up under the seat.
Very cool. 3D printing is a great method for prototyping, I have to set mine back up after relocating my office a couple months ago..
Will you use the 3D print as a mold for fiberglass? Or what will the final product be constructed of?
Will you use the 3D print as a mold for fiberglass? Or what will the final product be constructed of?
Tune-A-Fish
BOTM LOSER Proudly Deplorable
advCo said:Very cool. 3D printing is a great method for prototyping, I have to set mine back up after relocating my office a couple months ago..
Will you use the 3D print as a mold for fiberglass? Or what will the final product be constructed of?
Why not just epoxy dip the printout after an ABS slurry coat?
bcnSR250 said:That last one looks fantastic, your making me want to get a 3D printer
Doooo it! There are some really sweet affordable options now and so much support online, not to mention all the help on youtube through tutorials.
advCo said:Will you use the 3D print as a mold for fiberglass? Or what will the final product be constructed of?
Tune-A-Fish© said:Why not just epoxy dip the printout after an ABS slurry coat?
I thought I would get the covers looking the way I wanted first, then remodel them with the surface set back 2-3mm and print another set to then finer glass over the top of. Or even 3D print some kind of 2-part mild. BUT, after handling these prototypes, I am 100% confident that they are strong enough as they are. They have a 1.5mm wall thickness with a 20% infill and they seem really stable. With the mounting points, if I construct them in a way with this process in mind, I can give them ribs and support where needed. So I think I will print them out at a slightly higher resolution (right now they are only at 0.3mm layer thickness which is pretty rough), then run a light coat of filler over them, then spray putty, then top coat! The biggest shortcoming of PLA is its weakness under any hot conditions, its melting temp is so low that it gets soft and warps. But I figure these will not be subject to too much heat - mostly hanging in the breeze. I'll have to give a long term report on them in a year or so ;D
zap2504 said:I also like the under-seat platform idea!
RE: crankcase breather - there was an interesting technical article in the October 2016 edition of Motorcycle Consumer News by Dave Searle (former editor of MCN) talking about oil vapor breathers, separators, and some racing tricks. Mentioned were the use of both 1-way valves in the in the crankcase vents and vacuum pumps on crankcases to reduce pumping losses. Since a single-cylinder engine pumps a lot, I was thinking on trying out a 1-way PCV in-line with an automotive fuel filter acting as a catch can; probably suspended up under the seat.
Thanks for this Zap. I love that stuff! Do you have a copy of the article? I will look into what Yamaha have done internally inside the crankcases for this bike and post a couple pics
Sorry, I do not have a digital image of the article (probably too new). Here's a couple links that speak to the same issue:
http://suzukisavage.com/cgi-bin/YaBB.pl?num=1470705659
http://www.suzukihayabusa.org/forum/index.php?topic=144179.0
http://www.motorcycle.in.th/article.php/Crankcase-Pressure_Engine-Performance
I figure that my idea (not new by any sort) would work better than just a filter attached to the crankcase vent if you are doing away with the stock air box or trying to replicate the OEM recycling into the intake tract.
Thanks for that info Zap, I read all of it. really interesting stuff. I'm too close to finishing this build to try and implement something other than the breather filter, but the next SR I build will definitely employ something like that Armen guy suggested on the Savage forum. In fact, lots of the good ideas brought up in this thread that I haven't managed to get into this bike will be experimented with on the next ;D
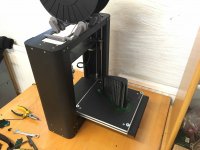
Eleganten, ABS would be ideal actually. Then I probably wouldn't need reinforcement at all. But to print ABS you need a heated bed and I can't be assed sorting that out. My intention with printing all along was/is just to make prototypes for fitment and to see how they look before making proper parts from proper materials.
The printer is a Printrbot metal plus. I bought it as a kit and it was only available for a short time - I suspect they had a lot of issues with it because I certainly did. Now they only offer it assembled and with a heated bed. The two biggest issues were the parts lifting off the bed - the aluminium plate is too cold and the heat differential to the hot plastic caused the parts to lift and warp. This was solved with build tak and I haven't had many issues since! The other issue was that the printer head ploughs into the work piece all the time, hard enough to break the part off the bed. I solved this by making a new printer bed that sits above the stock one and is spring loaded - so if/when the printer head hits the work piece, the whole bed just pushes down then springs back up again. Works a treat. ;D
3DogNate
"You Meet the Nicest People on a Honda"
JadusMotorcycleParts said:Thanks for that info Zap, I read all of it. really interesting stuff. I'm too close to finishing this build to try and implement something other than the breather filter, but the next SR I build will definitely employ something like that Armen guy suggested on the Savage forum. In fact, lots of the good ideas brought up in this thread that I haven't managed to get into this bike will be experimented with on the next ;D
Eleganten, ABS would be ideal actually. Then I probably wouldn't need reinforcement at all. But to print ABS you need a heated bed and I can't be assed sorting that out. My intention with printing all along was/is just to make prototypes for fitment and to see how they look before making proper parts from proper materials.
The printer is a Printrbot metal plus. I bought it as a kit and it was only available for a short time - I suspect they had a lot of issues with it because I certainly did. Now they only offer it assembled and with a heated bed. The two biggest issues were the parts lifting off the bed - the aluminium plate is too cold and the heat differential to the hot plastic caused the parts to lift and warp. This was solved with build tak and I haven't had many issues since! The other issue was that the printer head ploughs into the work piece all the time, hard enough to break the part off the bed. I solved this by making a new printer bed that sits above the stock one and is spring loaded - so if/when the printer head hits the work piece, the whole bed just pushes down then springs back up again. Works a treat. ;D
I added Auto leveling to my printer via an inductive sensor on an aluminum bed. http://www.ebay.com/itm/1pc-LJ12A3-4-Z-BX-Inductive-Proximity-Sensor-Detection-Switch-NPN-DC6-36V-4mm-/262497221271?hash=item3d1e0dba97:g:v84AAOSwM4xXbea8
(A heated bed is REALLY easy to add too. if you want to get into that. If you've recompiled firmware you know what you are in for.) I still prefer PLA or PET over ABS for most things... ABS can be a bit soft for smaller objects especially mechanical ones. newer PLA melts at similar temps to ABS anyway... ABS takes paint better is about the only thing it's got going that PLA doesn't and that's just due to ABS being solvent sensitive and PLA being very resistant.
Yeah I always liked PLA. No smell, strong enough, and no near for heated bed (in most cases)
This printer came with the autoleveling function with an inductive sensor. I actually added steel washers to the printer bed so that the sensor picked it up sooner than it does with just plain aluminium. This then lifts the sensor further away from the work piece in relation to the printer nozzle during a print.
This printer came with the autoleveling function with an inductive sensor. I actually added steel washers to the printer bed so that the sensor picked it up sooner than it does with just plain aluminium. This then lifts the sensor further away from the work piece in relation to the printer nozzle during a print.
HerrDeacon
Over 1,000 Posts
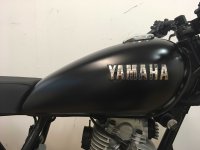
JadusMotorcycleParts said:Levelled and attached tank badges
Much, much better!!!


