Follow along with the video below to see how to install our site as a web app on your home screen.
Note: This feature currently requires accessing the site using the built-in Safari browser.
We noticed you are blocking ads. DO THE TON only works with community supporters. Most are active members of the site with small businesses. Please consider disabling your ad blocking tool and checking out the businesses that help keep our site up and free.
So I've been on this forum for a few months now and figure it's time to start a build thread.
I've built bikes in the past, but this is the first cafe I've built from start to (hopefully) finish!
It started as a far from complete '75 with no extras and few of it's necassary parts. It's going to be a cafe anyhow, and most of it would end up in the scrap heap, or heavily modified, so I wasn't too concerned. It was only a few hundred dollars and I was looking for a winter/spring project. I bought this in December, so I'll post up photos of the progress to date.
I should have taken more photos of the tear down, because this thing was filthy! I've never had a bike/car with such thick crud covering the frame, forks and hubs. After it was cleaned up and I could see the frame again, I welded in diagonal frame braces, to stiffen the frame up (from what I've read), but mostly because the side covers are gone and it looks cool!
I didn't take any photos of the seat build, in progress, but by this time you all know the routing. Foam carved to shape, glassed over and sanded to fit. This was the first fiberglass I've ever done, and it was super easy with a bit of patience. Tank is a universal Manx style that goes with the theme I'm going to create.
So this is also a first for me in terms of polishing. There's an aful lot of aluminum on these bikes and I feel it would be a shame to cover it all up with paint. Patience and more patience and I got a decent result.
Here are a few details of the tank mounting. I glassed in 3/8 bolts on the underside and welded mounts to the frame. I also wanted to use a tank strap over the top as per old race bikes. Problem was that alot of those bikes have an offset filler, mine is centered. Made brackets out of aluminum to bolt through the tank at the filler and pull back down to the frame. After a quick polish, riveted to the leather.
Wingspan's bike has been a great inspiration for mine. The styles will be quite different, but i stole some ideas. Namely the use of 18" aluminum wheels. I figure I might as well do this from the start and not kick myself in three months wishing I had. Called Buchanans and had some spokes sent out as well.
These are the first spoked wheels I've ever put together, so after alot of photos and prep I tried my hand at lacing, after three attempts, realized the zip ties work wonders...
Oh yeah, drilled the front drum too. I don't know how these don't over heat without it! Made some mods to the rear drum as well.
Drilled holes in the rear as well, avoiding all internal reinforcing of course. And welded a scoop on to duct some of that cooling stuff to the rear too.
Brass screen sure is purdy!
Built this truing stand and it works better than I had hoped! Being that both rims are brand new, I was able to get them within 1/100th of an inch in all directions, which is fine with me. Plus I have a stand now to true my bicycles and Harley wheels. All my bikes currently have spoked wheels so it's already paid for itself ($10 for the dial indicator).
Forks have been rebuilt and repainted by this time.
^^^That's a good idea. I had wanted to put holes elsewhere on the drum to vent it but there's alot of webbing on these. I'll probably vent it at the scoop eventually. I've got two sheets of this mesh, and need to use it up somewhere.
So heres a little detail of the bearing points on my seat mounting.
I made this seat pretty damn heavy, alot of layers but it's extremely sturdy. I epoxied in some shaped aluminum plate to bear across the frame and glassed them in as well to be sure they can't break loose. A little trial and error and finesse with the files, but it sits perfect now.
Made an aluminum hook in the rear with a corresponding slot notched in the rear frame loop, and a clevis pin on the front. The front of the seat has to be angled up quite a bit to get the hook started in, and when the front lays flat, it locks in good and tight.
Tubes should be showing up soon, then I can pop the tires on, (still) waiting on pipes from Titan performance before rearsets and mounting points can be welded on.
With some luck, and more $$ i'll have this thing going before the weather gets too nice here!
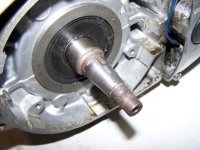
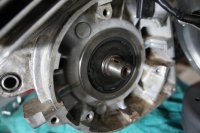
So here's a bit of a problem i ran into today. I bought a new system from Power Dynamo in Germany with great expectations. The manual they have for installation shows a long shaft from the crank to mount the unit, my bike bike has a very short tapered shaft and doesn't seem long enough to catch the taper in the rotor. Am I missing something here?! Heres a photo from their instructions and a photo of my bike. I've emailed them but haven't heard back yet.
This site uses cookies to help personalise content, tailor your experience and to keep you logged in if you register.
By continuing to use this site, you are consenting to our use of cookies.