
You are using an out of date browser. It may not display this or other websites correctly.
You should upgrade or use an alternative browser.
You should upgrade or use an alternative browser.
Father Son 75 CB200T Rise From the Ruins
- Thread starter Texasstar
- Start date

MiddleClassChops
New Member
I'm coming in late to the build but the wheels cleaned up awesome! Did you relace them or just clean them up whole? What process did you use?

Texasstar
Can't is a four letter dirty word
the magic of Marvel Mystery Oil and elbow greaseMiddleClassChops said:I'm coming in late to the build but the wheels cleaned up awesome! Did you relace them or just clean them up whole? What process did you use?

Texasstar
Can't is a four letter dirty word
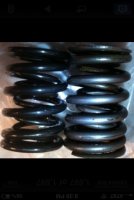
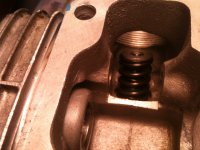
Measure twice cut once. We are going back and checking our build. We got our racing valve springs from vintage advantage and because there are less coils there appeared to be no up or down. Has any body used Les's springs before? First pic is side by side with the original valve springs. Then pics of each valve spring installed.
Attachments




Texasstar
Can't is a four letter dirty word
thanks Sonreir...well that is good news. Just read a string of a guy who put his valve springs upside down and couldn't get his engine to turn over.Sonreir said:A lot of aftermarket valve springs can be installed both ways. Not exactly sure why, but that's how it goes. Looks good to me.
Texasstar
Can't is a four letter dirty word
would you use valve shims with racing springs to increase rpms?Sonreir said:A lot of aftermarket valve springs can be installed both ways. Not exactly sure why, but that's how it goes. Looks good to me.

MotorbikeBruno
Over 1,000 Posts
Texasstar said:thanks Sonreir...well that is good news. Just read a string of a guy who put his valve springs upside down and couldn't get his engine to turn over.
Sounds like he had more wrong than just the springs in upside down.... :
Looking good guys!

Habanero52
The Race......is only with yourself!
Texasstar, isn't that the same lamp that is in the movie A Christmas Story? LMAO!!!!
Texasstar
Can't is a four letter dirty word
yes sir it is...it was a major award...we do all our engine work by the light of the leg...Habanero52 said:Texasstar, isn't that the same lamp that is in the movie A Christmas Story? LMAO!!!!

Texasstar
Can't is a four letter dirty word
We installed our cam chain idler.
Cleaned the base and installed gasket with no sealer.
Installed our pistons and pins without shooting the retainers across the shop. We rolled the retainers into place without compressing them.
Oiled everthing up and made sure our rings we lined up with the 120 degree markings we put on top of the pistons.
We made sure the arrows on the pistons were pointing toward the exhaust ports.
We compressed one rings at a time with a screwdriver taking care not to score the ring.
And that is our first jug installed!
Cleaned the base and installed gasket with no sealer.
Installed our pistons and pins without shooting the retainers across the shop. We rolled the retainers into place without compressing them.
Oiled everthing up and made sure our rings we lined up with the 120 degree markings we put on top of the pistons.
We made sure the arrows on the pistons were pointing toward the exhaust ports.
We compressed one rings at a time with a screwdriver taking care not to score the ring.
And that is our first jug installed!
Attachments


Texasstar
Can't is a four letter dirty word
There were two dowels and no orings for wear the jug joined the case. There are 4 dowels on the four corner @ the jug and head with two orings (green) at the rear of the jug.
Just FYI we found no torque spec for the jug set bolt and the cam chain idler.
Just FYI we found no torque spec for the jug set bolt and the cam chain idler.
Attachments


kopcicle
antidisestablishmentarian
For all standard "normal" fasteners other than obvious "specialty" threads ...
6mm = 8 Ft/Lbs
8mm = 18 Ft/Lbs
10mm = 28 Ft/Lbs
Just a convenient rule of thumb . Always refer to the FSM first and for comparisons .
A good example would be a well known misprint in the Kawasaki "J" engine manual that calls for 21 Ft/Lbs on a 6mm x 1.25 cap screw retaining the cam tower/cap . Pretty obvious that something is wrong referring to the guidelines above .
~kop
6mm = 8 Ft/Lbs
8mm = 18 Ft/Lbs
10mm = 28 Ft/Lbs
Just a convenient rule of thumb . Always refer to the FSM first and for comparisons .
A good example would be a well known misprint in the Kawasaki "J" engine manual that calls for 21 Ft/Lbs on a 6mm x 1.25 cap screw retaining the cam tower/cap . Pretty obvious that something is wrong referring to the guidelines above .
~kop