Glass seat pan attempt.

Tune-A-Fish

BOTM LOSER Proudly Deplorable
I've been watching some other glass work here and Deviant's fairing work and decided what the heck I'm gonna make a glass seat pan... I have not worked with fiberglass other than to patch or make small panels out of the cat hair in a can. If it goes to hell... at least i gave it a shot.

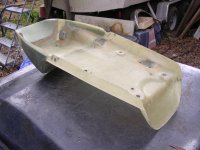
I am hoping to get some details from you guys for what to buy and where to add reinforcement. So far I have only roughed in the shape and masked off the under side. I think I'm ready to add some half pipe shapes for strength? I also have two mounting points to consider stiffening up. The first is a post behind the tank for the front seat mount and the second is a bracket that will through bolt and snap fasten to a lock under the frame.

Here's where I'm at: it's okay to blow it up, its no masterpiece
 

Attachments

  • IMG_20150325_214825005.jpg
    IMG_20150325_214825005.jpg
    2.7 MB · Views: 431
these are the brackets, the one at the tank I have a 3/4 radius cap covering tight to the top and the pillion bracket you can see the imprint in the silver aluminum tape

103383-150315165739-8211818.jpeg


103383-150315165740-8231824.jpeg
 
would a kit like this: work, it would give me 3 layers of fiber with several strips to use for around brackets.

http://www.ebay.com/itm/Carbon-Fiber-Fabric-Kit-Plain-Weave-Cloth-72-x-14-/321694316151?pt=LH_DefaultDomain_0&hash=item4ae679b677
 
That's pretty slick but I'm not sure if you need the carbon fiber kit for the pan. If I may suggest, pick up a piece of felt from wal mart, the stuff throw blankets are made from, and use that instead. Cut several pieces a little bigger than the seat pan so you can layer it. Two should be enough. You will need the fiberglass resin and hardner. Mix the chems soak the blanket material in it. Work it in good and use the blanket to lay out the base. It's thicker than the glass mat and will make a sturdy base that you can attach your seat cover to. I made my front fairing using glass mat and the blanket material, but the blanket would have been strong enough by its self. This is what we used to make custom speaker boxes.
 
Sounds like a good plan for a slab pan or if you want it thick and beefy, but I need to keep it thin and strong to keep the weight down, a gallon of epoxy can add some serious tonnage.

Thanks for the speaker box idea though I need to mold a box for under the back seat on my truck and to make the pan for that the felt in a single layer would work sweet with a form to square up a top edge and mount it all to some cabinet grade 6 ply 3/8" plywood for a top lid.
 
I run 10-18 Oz of resin in my seats. The one I have that is eerily similar to yours weighs about 2lbs finished.
 
J-Rod10 said:
I run 10-18 Oz of resin in my seats. The one I have that is eerily similar to yours weighs about 2lbs finished.
Thanks! What wt fabric do you use, and do you use a single chunk or strips? any preferred brand 3M

I see a lot of pre-fabbed seat/cowls never see a two piece unit like all the old school KZ, Seca, RD etc.. that's where I'm going with this so it has a quick open seat with glove box and the works man. Wish now maybe I went with the buy it and install it method, but no hurry no worry.
 
This is how I lay this one.

20150326_113103_zpsgmgwzsuj.jpg


But, if you are laying yours over a plug, you'll want to do a few finish layers of veil to give you a smoother finish.
 
Looks nice.

Not sure I follow you, I plan to lay the glass on the masked off section after I get done smoothing things over (the aluminum tape looks wrinkly but is very smooth) I will rub it all down with the clear shoe polish for release, but when I pull that sucker off, I plan to trim it, dip or brush the edges with epoxy and add a rubber edging bead... That's it. The foam and cover will go on next. no molds or "plug"?

Am I crazy? I mean I don't want to just waist my time if I neeed to make a mold.
 
No mold necessary. You're top coating, your last layer, will be you top layer, you want it as smooth as possible. Exactly the opposite of a lay up in a mold.

The veil on top will give you a smoother top layer to sand smooth prior to paint. CSM has strands going every which way and is not as smooth, cloth has it going two.
 
Tune-A-Fish said:
Thanks! What wt fabric do you use, and do you use a single chunk or strips? any preferred brand 3M

I see a lot of pre-fabbed seat/cowls never see a two piece unit like all the old school KZ, Seca, RD etc.. that's where I'm going with this so it has a quick open seat with glove box and the works man. Wish now maybe I went with the buy it and install it method, but no hurry no worry.
Posted these pics on Billyp's thread, but posting here in case you missed, 'cause it is so much like your scheme. This seat pan (actually this is the seat pan base) was built very similarly to what you are doing. The glass work was very easy, but I did spend a lot of time on the essentially throw away mold. The main difference is that I positioned the hinges and rubber bumpers on the frame along with some bits of wood and modeling clay along with basically a bunch of tape and other assorted bits same as you have. It worked out really well and the time spent to work out all the details first made the rest of the project pretty simple. The cowl portion was made just like Billyp's project over carved foam attached to the back of the seat pan base after it was made. It is all very thin, but it rests on 6 rubber biscuits and the hinges just like a stock seat so it relies on the frame for a lot of its strength- though it is very strong - mostly because it ended up with a more complex shape a lot like a stock steel pan and not just flat . I would say I used a little more than a pint of mixed epoxy for the whole thing, and probably 1/4 of that went to waste. Most of it is 2 or 3 layers of i'm guessing 3 oz. cloth. And there are some aluminum plates embedded to screw the catch and hinges to that got faired in with a bit of Bondo before a last layer of glass.

But I did mine just like you say - molded it on the bike, pulled it off, ground and cut and drilled the edges and holes and there you are. Pretty easy after fussing over the "mold"! I thought of trying to use the cowl for storage, but the rear stock frame fits up inside it so far there isn't enough room to make it worth while, so I left the foam core inside and called it a day. The foam is what looks green in the pic, the pink is Bondo I used to glue the foam the the seat base, both showing through the relatively clear fiberglass.
 

Attachments

  • DSCN0800.JPG
    DSCN0800.JPG
    668.6 KB · Views: 413
That is how I'm hoping this goes.

I'm stopping to get another roll of aluminum tape to finish and cover everything, should I put any ridges in the long flat section for rigidity? The first go round may not be that nice but it will have foam and a cover (professionally upholstered) so if its not junk it should be okay. your tank section is like how my tail section will be on the pan, my tail is separate so when the seat is off the tail, lights, tag and glove box stays. the seat access is for electrical, battery and oil with a small compartment for a few small things.
 
For any of you interested, modeling clay (plasticine) is a mixture (per 100g) of [60g] ball clay, [18g] cheese wax (soft paraffin wax), [12g] mineral oil (baby oil) and [7 - 10g] petroleum jelly. Melt wax at 250°- add oils-then slowly add ball clay. It's really easy to make and relatively cheap. Keep it in tupperware or sealed buckets and it stays good for years. I still use clay I made over 15 years ago. (You can use beeswax instead of soft paraffin, but beeswax can get pricey)
 
Back
Top Bottom