My CB650 project...

Apollo,

I sent you some questions to the e mail address in your profile. Thanks for any help.

One more thing - How did you go about painting those calipers the second time ? They turned out great !
 
Fort Worth Realtor said:
Apollo,

I sent you some questions to the e mail address in your profile. Thanks for any help.

One more thing - How did you go about painting those calipers the second time ? They turned out great !


Did you get my email response?

I will pm you about the calipers.

Let me know!!
 
Fort Worth Realtor said:
Got the e mail. Thanks !

Here's the header wrap I bought, cheapest on ebay, 50' each. Bought 2 rolls.
http://cgi.ebay.com/ebaymotors/ws/eBayISAPI.dll?ViewItem&item=370365272844&viewitem=&sspagename=STRK%3AMEWNX%3AIT

Here's the swing arm locknut wrench from honda, $50, or you can make one out of a junk socket like this guy with a dremel.
Honda Part Number 07908-ME90000
Actual tool = http://www.my-mc.com/messages/1/63461.html?1138247608
Homemade tool = http://cbrforum.com/forum/showthread.php?t=90880
 
Hey there, I joined the forum because your motorcycle came up when I was searching for cafe-style Nighthawks on google. Turns out this forum is pretty kick-ass! I recently bought an '83 Nighthawk 650 (it's my first bike). I hope to do start doing some work on mine when the weather here in Chicago starts getting colder.


I wonder, what ever became of your Nighthawk? Did you ever complete it? I'd really love to see the finished product. It was looking great already. If it's okay with you, I hope to use your bike as a guide to making mine almost as nice as yours.


I've attached a picture of my bike (I can't wait to get rid of those square headllights!)
 

Attachments

  • 339828_507267101839_133800144_126659_3561541_o.jpg
    339828_507267101839_133800144_126659_3561541_o.jpg
    295.2 KB · Views: 374
Hey man,

Congrats on the new bike, theyre great rides!! Absolutely, there was nothing for me to go off of when starting this bike, so I spent a while figuring out what I wanted and the rest I just winged it and thats what I ended up with, so feel free to take whatever I've done for your ideas as well. I partially took the bike apart and put it back together a couple times till I had a general idea of what I wanted. The biggest problem you'll have is putting the clubmans or clipons on without the throttle sticking, I've got some pics I think of how I did that so when you get to that point let me know (I would recommend getting that problem fixed before completely tearing down because you'll have to take the carbs off and on till it works). The second biggest problem is once the clubmans were on, they hit the tank when turned to one side or the other. So once I had the frame completely torn down, I took it to a fabricator and had him weld in a larger steering stop, which then I had to trim back with a dremel until the bars came within an 1/8th inch or so of the tank without hitting. Those were the biggest obstacles really... The bike is still not finished, I own a company and all my money has gone into that and so the bike is just sitting in my garage reminding me everytime I go in how much I just want to finish it... :(

I still mess around with it from time to time, lately I've been having some ridiculously nagging electrical issues, from turn sigs not working, brake light working, not working, working, then not working again, and now the bike wont turn over. Dissassembled and rebuilt the starter button, chased volts, cleaned solenoid, memorized wire diagrams and havent yet completely figured out the problem, although I think I settled on the solenoid last night. If you want tips on rattle canning, there are some amazing dudes on here with insane skills on that stuff and they really made me push to do a good job (they literally blasted me on the first attempt to spray my brake calipers lol). Just take your time, take LOTS of pictures, bag and lable EVERYTHING and take it one little project atta time and dont focus on the big picture. First time I did my brakes, they sucked. The second time, I stripped, dissassembled, prepped and spent about two weeks on em and they turned out amazing, so you just have to apply that "one piece at a slow-ass time" mentality. You might also want to take pics of every single electrical connection for reference during reassembly, came in handy... if you go with a round headlight, you'll have to fab up some headlight ears which isnt too hard, plently of info on here regarding that, just takes some practise and screw ups to get it right.
For the paint, I believe I used grill paint for the motor cause it has a much higher heat rating (just dont use too much as it could retain more heat than the engine can handle), the rest of the bike I used engine block paint on top of textured krylon, on top of primer to give it a rough look. Worked out better than I thought with the texture cause it hides any dents or imperfections that might otherwise show up without it... Get a bunch of simple green, SOS or steel wools pads and spend a lot of time cleaning and degreasing, and get a ton of masking tape. A good masking job before painting makes all the difference...
Thats it really, let me know if you need anything. Send me alink to your thread too, good luck!!
 
That's unfortunate, I hope you can find the time and money to work on her soon. I'm a bit squeamish about tearing the bike apart, I am a bit mechanically inclined, but I know nothing about this bike. I've been thumbing through the Clymers to soak in some knowledge before I attempt anything. I did buy some superbike bars on ebay the other day and I'm hoping to install that when it comes in. I figure it's temporary until I can figure out if I want clubmans or clip-ons, or just stick with them. I'm also looking at buying a round headlight from a CB750. I still have to do more research, but from the little that I've done it seems that I can keep the same ears and maybe just mess with screws and spacers.


I'll definitely post a build thread soon. By the way, what kind of tires are you using? And are they different from the stock specs?
 
Just take your time, its not as difficult as you think. The more complicated areas are the controls, removing the throttle cables from the carbs, removing the wiring harness and all that little crap up front and around the headlight. The rest is pretty straight forward. Gotta remove the rear tire to pull out the airbox. Checking out the Clymers manual is a good idea to understand how it all comes apart (great to read when sittin on the throne:)). I will say that the clubman bars really gave the bike a very comfortable riding position, it just feels right and natural. Im 6'4 and obviously its all subjective, but it feels more comfortable to me than the original bars did. If you fly through tearing the bike down, you'll have a harder time remembering how it goes back together and that happened to me on some of the stuff. You'll need to buy a locknut wrench from honda to remove the swingarm (cost me about $50) btw. As for the headlight, the stock ears will not work as the stock headlight basically rests on top of the fuse box where as the 750 round headlight needs more room to be mounted. So I just took tWistedwheelz advice and bought some aluminum pieces from Lowes for 12 bucks and just started shaping some new ones. It takes a few screw ups before you begin to figure out how to shape it, buts not difficult, just take your time. Try to get everything set the way you want it with the handle bars and overall look before you tear the bike down. You'll most definitely ruin your paint work if you try to fab or set things up after you just painted everything. Oh, and make sure you buy one of those spray paint can holder/nozzle things from lowes, your index finger will thank you and it gives you more control. I couldnt feel the tip of my finger for a week after 3 hours of painting. And get the good dual filter face mask, the cheap paper ones will leave you stoned in no time... Theres a bunch of little tricks too when it comes to painting that youll find on here, like heating the can to build pressure which gives you a better, more atomized and even spray (i only did this for the brake calipers though as I didnt find out about it till then), laying dusting coats so that the preceeding smooth coats have some grab, time between coats, etc... twistedwheelz has some stickies on that I believe, really good stuff. Anyways, whatever questions you got, just let me know!! There are many cafe'd 650 Hawks out there so I'm all for helpin out a fellow Hawk rider... :) Ironically, the cafe thing is really catchin on here in Cleveland so your normal Kawi's and Honda's (350, 550, 750, etc) are common to see, and I'm almost certain very rarely, if ever, someones gonna come up to you and say "nice nighthawk" cause they were ugly to begin with lol...
 
"There are many cafe'd 650 Hawks out there so I'm all for helpin out a fellow Hawk rider... Ironically, the cafe thing is really catchin on here in Cleveland so your normal Kawi's and Honda's (350, 550, 750, etc) are common to see, and I'm almost certain very rarely, if ever, someones gonna come up to you and say "nice nighthawk" cause they were ugly to begin with lol... "

There ARENT many... my bad

Also, now that Im thinking about it, if you havent torn into your bike yet, id like to ask a few small favors thatll help me figure out my electrical problems as I could really use a working version of my bike to make some comparisons. Some of the electrical components were never working when I got it and someone had hacked the harness in a few spots so I never really had an original reference point. Would you be down with that?
 
This is like the best thing I could ever hope for haha. I don't really have other buddies that ride that I could count on for mechanical advice. Thanks for all the help.


There definitely is a shortage of cafe'd NH's out there. So sure thing. Just let me know what I should be taking pictures of.
 
Re: My 84' CB650SC Nighthawk project...

I would also recommend jumping on http://www.nighthawk-forums.com/. Good info on nighthawks, im on there as well. You'll find a lot of good advice on both...

Cool, thanks man!! Right now the first thing I can think of is the starter solenoid. When I turn the ignition key to On, I get no power from the hot wire running to the fuse box from the ignition, and I wanted to see if power goes directly from the battery to the solenoid before it goes to the rest of the bike. When I bypass the solenoid and short the + and - terminals on the solenoid the starter turns right over, so the starter works and battery has charge, yet nothing works on the bike. If power from the battery initially goes through the solenoid before the rest of the bike, then if the solenoid is bad, that might explain why nothing else works. So, what I would need to know is if you disconnect the connector attached to the solenoid, then turn your ignition to "On", do all the electricals on your bike still turn on (brake light, dash light, turn sigs, etc.)? If your sitting on your bike, remove the panel on the right side (battery side). At the very back (left of battery if viewing from the side) you'll see a silver cylinder sitting in a round, rubber pocket. Thats the starter solenoid. There should be a clear, plastic electrical connector inserted in the top with about 4 wires in it (colors are red, green/red, etc.). Disconnect that connector (carefully) and then turn your key to "On". Does everything light up? Take your time, no rush. Should only take 5 minutes so just whenever you get a freebie that would be awesome. Thanks bud!!
 
Sorry for taking my sweet time on doing this simple thing. I was pretty busy the past few days.


So when I disconnected the connector, I get no electrical power — nothing lights up. I took a picture just to show you (in case I'm a bumbling fool and disconnected the wrong thing).
 

Attachments

  • IMG_0456.JPG
    IMG_0456.JPG
    203.3 KB · Views: 376
The solid lead on the solenoid (the one covered with the red cap at the back) comes directly from the battery. This feeds to the coonnector block, then the smaller red wire on the connector goes out to your ignition to power everything else. The fuse attached to the solenoid will probably be for the red wire on the connector.

In other words, unplugging that connector will disconnect all power except to the solenoid.
 
I've read back a few posts, but can't determine what your problem is, but if you disconnect that plug, you will have no power to anything. Have you looked at the fuse under that cover? They are notorious for having hair-line cracks that interrupt the current.


... and what is 6 volt? not this bike surely??


sorry. not very helpful eh?


cheers
ian
 
paulve said:
Hey there, I joined the forum because your motorcycle came up when I was searching for cafe-style Nighthawks on google. Turns out this forum is pretty kick-ass! I recently bought an '83 Nighthawk 650 (it's my first bike). I hope to do start doing some work on mine when the weather here in Chicago starts getting colder.


I wonder, what ever became of your Nighthawk? Did you ever complete it? I'd really love to see the finished product. It was looking great already. If it's okay with you, I hope to use your bike as a guide to making mine almost as nice as yours.


I've attached a picture of my bike (I can't wait to get rid of those square headllights!)

Funny I haven't checked this thread in a month or two and was just gonna ask how close it was to finished. This bike is also the bike that got me to this website, and into cafe bikes in general. I don't have a nighthawk, but I have an 83 Honda Ascot, which looks pretty much identical except for the motor and the lack of a passenger handlebar.

I'm curious about how you will have the rear end finished, there are not many cafe'd bikes with a non-straight frame, (or they are cut off with some sort of hoop), so I have little for inspiration.

but yeah love the bike, It's a serious inspiration for my own project.
 
Hey Man,

My bad for taking so long to respond to this, for some reason my email notifications were sitting in my spam folder and not my inbox so I just noticed these. Ian, the reason I wanted to know if disconnecting the 4pin connector on the solenoid killed the rest of the bike is because my solenoid has a fresh fuse in it, battery has power, and the starter motor works. I tested continuity on every single wire on the bike, tested the ignition switch, tested the fuse box, literally everything. Yet nothing works when the ignition is turned on and yet the starter turns over when I short the top terminals on the solenoid, which means that power from the battery is not getting through the solenoid to the rest of the bike which basically means the solenoid was dead. I just needed someone to pull the connector on their solenoid to confirm what I was thinking before I drop the money on a new solenoid. Hope all is well you with bud as I still appreciate the help you gave me through this build. later!!

bikeboy said:
I've read back a few posts, but can't determine what your problem is, but if you disconnect that plug, you will have no power to anything. Have you looked at the fuse under that cover? They are notorious for having hair-line cracks that interrupt the current.


... and what is 6 volt? not this bike surely??


sorry. not very helpful eh?


cheers
ian
 
Hey bud,

Again I apologize for the long time to reply as the notifications were sitting in my spam folder and had no idea people were still checking out this thread lol, but thank you for the compliments and Im glad that this could be an inspiration to you!! Anyways, the bike is still exactly where I left off unfortunately. I started a company two years ago to help the fam out as were they're having a tough time financially right now and basically biz has been slow up until the last 6 months and what little I made went back to them so the bike has just been sitting here in my garage at my office. I see her everyday and it drives me nuts watching two summers go bye and everyones out riding and shes stuck in the garage. Its all good though, it'll be nice when I can finish her.
Anyways, for the rear of the frame I initially wanted to cut the back half off starting right behind where the bolt for the seat sits on each side of the frame. Then, if you look at the underside of the seat, there's a perfect groove on each side that would fit the same size frame rail. So I would basically weld in a new frame rail that ran up right into that groove thus perfectly hiding it and giving it a cleaner look. I liked the way the seat was shaped as it kinda had a natural bumpstop to it, plus I liked the old leather and the stitching as it kinda gave it an older, retro look to it (plus its extremely comfortable). Then I was just going to take the tail light and fix it to the back of the seat which has a very thick, flat plastic side to it that would perfectly fit my tail light. Unfortunaley, money and lack of finding a good welder (or any welder/fabricator for that matter) forced me to just leave it as is. Although, it wouldnt be too difficult to have it done at any point in time down the road.
I took some pictures recently as I usually pull her out into the sunlight occasionally and wash her. Ill get some up today. Thanks again for the kind words and let me know if you need any help. Take care!!


andrew6v said:
Funny I haven't checked this thread in a month or two and was just gonna ask how close it was to finished. This bike is also the bike that got me to this website, and into cafe bikes in general. I don't have a nighthawk, but I have an 83 Honda Ascot, which looks pretty much identical except for the motor and the lack of a passenger handlebar.

I'm curious about how you will have the rear end finished, there are not many cafe'd bikes with a non-straight frame, (or they are cut off with some sort of hoop), so I have little for inspiration.

but yeah love the bike, It's a serious inspiration for my own project.
 
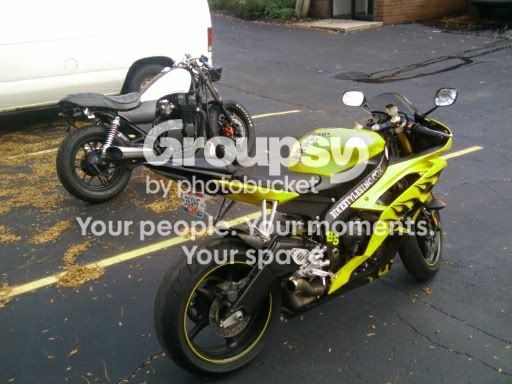
These were taken a few months ago, thats my buddies R6. The bike is kinda saggin a little in the rear as I need a nut for the shock, lost it somewhere and the shock keeps popping off when I move the bike around. The front is a mess as there are wires all over the place, but it'll get cleaned up when I finish putting everything back together someday. Need to rebuild the forks at this point, replace the valve cover gasket, new solenoid, fab up headlight ears, rebuild clutch and brake master cylinders, add stainless steel braided brake lines, mount rear tailight, add new speedometer and eventually add new rear shocks. Not a whole lot it but it adds up. Anyways, there she is in all her unfinished glory!!!! :)


IMG_20110628_125231.jpg


IMG_20110628_125213.jpg


IMG_20110628_125156.jpg


IMG_0062.jpg


IMG_0057.jpg


IMG_0055.jpg


IMG_0056.jpg
 
Back
Top Bottom