You are using an out of date browser. It may not display this or other websites correctly.
You should upgrade or use an alternative browser.
You should upgrade or use an alternative browser.
TX500 build
- Thread starter JRK5892
- Start date
made my to do list... anything look like it is missing?
T-REX 500
Front end:
o Mount front brake cylinder
o Bleed brakes
o Tighten all bolts
o (possible redo the lower tree powder
o Clutch cable
o Throttle cables
o Levers
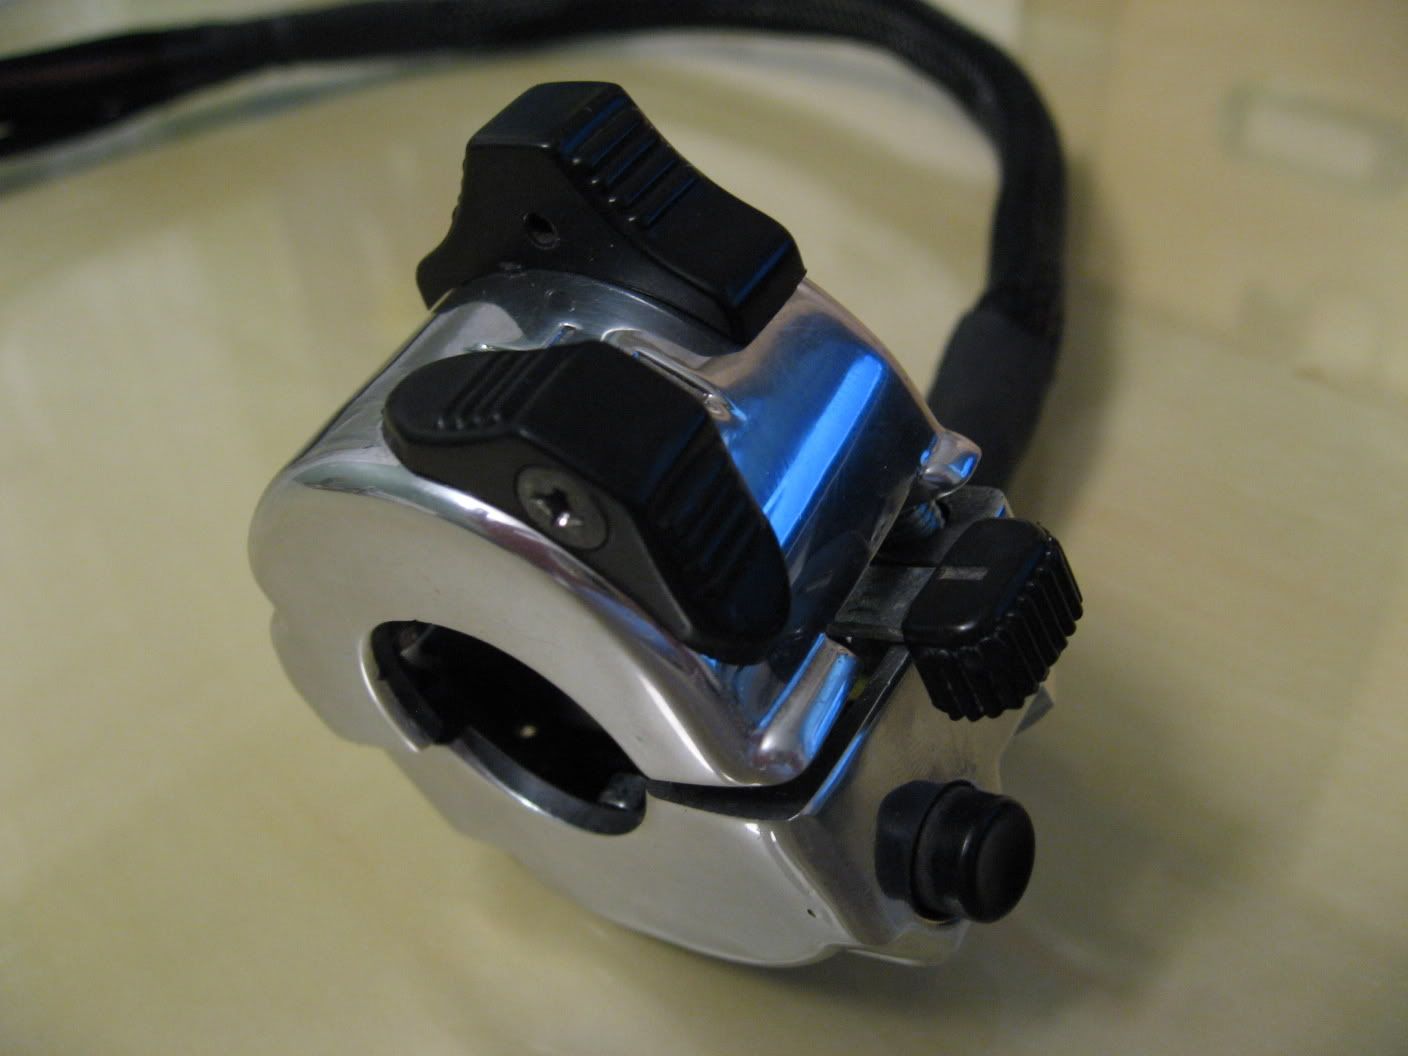
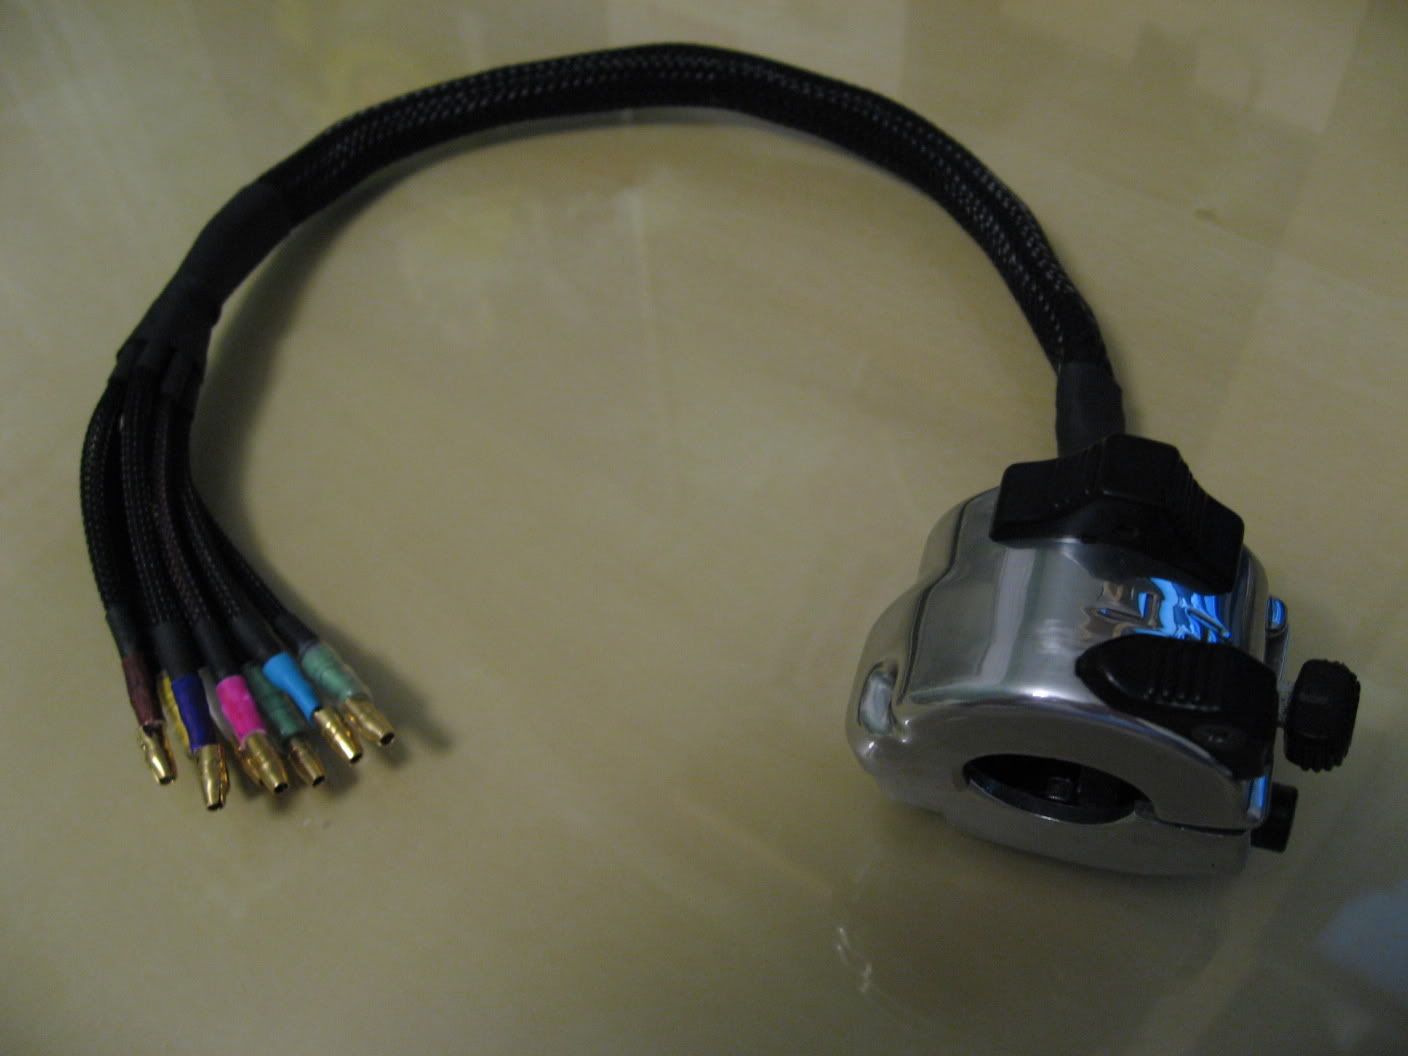
o Run chrome wire covers (maybe white) – also order main wire covers
Middle:
o Run oil lines
o Mount oil cooler
o Cut side case for oil cooler
o Mount rearsets
o Powder coat rear sets
o Make shift linkage brackets
o Smaller rear engine bolt
o Make seat mount
o Mount tail lights (powder?)
o Figure out exhaust
o Powder coat exhaust hangers
Rear end:
o Powder coat springs
o Chain
o Lube chain
o Add belt guard
o Align rear tire
o Hook up rear brake/brake switch
o License plate holder
o Horn under seat bump/ storage box
Paint:
o Tins (recoat with white, then add black base coat/ gold air brush and brush down it for cool effect)
o Seat (sand and paint, follow tins paint)
o Cut out holes in side covers and add vents (powder vents)
o Large 22 on sides of the side covers
o “no regrets” pinstriped on the tail section
Wires:
o Wire bike up
o Add “do it all” light
Before riding:
o sync carbs
o adjust timing on points
o ADD OIL
o Wax chain
o Adjust clutch
T-REX 500
Front end:
o Mount front brake cylinder
o Bleed brakes
o Tighten all bolts
o (possible redo the lower tree powder
o Clutch cable
o Throttle cables
o Levers
o Run chrome wire covers (maybe white) – also order main wire covers
Middle:
o Run oil lines
o Mount oil cooler
o Cut side case for oil cooler
o Mount rearsets
o Powder coat rear sets
o Make shift linkage brackets
o Smaller rear engine bolt
o Make seat mount
o Mount tail lights (powder?)
o Figure out exhaust
o Powder coat exhaust hangers
Rear end:
o Powder coat springs
o Chain
o Lube chain
o Add belt guard
o Align rear tire
o Hook up rear brake/brake switch
o License plate holder
o Horn under seat bump/ storage box
Paint:
o Tins (recoat with white, then add black base coat/ gold air brush and brush down it for cool effect)
o Seat (sand and paint, follow tins paint)
o Cut out holes in side covers and add vents (powder vents)
o Large 22 on sides of the side covers
o “no regrets” pinstriped on the tail section
Wires:
o Wire bike up
o Add “do it all” light
Before riding:
o sync carbs
o adjust timing on points
o ADD OIL
o Wax chain
o Adjust clutch
Flugtechnik
My bike is not transportation, it is a respite
You forgot about the beer! 
Joe....these "power" vents ain't gonna work. Someone mentioned it earlier, and he is right. There will be no way to jet the carb for the difference between wide open throttle at 10 mph vs wide open throttle at 80 mph when you are craming air in the carb. I think you should skip this step. These CV carbs don't take to intake and exhaust mods very well and what you are talking about is drastic change.
very cool! i will have to figure something out... can not just leave it stock, i wonder if i was to cut out the section very clean, add the screens and then use a plastic welder and weld back in the part i cut out? think that woudl work, that woudl allow me to have the vents and then cap it off so that there is not extra flow going though there?
I thought you were talking about building a "scoop" to force the air in your carbs. Just cutting the holes out and putting screens on isn't going to hurt anything. That will actually be quite a ways back from your stacks. You know the original screens just fit under the plastic "chromed" rim, right?JRK5892 said:very cool! i will have to figure something out... can not just leave it stock, i wonder if i was to cut out the section very clean, add the screens and then use a plastic welder and weld back in the part i cut out? think that woudl work, that woudl allow me to have the vents and then cap it off so that there is not extra flow going though there?
no bud, i have the scoop... just got it yesterday, but that goes on the motor, here is a pic of the one i got, it is again to help cool the motor down...

what i am talking about is these:

i want to cut them out and make form fitted screens for them (like you see on rockets) but i have been told that these cut outs would allow for just to much air flow, i am just not sure what to do
what i am talking about is these:
i want to cut them out and make form fitted screens for them (like you see on rockets) but i have been told that these cut outs would allow for just to much air flow, i am just not sure what to do
JRK5892 said:no bud, i have the scoop... just got it yesterday, but that goes on the motor, here is a pic of the one i got, it is again to help cool the motor down...
what i am talking about is these:
i want to cut them out and make form fitted screens for them (like you see on rockets) but i have been told that these cut outs would allow for just to much air flow, i am just not sure what to do
How about this joe:
1) Grab pieces of plastic that are black and cut them down to the size of the cuts in the side covers.
2) Next: grab a second set and cut them identical.
(basically 2 for each side)
On the first set drill all the holes your heart desires to make the screen appearance.
On the second set only drill maybe half of the holes using the first as a template for the holes.
Epoxy the 2 sets together where all you are going to see is the one with ALL of the holes on the outside, and the one with less holes on the inside. Thus creating the visual effect you want and the slight restriction for air as well.
Something like this man:

Obviously with more uniformity (is that a word) to your hole drilling but you get the idea. They get bonded together and the one with the more holes goes on the outside. Obviously mounting them from the inside of the covers with possibly some epoxy, or plastic welder.
I love microsoft paint ;D
Obviously with more uniformity (is that a word) to your hole drilling but you get the idea. They get bonded together and the one with the more holes goes on the outside. Obviously mounting them from the inside of the covers with possibly some epoxy, or plastic welder.
I love microsoft paint ;D
Maritime
Over 10,000 Posts
How about painting the plastic black inside where the screen goes, then fitting the brass screen you talked about over that. No holes for air but looks like there is. The black background would show off the brass really well too. Less work, no extra airflow but the same look you want.
Cheers.
Cheers.
those are sweeT!!! did you save the site by chance?!LL said:wouldn't look great, but saw the color of these aluminum pegs and thought of your bike:

valvesprung
Over 1,000 Posts
http://www.hippykiller.com/store.html (from the photo URL ;D)
in it to win it now... going to ride this sucker this month! so far tonight i have got the cables wrapped... $$$ is a issue so i could not afford the braided cables, i discovered this company a few years ago... and this is what i do instead
http://cableorganizer.com/chrome-sleeving/chrome-xc-braided-sleeving.html
all you need to do is wipe down your old cables real well... now you can order this wiht side entry (used the black on my harley.. LOOKS SICK AS HELL, like black braided cables) but on this i need the bling, ordered the chrome... on this when ever i cut it, i use a lighter to heat the end and then while it is gooey i touch my finger to it... this just seals it all up so that it does not unravel... dad taught me this years ago to fix our ski ropes when we had to make them longer... thenwip tie, pull it tight, zip tie again.... looks awesome!


ok, off to eat, then back out to get more done!
http://cableorganizer.com/chrome-sleeving/chrome-xc-braided-sleeving.html
all you need to do is wipe down your old cables real well... now you can order this wiht side entry (used the black on my harley.. LOOKS SICK AS HELL, like black braided cables) but on this i need the bling, ordered the chrome... on this when ever i cut it, i use a lighter to heat the end and then while it is gooey i touch my finger to it... this just seals it all up so that it does not unravel... dad taught me this years ago to fix our ski ropes when we had to make them longer... thenwip tie, pull it tight, zip tie again.... looks awesome!
ok, off to eat, then back out to get more done!
Joe, those cables look bad as hell. Another one for the under $50 thread. That thread was a great idea by the way.
I wonder what that braided sleeve would look like covering my all thread linkage on my shifter. I'm sure it would look better than just the all thread.
Also, Got the LED today. Thanks a lot!
This build is so killer. I really hope you are riding it by the end of the month! Troy
I wonder what that braided sleeve would look like covering my all thread linkage on my shifter. I'm sure it would look better than just the all thread.
Also, Got the LED today. Thanks a lot!
This build is so killer. I really hope you are riding it by the end of the month! Troy
Joe - if you can get your hands on some 3:1 heat shrink, you might be able to get some over the cable ends etc. and then cover off the cut ends of the sleeving. It's what I've been doing on my wiring harness, which is all sleeved in the same sort of braided sleeving.
The 3:1 stuff is typically lined with adhesive, making it nice for this sort of thing. I've been using more typical 2:1 as it's been hard to find 3:1 anywhere.


The 3:1 stuff is typically lined with adhesive, making it nice for this sort of thing. I've been using more typical 2:1 as it's been hard to find 3:1 anywhere.

alright... rear sets are almost done, go them mounted both shifter and brake side... also have to shave anything that does nto support them or help shift off... then they will be ready for powder... also got the side of the engine case cut out, for the jack plate for my oil cooler, now my oil filter sticks out about 1.5 in further than stock, so i cut it out to fit it still... looks cool... wrapped up the wires earlier... that will do for the night... next i will pop on the oil cooler and figure out how i want to run my cooler lines.... of course this is still mock up and not final assembly so of course all the bolts will be replaced and polished, every thing else will get powdered... also mounted my tail/brake lights...
oil filter cut out

brake side rear set:


tail lights


oil filter cut out
brake side rear set:
tail lights