Yamaha DT3 Tracker - Small Bike, Large Ambition

Intake update!

After following the rabbit hole Teazer sent me down, the researched turned out quite fruitful!
I bought an eBay intake for a Yamaha Blaster 200 in hopes the math and form factor would prove out before dumping $130 on a V-Force reed cage. This setup mostly checks out, with the exception of the carb angle and the distance between the lower bolts and new carb.

I'll likely use some flanged bolts with a smaller hex diameter and massage the carb ever so slightly to gain some clearance.

I don't think the carb angle is bad enough to affect the intended function, but I foresee some float-bowl adjustments to make sure. Otherwise, I'll look at an angled spacer or something of that nature.

You'll also notice the new carb swapped in real simple. That's the stock throttle cable in there for mock up. Literally just unthreaded the adapter and unsnapped the cable from the OEM Mikuni round-carb and screwed it into the top of this 32mm Mikuni flat slide, snapped in the cable, and away we go!


PXL_20210324_195913832.jpg

PXL_20210324_200326355.jpg

PXL_20210324_195923790.jpg


jet2.jpg

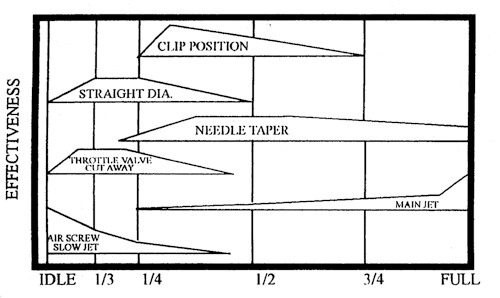
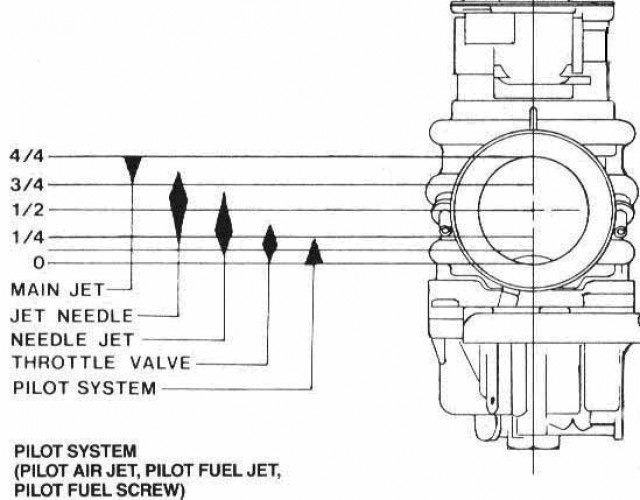
http://www.nightrider.com/bt30/carb_jet_ranges.htm

https://howtomotorcyclerepair.com/how-to-tune-throttle-valve-cutaway/
Carburetor-throttle-position-effect-circuit-Mikuni-e1352384914268.jpg
 
Last edited:
Capturing more info as I'm waiting for my chromoly to arrive for my swingarm build
Possible rear axle option: http://www.oem-cycle.com/forum/viewtopic.php?f=59&t=193

Website that's FULL of good information with dimensions:
http://www.oem-cycle.com/forum


Update:
I've paused on the bike for a while as I've been sorting out that work/play balance. A new track went in close to home and so I've taken some time to enjoy the dirt again with my flat track bike.
I'm also waiting on steel AND trying to get my swing arm pivot bolt removed. That's proven to be an unsuccessful chore thus far.
 
Still waiting on my chromoly....

In the mean time, I pulled the engine and swing arm. Boy I'll tell ya - the seized swingarm bolts put up a fight! Heat and hammers didn't work. Cutting it should've been my first move (way easier).

Next up,
Start making a new subframe and fixturing the swing arm.
IMG_20210523_185748_805.jpg
PXL_20210524_005808467.jpg


Added 9/20/22:
https://www.xs650.com/threads/radian-swingarm-for-a-tracker.18660/
Alternative to look at for swing arm if not too heavy
 
Last edited:
Very limited update (no photos)

The project was on pause for a long while this spring / summer. My chromoly FINALLY came in so I can get started on a swingarm now. However, I just started escrow and now need to pack & move into my first home.
I'm pretty stoked to go from a 10x18 garage to a 3 car garage + 600 sq-ft workshop. I finally have a place where I can have bikes AND a place to work on them. More progress on the DT3 this fall/winter after I get the house settled.
 
Gotta admit I'm a bit jealous of the new garage/shop. But, it has been convenient to just go down the steps to our basement garage. Even if it is shared with the washer and dryer. That DT3 should be out of it in no time!
 
Well that's not gone well!
No updates since August :eek:

I kind of figured this might happen after buying my first house. We've been inundated with projects and randomness the last few months. We termite tented the house, fixed up the jacuzzi, patio roof, repainted all the bedrooms, fixed brickwork on the patio, uprooted about 50 Sago Palms pups, moved a decrepit wood pile, tore down built-in cabinets in the house and smaller garage, patched drywall, planted fruit trees, and then (as of 1/2/2022)...bought a puppy.

I'm beginning to think this DT3 will be done when I retire. In 35 years.
 
For better or worse - I'm not tired but keep running out of time in the day/night! It's been fun honestly.
The biggest stumbling block is that we have a lot of built-in cabinets that are terrible for organizing the garage and shop, so I'm not able to get my welding / fab table setup & organized yet.
Once I can configure the space, it should be quite easy to crank out work.
 
Well, another 6-7 months have passed and I still haven't made an inch of progress on the DT3. The good news is that I haven't forgotten about it nor has my wife come to expect it won't be the next money pit after I wrap up this sunroom insulation project. The bad news is that I'm still neck deep in my sunroom insulation project and it ain't ending until October or so.

Yesterday I also added a couple more wheels to walk around. Picked up a Yamaha TTR50e for my 6 year old and a street legal WR250f for me. The 250 needs a carb service before it's ready, otherwise it's ready to be my do-anything bike while the DT3 is under the knife.

I also blew up my wrung-out 70cc Zuma last week on the way to work, so I'll have to diagnose that eventually. Could be broken reeds.
2001wr250f.jpggarage bikes.jpg2013 TTR50e.jpg

Edit: WR Wheel info (Yes, Yes I know I should work on the DT3 but damn it's fun to dream about new rubber and wheels on old steads!)
https://www.thumpertalk.com/forums/topic/1317151-2007-wr250f-wheel-fitment/
1660693501023.png
 

Attachments

Last edited:
I'm sure I have the worst updates in terms of both timing and alignment with original topic.
Why change now right?
Here's the latest "progress" on the DT3:
Sheldon 11.jpg


I kept hitting hurdles with the DT that required spacers or modification to existing pieces. Most notably making a complete swing arm requires a lot of tube work and pieces turned out.
As a result of this need and my desire to reconnect with my old machining roots, I went on the hunt for a proper shop tool. This 11" lathe should help ensure progress can be made without pause (once I get started again).
 
Last edited:
I don't know what happened to this site, but it looks like they fixed the login error.
I'm back on, and working on the bike again.

For the first time in years I've been able to make real-progress on fabrication. Updates include:
  • 3D Printed Axle Block
  • Machined Aluminum Axle Block Inserts
  • Chromoly Swingarm Sides
  • Farm-quality weld fixture
  • Mock up on the bike!
Next up - I've gotta fix the Trail and Rake before building a subframe and ordering rear shocks.
Currently sitting at 26-27* rake an 150mm trail. I'm aiming to get those numbers down to ~22-24* and 100mm trail.
After that I loosely hang the tail section for cosmetics and build the subframe accordingly.

Swingarm fab1.jpg
Swingarm fab2.jpg
Swingarm fab3.jpg
Swingarm fab4.jpg


US Made Foam and Vinyl
https://www.texasfabricsandfoam.com/denali-vinyl-34-black-pantera/
 
Last edited:
Last night I had an epiphany while setting rake & trail.

I really need to get a mock sprocket on there with the chain so that I can set the ride height & swing arm angle while ensuring the chain doesn't drag on the swing arm at all times.
So now I'm looking at making hubs, which lead me down the path of going to a quick-change setup to keep hardware light and simple.

Time to draw & print a hub for mockup. Note: Must accept a 2.5"x12 thread for common QC replacement nuts:
https://durelleracing.com/index.php?main_page=product_info&cPath=2_59_106&products_id=125
https://loweryracing.com/collections/other-wheel-components/products/quick-change-nut
https://durelleracing.com/index.php?main_page=product_info&cPath=2_59_107&products_id=124
 
There is another consideration that is important when designing the rear suspension. The chain drive is impacted by more than just the chain potentially rubbing on the swingarm, though the fact that this can happen keeps most designs out of trouble even if not considered. The issue is the fact that the chain will be tightest when the countershaft sprocket, swingarm pivot and wheel sprocket are in a straight line. And, of course becomes slack when the arm moves up or down. To make life as friendly as possible for the chain, the straight line condition should occur when the bike is normally loaded. That way, you get the least change in sprocket to sprocket distance as the suspension moves. In most street applications, this will keep the chain from contacting the arm, unless the arm is very large, or the countershaft sprocket is unusually far ahead of the pivot, or the suspension has very long travel. This can be a bit tricky to determine if you don't have an otherwise complete motorcycle to work from. But, you should be able to get acceptably close by determining the sag you want for the rear suspension ( 30 to 50% compressed), and locating the engine so the countershaft falls on that straight line with that sag. Then, you can lift or lower the headstock to fiddle with your rake and trail. Remember, you will need your final rear tire dimension to get the front end where you want it.
Also, in my experience, over large tires really kill handling on smaller bikes. They are also much heavier, which creates another set of performance issues. We've become used to seeing very large tires on modern bikes, but they are generally a very unhappy liability on small, light bikes. Tiny looking tires will provide more traction than you will ever need, and make for a much easier to ride and much more nimble machine.
 
Last edited:
There is another consideration that is important when designing the rear suspension. The chain drive is impacted by more than just the chain potentially rubbing on the swingarm, though the fact that this can happen keeps most designs out of trouble even if not considered. The issue is the fact that the chain will be tightest when the countershaft sprocket, swingarm pivot and wheel sprocket are in a straight line. And, of course becomes slack when the arm moves up or down. To make life as friendly as possible for the chain, the straight line condition should occur when the bike is normally loaded. That way, you get the least change in sprocket to sprocket distance as the suspension moves. In most street applications, this will keep the chain from contacting the arm, unless the arm is very large, or the countershaft sprocket is unusually far ahead of the pivot, or the suspension has very long travel. This can be a bit tricky to determine if you don't have an otherwise complete motorcycle to work from. But, you should be able to get acceptably close by determining the sag you want for the rear suspension ( 30 to 50% compressed), and locating the engine so the countershaft falls on that straight line with that sag. Then, you can lift or lower the headstock to fiddle with your rake and trail. Remember, you will need your final rear tire dimension to get the front end where you want it.
Also, in my experience, over large tires really kill handling on smaller bikes. They are also much heavier, which creates another set of performance issues. We've become used to seeing very large tires on modern bikes, but they are generally a very unhappy liability on small, light bikes. Tiny looking tires will provide more traction than you will ever need, and make for a much easier to ride and much more nimble machine.
and some bikes like my sons Hawk, the chain looks ready to fall off when properly set and the suspension is not loaded as it tightens a lot under load then even more when the swingarm compresses more. So knowing the bike and the amount of movement is very important.
 
All good points!
As you all know, it's a dance. I won't be burning in anything until I can prove out the points you've mentioned. At the moment I'm using stock swingarm pivot, however I'm tempted to nudge the pivot closer to the sprocket to improve the change in tension. We'll see - depends how the other parameters shake out.
In the meantime, I still need a sprocket & hub adapter before I can further set dimensions. Any reason not to aim for loaded ride height at 70% of overall? I feel like that would provide a good baseline, but these short-travel bikes are a bit novel for me.
 
Back
Top Bottom