
We noticed you are blocking ads. DO THE TON only works with community supporters. Most are active members of the site with small businesses. Please consider disabling your ad blocking tool and checking out the businesses that help keep our site up and free.
You are using an out of date browser. It may not display this or other websites correctly.
You should upgrade or use an alternative browser.
You should upgrade or use an alternative browser.
1st time build-1980 Suzuki GS750 Cafe
- Thread starter claygs750
- Start date
Hoosier Daddy
Earache my eye...
No Clay, the Petcock is not what meters the fuel flow to the carb. It is just an on and off valve. Most bikes it's either open or closed manually, you leave it open the whole time you are running. Your vacuum operated unit is just a weak attempt to do it automatically .
The floats needle valve is what meters the fuel flow into the bowl. Controling that is the purpose of the float. If everything is working properly the float raises as the bowl fills and pushes on the needle valve against it's seat and shuts off the flow. The level which this happens is adjusted by setting the float height.
The floats needle valve is what meters the fuel flow into the bowl. Controling that is the purpose of the float. If everything is working properly the float raises as the bowl fills and pushes on the needle valve against it's seat and shuts off the flow. The level which this happens is adjusted by setting the float height.
Attachments
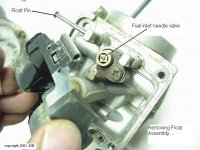
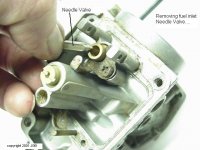
Ok, so I removed the carbs and checked carbs 3 and 4 since those were the only ones leaking and the needle valve looks ok, height of floats are to spec and nothing dirty anywhere since I previously went through everything already with a fine tooth comb. Before I assemble everything and attach to the bike is there anything else I should look at?
mechdesign2k4
Chop-N-Change
depending on the tank (stock GS), the petcock may have an on, off, and prime position. off is self explanatory, on is operated only when there is vacuum present, and prime is the same thing as on but does not require vacuum. Keeping the valve in this position may cause carbs to overflow. faulty petcocks can cause this also. My thought would be first re-check float heights using a method like this bike on center stand...... http://ww2.justanswer.com/uploads/motoforge/2010-08-01_013312_Float_level_adjustment.jpg
Thanks guys, I think I will do what you guys said, but for now I'm putting that off and getting back to mounting the electric. Before I just had the wires temporarily connected so with a gas leak that's probably not a good idea. ")
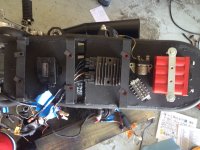
Anyway, I've placed the components under the hump and I wanted to see if you guys think it would be ok. The main concern is the regulator. There's about an inch gap opening in front of it and I'm curious if that would be enough air flow. My only other thought was to mount it upside down above the triangle. What do you guys think of this setup?
Anyway, I've placed the components under the hump and I wanted to see if you guys think it would be ok. The main concern is the regulator. There's about an inch gap opening in front of it and I'm curious if that would be enough air flow. My only other thought was to mount it upside down above the triangle. What do you guys think of this setup?
Attachments
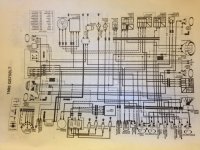
Ok, so I've mounted everything temporarily, but it's not started. I hear it cranking, but when I have one of the spark plugs out still attached to the plug and grounded I'm not seeing a spark from any of the plugs. I've attached a crude diagram how everything is currently connected and the schematic and to me it looks ok. I don't have any of the front or rear end wired currently. I'm running a hot wire from the battery to the solenoid wire going into the harness to try to start it. Please help? I'm clueless here.
Also, before I started this build all the electric worked fine so I'm 99% sure it's something that I did as far as not having it wired correctly.
Thanks.
Also, before I started this build all the electric worked fine so I'm 99% sure it's something that I did as far as not having it wired correctly.
Thanks.
Attachments

Hoosier Daddy
Earache my eye...
All I see in your diagram is the starting and charging circuts... nothing for ignition?
I thought I could bypass the ignition switch for now by applying voltage to the start switch wire (green) then if I see a spark I could then connect the ignition switch. What I'm doing now is taking a loose wire from the positive side of the batter and touching the green connector from the solenoid to the starter disconnect switch. Is that not correct?
Ok...I've been working on this all night and have narrowed it down to and switch problem.
I opened up the ignition switch and the orange wire had 12v going into the kill switch, but when I checked the other o/w wire leaving the kill switch going to the run button it had no power in the run status. I squeezed in a little screw driver to clean the contacts on the kill switch since you can't open it up and then I had 12v going in and out of the kill switch. I hit the button and it actually started and ran for a good solid minute and then died (that's another story) I was very excited!!
So I went to hit the button again and nothing again, checked the wire leaving the kill switch and again no volts. So I was going to replace this ignition switch anyway since its pretty beat up looking so I decided to take it apart, splice the two o/w and orange wires together at the kill switch and then hit the button, but nothing happen.
I pulled the connector and checked and I was still getting 12v at the orange pin and getting 12v at the orange wire and plugging the connector back in, but once I splice the orange and o/w wire together and check there's no volts. So now I'm puzzled because I thought the kill switch was just a switch so if you spice the wires it's bypassed right?? Plus before I did all this I took a wire and shorted the orange, o/w and g/y inside the switch connector and it actually tried to turn over, but now nothing happens even though the orange pin does show 12v.
I'm getting a new ignition unit tomorrow anyway, but any ideas why it won't crank over now when it did before? Could I have messed something up?
Hoosier Daddy
Earache my eye...
What about the starter disconnect switch that's in the clutch lever? That is in the circut after the starter button but before the starter relay so if it is open no current would pass. Make sure you are pulling in the clutch lever to start or you can bypass it like you did the kill switch by jumpering the Green / Yellow wires
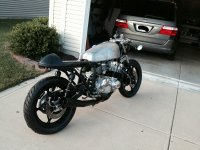
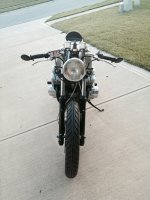
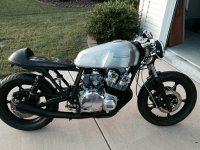
I haven't posted in awhile,but besides a little carb work, upolstry for the seat and matte black paint for the tank I might be on the road in 2 weeks.
Attachments


danejurrous
Been Around the Block
Bike is looking awesome man!
bananas
Been Around the Block
I've seen another build recently where the guy welded a thin gauge plate between the frame tubes. You could also try fabbing up a rear hugger like on a modern sportsbike. If the tolerances are tight enough it'll mimic the shape of the rear wheel and shouldn't be too noticeable.


