Honda CB200 74' cafe/brat Australia

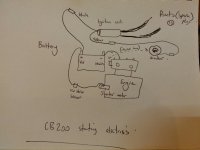
No you don't need a stator to start. All you need is 12 volts into the coil and check 12 coming out.

Suck squeeze bang blow
1: check compression
2. Make sure you have clean carbs and fuel
3. Test coil make sure you have good resistance through the coil and through the plugs.
4. Check to see capacitor is good.
5. Pull plug and hook the plug wire up ground to the engine turn over see if you have spark. If so install plugs, turn fuel on, choke carbs, start her up...


Sent from my iPhone using Tapatalk
 
Thanks a heap tex.

Going to source a compression gauge tomorrow. Will also buy some carb clean solution whilst at it, looking forward to the therapeutic pull down and rebuild of the carb's. Would you recommend buy the kit or just reassemble?

In point 5, I would remove one of the plugs. With the plug wire just make contact on the engine to see if it throws a spark therefore the circuit is complete? Turning over is as simple as kicking the kick starter? (yes im a noob haha)
 
lukeglasso said:
Thanks a heap tex.

Going to source a compression gauge tomorrow. Will also buy some carb clean solution whilst at it, looking forward to the therapeutic pull down and rebuild of the carb's. Would you recommend buy the kit or just reassemble?

In point 5, I would remove one of the plugs. With the plug wire just make contact on the engine to see if it throws a spark therefore the circuit is complete? Turning over is as simple as kicking the kick starter? (yes im a noob haha)
of course also check the oil before starting...yes you can kick start it. We clean our carbs in an ultrasonic cleaner.


Sent from my iPhone using Tapatalk
 
Success!!

Thanks a bunch Tex for your advice.

1. Cleaned the carb's with appropriate cleaner and compressed air.
2. Borrowed my brothers CB100 tank which is clean with fresh fuel, lines and filter.
3. Drained and replaced fresh new oil.
4. Fitted the handle bars to aid in throttle use.
5. Fitted the wiring. Originally with just the Coils, battery and plugs I was unable to kick it over. It took a couple of days looking at schematics then 10pm tonight thought about running a (+)pos wire through the 12v solenoid, and on to the starter motor. Also attached the ground wire through the contact breaker. This is the result.

I dont know when the bike was last started. The previous owner never saw it running!

http://youtu.be/dX6gNSUNcBI

Half choked and she went :) Im very happy and satisfied the project can now move forward. Living by my moto of 'trial and error'. Very rewarding

Also attached is a very comical version of my wiring to kick the motor over. I will aim to provide a more formal diagram soon
 

Attachments

  • 20141014_153245_HDR_resized.jpg
    20141014_153245_HDR_resized.jpg
    832.9 KB · Views: 257
lukeglasso said:
Success!!

Thanks a bunch Tex for your advice.

1. Cleaned the carb's with appropriate cleaner and compressed air.
2. Borrowed my brothers CB100 tank which is clean with fresh fuel, lines and filter.
3. Drained and replaced fresh new oil.
4. Fitted the handle bars to aid in throttle use.
5. Fitted the wiring. Originally with just the Coils, battery and plugs I was unable to kick it over. It took a couple of days looking at schematics then 10pm tonight thought about running a (+)pos wire through the 12v solenoid, and on to the starter motor. Also attached the ground wire through the contact breaker. This is the result.

I dont know when the bike was last started. The previous owner never saw it running!

http://youtu.be/dX6gNSUNcBI

Half choked and she went :) Im very happy and satisfied the project can now move forward. Living by my moto of 'trial and error'. Very rewarding
awesome!


Sent from my iPhone using Tapatalk
 
Congratulations! That first fire is a huge rush of excitement and relief. Kudos for getting it done before going further.
 
Now pull the tappet covers and make sure you are getting oil to the top of the engine...we like to start it after we pull the covers just to make sure


Sent from my iPhone using Tapatalk
 
Also after you enjoy your success pull the right side cover and look up the procedure for removing and cleaning the centrifugal filter.


Sent from my iPhone using Tapatalk
 
Vroooom!! Congrats! It's a little more pleasant if you let the engine cool before you start it and then pull the tappet covers. That oil is hot
 
Thanks guys, is a great feeling.

Barnburner thankyou for your initial words to get her started now prior to moving on :)

Will do tex, and will update in the coming days.
 
Thanks 1sttimer haha, maybe that answered my question to why some people recommend safety glasses when removing them
 
Texasstar said:
Also after you enjoy your success pull the right side cover and look up the procedure for removing and cleaning the centrifugal filter.


Sent from my iPhone using Tapatalk

Pulled the tappet covers today. All was well with fresh oil under the covers. Looking through the manual I came across a procedure to remove the extreme rear left and right acorns whilst running. Im sure this is the same as the tappet cover removal.

Tomorrows task is to clean the filter.
 

Attachments

  • 20141014_155123_HDR_resized.jpg
    20141014_155123_HDR_resized.jpg
    481.2 KB · Views: 262
lukeglasso said:
Pulled the tappet covers today. All was well with fresh oil under the covers. Looking through the manual I came across a procedure to remove the extreme rear left and right acorns whilst running. Im sure this is the same as the tappet cover removal.

Tomorrows task is to clean the filter.
yep you can do that but make sure you torque the back to spec


Sent from my iPhone using Tapatalk
 
What do you guys think regarding custom exhausts. Before I take the frame to get cut, modified then powder coated should I first get a custom exhaust fitted? I am wanting this style exhaust (cb350 - Christian's @ Modern Motorcyle Company) or a 2-1 reverse cone.
 

Attachments

  • exhaust4.jpg
    exhaust4.jpg
    181.2 KB · Views: 267
I think SOP should be to source your components and fit them on the rough bike as a dry run before breaking every down to do powder or paint. That sort of stuff should always be last because inevitably you'll want to change something or run into a problem fitting a component. It seems like there's always at least 1 new issue for every 1 you address with a customization. For example, you may find that with a custom exhaust you'll need to do a custom mount.
 
BarnBurner said:
I think SOP should be to source your components and fit them on the rough bike as a dry run before breaking every down to do powder or paint. That sort of stuff should always be last because inevitably you'll want to change something or run into a problem fitting a component. It seems like there's always at least 1 new issue for every 1 you address with a customization. For example, you may find that with a custom exhaust you'll need to do a custom mount.
totally agree we have yet to powdercoat a frame. We have used the epoxy appliance paint and the ceramic engine paint for frames. We have made many mods to the frame even after paint.


Sent from my iPhone using Tapatalk
 
Have you read how to build a functional Café racer that Sonreir penned?


Sent from my iPhone using Tapatalk
 
Texasstar said:
Have you read how to build a functional Café racer that Sonreir penned?

No i have not Tex, will look for it now. Wow good reading thankyou. Have only skimmed but will read in the coming days. Also reading so far I am very interested about the reduction in weight as "free power". Another hobby of mine is hiking, and being ultralight not only conserves energy but allows further distance covered. Same concept, cutting down to bare essentials could come in very helpful with this build. Im back at work for a week but any spare time im going to refresh your build for my next approach :)

Sent from my iPhone using Tapatalk
[/quote]
BarnBurner said:
I think SOP should be to source your components and fit them on the rough bike as a dry run before breaking every down to do powder or paint. That sort of stuff should always be last because inevitably you'll want to change something or run into a problem fitting a component. It seems like there's always at least 1 new issue for every 1 you address with a customization. For example, you may find that with a custom exhaust you'll need to do a custom mount.

Couldn't agree more BarnBurner. Its frame, seat pan and exhaust as my next to do's in that order. Was hoping for 1 drop to the weld shop but could be a few!! Or just learn to weld from my old man who's background was a boiler maker.
 
Whilst I procrastinate, educate myself, read and research more for this build Im moving forward working on rebuilding the front end forks and both wheels to progress including relacing. This should keep me busy whilst my frame will be shaped.

Forks dissembled and found a nice surprise being one of the fork spring broken.

Now to begin the sanding and polishing. I have looked at Swan's method into this process. Am trying to acheive same has his results below

swan said:
Busy week, out of town with little time to touch the project. I managed to sand and polish the fork lowers, front hub, primary covers and dissembled rear hub as well as picked up new bearings front and rear.

You know the drill: paint stripper, clean, 400, 600, 800, 1000, 1500 grit sandpaper wet and dry and polish with black, brown and white polishing compound with lacquer thinner clean between all.

I will have a full day off on Thursday dedicated to working on bikes and have another pile of new parts ready to go.
DSCN6262.jpg

DSCN6264.jpg

DSCN6265.jpg

My disassembly, im not 100% on those fork tubes as the rust has decent 1mm cavities.
 

Attachments

  • 20141016_115901_HDR_resized.jpg
    20141016_115901_HDR_resized.jpg
    751.8 KB · Views: 263
Back
Top Bottom