We noticed you are blocking ads. DO THE TON only works with community supporters. Most are active members of the site with small businesses. Please consider disabling your ad blocking tool and checking out the businesses that help keep our site up and free.
You are using an out of date browser. It may not display this or other websites correctly.
You should upgrade or use an alternative browser.
You should upgrade or use an alternative browser.
Honda CB200 74' cafe/brat Australia
- Thread starter lukeglasso
- Start date


lukeglasso
Active Member
Re: Honda CB200 build
Mate awesome stuff thank you, that's very reassuring. I will expect the stator over the coming days when I kick the bike over and run a voltmeter over it. Thank you for the pictures as well.
I was just looking at Sonreir's barebones loom but his custom jobs definitely look like the way to go. I will look at what you have suggested as its proven for our bikes already.
1sttimer
Over 1,000 Posts
Re: Honda CB200 build
Yeah my biggest problem with the bike has been charging. The stators go bad over time for some reason, and Sonreir and I have come to the conclusion over some time that a new stator is probably my best bet. Right now I can ride my bike for about 30 miles then the lights start to dim and stuff.
lukeglasso said:Mate awesome stuff thank you, that's very reassuring. I will expect the stator over the coming days when I kick the bike over and run a voltmeter over it. Thank you for the pictures as well.
I was just looking at Sonreir's barebones loom but his custom jobs definitely look like the way to go. I will look at what you have suggested as its proven for our bikes already.
Yeah my biggest problem with the bike has been charging. The stators go bad over time for some reason, and Sonreir and I have come to the conclusion over some time that a new stator is probably my best bet. Right now I can ride my bike for about 30 miles then the lights start to dim and stuff.
lukeglasso
Active Member
Re: Honda CB200 build
Oh wow, have you tried a new stator on your bike yet or replacing them after a period of time? Would be interesting to see the voltage drop over that 30mins on a digital display vs the purchase of a new stator. Do you find that keep the bike at a higher Rev will keep the lights functioning longer?
1sttimer said:Yeah my biggest problem with the bike has been charging. The stators go bad over time for some reason, and Sonreir and I have come to the conclusion over some time that a new stator is probably my best bet. Right now I can ride my bike for about 30 miles then the lights start to dim and stuff.
Oh wow, have you tried a new stator on your bike yet or replacing them after a period of time? Would be interesting to see the voltage drop over that 30mins on a digital display vs the purchase of a new stator. Do you find that keep the bike at a higher Rev will keep the lights functioning longer?
1sttimer
Over 1,000 Posts
Re: Honda CB200 build
I'm saving to buy a ricks stator. Still running on the stock unit. I live 2 miles from work so one charge lasts me a week")
Yep, there's kind of a trial and error process with the wires on your stator going to your R/R and getting the pink wire in the right position is the key.
Did I mention that I still have a few loose ends to wrap up on my 175?
lukeglasso said:Oh wow, have you tried a new stator on your bike yet or replacing them after a period of time? Would be interesting to see the voltage drop over that 30mins on a digital display vs the purchase of a new stator. Do you find that keep the bike at a higher Rev will keep the lights functioning longer?
I'm saving to buy a ricks stator. Still running on the stock unit. I live 2 miles from work so one charge lasts me a week
Yep, there's kind of a trial and error process with the wires on your stator going to your R/R and getting the pink wire in the right position is the key.
Did I mention that I still have a few loose ends to wrap up on my 175?
lukeglasso
Active Member
Re: Honda CB200 build
Noted taken thanks man. On the other hand what is left to wrap up?
Thanks Texasstar, 1sttimer referred me to your page also and have already copied some of your processes. Much to learn from you guys. Im just trying the get the motor at least kicked over before moving forward. Would you both suggest not only kicking over but at least a ride up the street to test the gears before stripping down?
1sttimer said:I'm saving to buy a ricks stator. Still running on the stock unit. I live 2 miles from work so one charge lasts me a week
Yep, there's kind of a trial and error process with the wires on your stator going to your R/R and getting the pink wire in the right position is the key.
Did I mention that I still have a few loose ends to wrap up on my 175?
Noted taken thanks man. On the other hand what is left to wrap up?
Thanks Texasstar, 1sttimer referred me to your page also and have already copied some of your processes. Much to learn from you guys. Im just trying the get the motor at least kicked over before moving forward. Would you both suggest not only kicking over but at least a ride up the street to test the gears before stripping down?
1sttimer
Over 1,000 Posts
Re: Honda CB200 build
You should be able to run through the gears with the motor out of the bike. If it needs nudging you can mount the engine, connect the rear wheel with the chain and turn the back wheel manually with your hand to engage the transmission.
Set the motor on the edge of a table with about 3" of the left side of the motor hanging off the table. Give yourself enough room to actuate the shift lever. Then give it a go.
lukeglasso said:Noted taken thanks man. On the other hand what is left to wrap up?
Thanks Texasstar, 1sttimer referred me to your page also and have already copied some of your processes. Much to learn from you guys. Im just trying the get the motor at least kicked over before moving forward. Would you both suggest not only kicking over but at least a ride up the street to test the gears before stripping down?
You should be able to run through the gears with the motor out of the bike. If it needs nudging you can mount the engine, connect the rear wheel with the chain and turn the back wheel manually with your hand to engage the transmission.
Set the motor on the edge of a table with about 3" of the left side of the motor hanging off the table. Give yourself enough room to actuate the shift lever. Then give it a go.
Texasstar
Can't is a four letter dirty word
Re: Honda CB200 build
Sent from my iPhone using Tapatalk
60k on a 200 is a well loved bike...we just ran through the gears on the bench.1sttimer said:FYI 60k kilos is a lot of wear, but sometimes I hear you actually want a bike with lots of miles because it has stood the test and been kept running. This compared to a bike with 2k on the clock that has just been sitting.
Sent from my iPhone using Tapatalk
1sttimer
Over 1,000 Posts
Re: Honda CB200 build
Seriously. Commuter for sure!
Texasstar said:60k on a 200 is a well loved bike...we just ran through the gears on the bench.
Sent from my iPhone using Tapatalk
Seriously. Commuter for sure!
lukeglasso
Active Member
Re: Honda CB200 build
Will try just that, cant wait to kick it over.
I have been pondering about the wiring harness and came across Sonreir's barebones harness just to get the bike started. I have order the ignition coil, R&R and some NGK plugs. Just waiting on the caps, fuel lines and kill switch. From the bare bones harness I will add to it once the bike is finished. I think I will attempt the harness myself as have auto electricians in my family, could save alot of money doing so. But if all else fails I will get Matt to make one
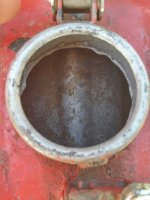
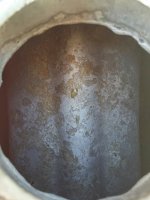
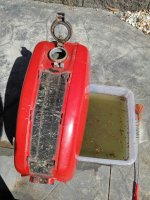
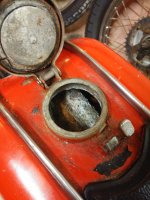
Good news on the tank progress today following the use of deox-c. Tank had 3 days baking with the solution in the tank. A shake twice a day with the 2nd day resting upside down to work on the lid. Here are the results. Corrosion has lifted but still not shiny like new. I used a beer bottle brush to get deep into the tank. There still remains small patches of rust. Im going to add some fuel to the tank and filter to see if any sediment passes through.
1sttimer said:You should be able to run through the gears with the motor out of the bike. If it needs nudging you can mount the engine, connect the rear wheel with the chain and turn the back wheel manually with your hand to engage the transmission.
Set the motor on the edge of a table with about 3" of the left side of the motor hanging off the table. Give yourself enough room to actuate the shift lever. Then give it a go.
Will try just that, cant wait to kick it over.
I have been pondering about the wiring harness and came across Sonreir's barebones harness just to get the bike started. I have order the ignition coil, R&R and some NGK plugs. Just waiting on the caps, fuel lines and kill switch. From the bare bones harness I will add to it once the bike is finished. I think I will attempt the harness myself as have auto electricians in my family, could save alot of money doing so. But if all else fails I will get Matt to make one
Good news on the tank progress today following the use of deox-c. Tank had 3 days baking with the solution in the tank. A shake twice a day with the 2nd day resting upside down to work on the lid. Here are the results. Corrosion has lifted but still not shiny like new. I used a beer bottle brush to get deep into the tank. There still remains small patches of rust. Im going to add some fuel to the tank and filter to see if any sediment passes through.
Attachments
cyclefreak
Over 1,000 Posts
Re: Honda CB200 build
Looking forward to see how this one turns out!
Looking forward to see how this one turns out!
Barnburner
Coast to Coast
Re: Honda CB200 build
Tank looks much better! I just read up on deox-c and it sounds a lot like the "Evapo-Rust" and Metal Rescue" products I've used in the past to get rust out of a tank. It's great when a biodegradable, nontoxic chemical can actually do the job well. It looks like some of your rust was pretty deep into the tank metal. I'd definitely do a double check for any pinholes before painting.
As for the wiring harness - you should be fine doing it yourself. I have almost no previous electrical experience other than wiring a few outlets around my house and I wired up my CL350 using a simplified diagram I put together and with brand new 14 gauge wire, bullet connectors and abrasive-resistant sheathing. It performs and looks great. It really wasn't that hard once I figured out my diagram. I just laid out wire on the bike from component to component to be sure the lengths were right, then cut and sheathed everything together, then spent some time crimping the connectors while watching a movie. A tip I will add is get a proper crimper like the one from VintageConnections.com. Before I had made my new harness I had used a cheap crimper that I had laying around and a few of those terminals ended up coming loose from the wire. The ones done with the new crimper are solid.
lukeglasso
Active Member
Re: Honda CB200 build
Thanks Barnburner, looks much better doesn't it. I agree not having something toxic is a nice deed on my part let alone handling the stuff.
Same same with the electrical stuff. I had a similar experience with the shitty crimper's prior to decking out my boat I bought a pair of those crimper's. Best advice I was given was buying a pair of them! Thanks for the tip on the 14 gauge wire to, I was researching 10's so appreciate your advice.
BarnBurner said:Tank looks much better! I just read up on deox-c and it sounds a lot like the "Evapo-Rust" and Metal Rescue" products I've used in the past to get rust out of a tank. It's great when a biodegradable, nontoxic chemical can actually do the job well. It looks like some of your rust was pretty deep into the tank metal. I'd definitely do a double check for any pinholes before painting.
As for the wiring harness - you should be fine doing it yourself. I have almost no previous electrical experience other than wiring a few outlets around my house and I wired up my CL350 using a simplified diagram I put together and with brand new 14 gauge wire, bullet connectors and abrasive-resistant sheathing. It performs and looks great. It really wasn't that hard once I figured out my diagram. I just laid out wire on the bike from component to component to be sure the lengths were right, then cut and sheathed everything together, then spent some time crimping the connectors while watching a movie. A tip I will add is get a proper crimper like the one from VintageConnections.com. Before I had made my new harness I had used a cheap crimper that I had laying around and a few of those terminals ended up coming loose from the wire. The ones done with the new crimper are solid.
Thanks Barnburner, looks much better doesn't it. I agree not having something toxic is a nice deed on my part let alone handling the stuff.
Same same with the electrical stuff. I had a similar experience with the shitty crimper's prior to decking out my boat I bought a pair of those crimper's. Best advice I was given was buying a pair of them! Thanks for the tip on the 14 gauge wire to, I was researching 10's so appreciate your advice.
Barnburner
Coast to Coast
Re: Honda CB200 build
I just double checked and apparently it was 16 gauge I used. Sorry for the misinformation. I got a deal on the wire from another DTT member on here (Mark13018) so that's what I went with. I think you could go even smaller though. I believe Matt from SparckMoto does 18 gauge wire for most circuits. Also, I just went and looked at your diagram again. Not sure if you included a fuse or not, but you will definitely need one.
I just double checked and apparently it was 16 gauge I used. Sorry for the misinformation. I got a deal on the wire from another DTT member on here (Mark13018) so that's what I went with. I think you could go even smaller though. I believe Matt from SparckMoto does 18 gauge wire for most circuits. Also, I just went and looked at your diagram again. Not sure if you included a fuse or not, but you will definitely need one.

lukeglasso
Active Member
Re: Honda CB200 build
Thanks BB. From what i have been reading around 10-12amp wire and maybe a bit bigger off the battery. Can get the automotive 11 colour stuff to match the original harness but simplified. Will be running LED blinkers with the LED flasher and a LED 5" headlight so not a lot of effort required in wattage terms. I'm going to keep the bike kick start only i think. What have you guys done?
Sonreir mentioned for the barebones "I recommend a 5A fuse on the black wire leading to the coils" so thanks for reminding me.
Just waiting for the parts in the mail then will video the start up.
Thanks 1sttimer, that harness looks epic. If mine can look half as clean and nice as yours I will be very satisfied.
lukeglasso
Active Member
Re: Honda CB200 build
It has been a little bit of a wait over the past 2 weeks waiting for parts from America, England, Asia and here in Australia. Not a lot of progress has occurred although have put the engine back in the frame, forks and wheels back on to help in turning over the engine. Hopefully this weekend I have some time to make the bare bones system to kick her over.
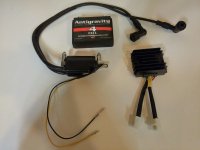
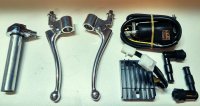
Here are some of the goodies. Controls were ordered along side the ignition coil and RR to save postage.
It has been a little bit of a wait over the past 2 weeks waiting for parts from America, England, Asia and here in Australia. Not a lot of progress has occurred although have put the engine back in the frame, forks and wheels back on to help in turning over the engine. Hopefully this weekend I have some time to make the bare bones system to kick her over.
Here are some of the goodies. Controls were ordered along side the ignition coil and RR to save postage.
Attachments
lukeglasso
Active Member
Re: Honda CB200 build
The battery has arrived and ive had half a day to tinker. Im feeling a tad beaten today as cant get my head around turning her over.
Steps I took today:
1. Barebones electrical circuit connected with the ignition coil and battery.
2. Fuel tank with lines and filter ran to carb's
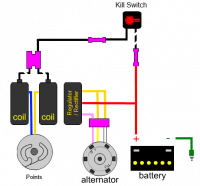
With the kill switch disengaged and the the circuit complete I was unable to kick her over. However im very very novice to this procedure and I feel I have missed things. I am asking for the community to please provide some basic help with the procedures they do for start up. Right back to the initial basic ideas for the electrical circuit. Do I need to connect the R&R for this.
One thing I must mention is, I just want to kick her over. Does this mean I need to connect the stator. I was hoping I just need to have the battery, kill switch, ignition coil and spark plugs to ignite the fuel then once turned over engage the kill.
One important lesson I have learnt here is to get the bike started prior to any break down. But that how I learn
The battery has arrived and ive had half a day to tinker. Im feeling a tad beaten today as cant get my head around turning her over.
Steps I took today:
1. Barebones electrical circuit connected with the ignition coil and battery.
2. Fuel tank with lines and filter ran to carb's
With the kill switch disengaged and the the circuit complete I was unable to kick her over. However im very very novice to this procedure and I feel I have missed things. I am asking for the community to please provide some basic help with the procedures they do for start up. Right back to the initial basic ideas for the electrical circuit. Do I need to connect the R&R for this.
One thing I must mention is, I just want to kick her over. Does this mean I need to connect the stator. I was hoping I just need to have the battery, kill switch, ignition coil and spark plugs to ignite the fuel then once turned over engage the kill.
One important lesson I have learnt here is to get the bike started prior to any break down. But that how I learn