Follow along with the video below to see how to install our site as a web app on your home screen.
Note: This feature currently requires accessing the site using the built-in Safari browser.
We noticed you are blocking ads. DO THE TON only works with community supporters. Most are active members of the site with small businesses. Please consider disabling your ad blocking tool and checking out the businesses that help keep our site up and free.
The past week, I got a few things done. I was able to glass my seat, and added 3 layers of bondo. I'm not quite done smoothing it out yet though. Yesterday I figured out where to mount the rear turns and I cut off some tabs. Now for the picutres:
Here's the seat glassed with 3 layers of cloth drying out in the sun. I cut around the seat before it was fully cured with a razorblade and the excess came off easily.
Here it is mocked up on the frame with the tank. Once painted, I think it'll look dope!
Here's where turns are going to be mounted. I had to cut the bottom half of those rectangular tabs. The part with the big circle that extends behind it is now gone. It stuck out too much and looked ugly. I'm not sure I'm sold on using the stock turn signals so I think I'm going to buy a cheap set on eBay.
Failure today. I shot some self etch primer on the tank today and it just revealed how ugly of a body job I did on it. The bondo wasn't completely smooth and it had a LOT of pinholes in it. I'm going to have to wet sand the primer on the tank, then add more layers of bondo to smooth everything out. I plan on using filler primer too so hopefully that helps.
You need some filling or glazing putty to fill in the pinholes more bondo will just do the same thing. Get a tube of nitrostan or something at the local auto store and put a thin glazing of that on there to fill in the holes.
Worked on the bike for about 4 hours now and this is what I was able to accomplish:
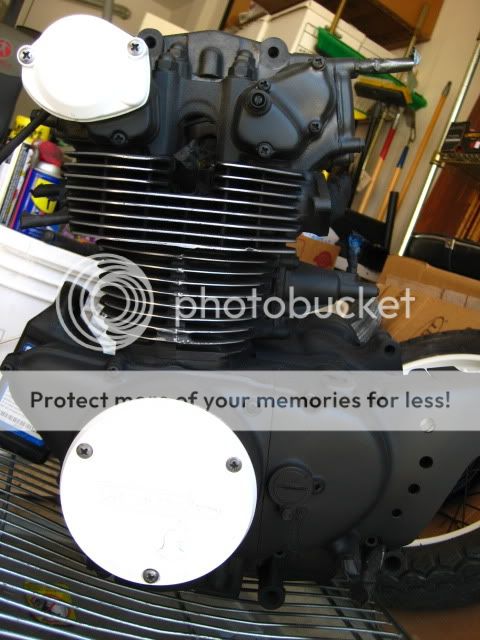
Bought some paint so I added one coat to the engine. Here's a close up to where the tapered holes are. Looks sezzzy.
I painted the trees with appliance epoxy because I wanted something bullet proof. It has a textured look to it which I like. Looks tough.
Here's the tank and seat drying in the sun. I wet-sanded the tank with 220 grit sandpaper. Then I got some spot & glazing putty to fill in some small dents where the body filler didn't fill over and the pinholes as stated in the previous posts. I sanded the seat a bit as well. Then I sanded down the glazing putty on the tank, then added another layer, then sanded again. The thank looks a lot better and it's so smooth! I actually enjoy wetsanding a lot more than dry sanding. Next week I am going to complete the tank and shoot the frame again with more color so I can call up a body shop to see how much they'll charge me to clear it.
It's so hot here that I'm all sticky now. Time for a shower, then after that, spend some time with the future wifey .
I've been working for 4 hours on the tank and seat again this morning. The gas tank never fails to piss me off. For the past week I've been prepping it for paint: smoothing out the pinholes and adding more bondo and such. It takes so much damn time. So I threw some filler primer on it today, but that shit is a waste of money. Filler primer does nothing but give you a rough surface.
So anyway on the emblem mounts for my tank, I wanted to make it smooth so I put more body filler on it a few days ago. it felt level and what not after sanding, but when I threw on paint, after priming of course, I could still see the dents. Holy shit. I resorted to stripping the tank. It's a big mess right now. The edges of where I applied bondo are coming off. This is by far the shittiest and noobiest job I've ever done. What a waste of time. So now I'm going to sanding the shit out of my tank on monday, filling what needs to fixed with bondo, then prime and paint. What a gay experience. I had no knowledge before what so ever but now I'll do it better this time. Hell, I don't give a shit if it comes out rough on monday. The DIY approach is full of failure.
What have you been sanding it with? I mean, a sander, by hand? When sanding hold it up to the light occasionally and that will reveal imperfections with shadows. Something to watch out for is that it may feel smooth but it won't be shaped right. It's hard to describe in text. Post some pics.
What have you been sanding it with? I mean, a sander, by hand? When sanding hold it up to the light occasionally and that will reveal imperfections with shadows. Something to watch out for is that it may feel smooth but it won't be shaped right. It's hard to describe in text. Post some pics.
I've been doing it by hand and I know exactly what you mean. Even though it felt smooth, shape wasn't quite right. I stripped the tank already but there's still filler primer on it so I'll have to sand it really well, then re-bondo some areas. It's going to take a lot of work but I just need to get it done already. Thanks for the tip man!
Here are some pictures from these weekend's progress.
As you all know I failed at bondo-ing my tank. Here you can see where I put bondo on to cover the badge mounts or whatever through the paint. These were taken right after a second coat of paint. I really like the color.
Fail. This is what I got after rushing through stripping the tank.
So a couple days after, I sanded it all down with a coarse grit sanding sponge. Then I reapplied more bondo and sanded it down. I did this for a few more times. Then I put on some spot & glaze putty and sanded that down as well and got this. I don't have a picture of it, but I sprayed some self-etch primer on the tank to check out how the bondo smoothes out and it looks a lot better. If I can't get it perfect, I'm not going to stress it.
While I waited for the bondo to cure on the tank, I cut out one lever out of 1/4" 6061 Aluminum for my rear sets. I used a jigsaw, but it took some time so I only go to cut out one. It looks pretty raw right now, but I will be smoothing down the edges as best as I can, drill holes, then polish it up.
Re: My First 1974 cb450: Cafe Project! *Update 6/2*
I did more body work on the tank and seat. I'll be finishing them up in a couple weeks.
I also painted the points and alternator cover white. Here's a pic.
I'm going to be leaving on Friday to Florida then to the Bahamas so I'm pretty stoked about that. I won't be able to do much work on my bike for now either since this is finals week. I'm kind of getting lazy too. But I guess I have other priorities. I really want to start putting this thing back together! Once I get back from the trip, I'm going to order two cans of two-part clear.
Re: My First 1974 cb450: Cafe Project! *Update 6/2*
Oh man, that engine looks awesome! What kind of paint is the black? It would have been sweet if you could have done the fin edges in white to match the covers but I know that would be near impossible. Still looks great.
Oh man, that engine looks awesome! What kind of paint is the black? It would have been sweet if you could have done the fin edges in white to match the covers but I know that would be near impossible. Still looks great.
I was contemplating about that regarding the fins! & thank you! I also painted the starter motor as well but it'll be installed once it dries out. I used DupliColor Engine Enamel Low Gloss Black. I wish this paint was a lot harder though.
I got back from the Bahamas yesterday. It's beautiful out there, but there's always that good feeling of being home. It's funny how my build got pushed all the way to page three already! And there's so many other 450 builds out there, which is awesome. Looks like we're taking over.
Anyway, I bought more gold Bondo and I must say, "Wow!". It's so much creamier and easier to work with than the last batch I had. Perhaps I didn't seal the container enough. Anyway, I gave the tank another go. The spots that need work have a fresh layer of bondo over it and it will be sanded tomorrow. Such a painstaking process.
After a couple weeks of not really getting much done on the bike, I feel confident in moving forward again. I've been having trouble with the tank lately with shaping and what not, but today I'm finally satisfied with it. Here is the tank primed with it's HUGE knee dents.
The tank will be wet sanded again with 500 grit just to smooth it down a bit. I'll be laying it down with paint once I get home from class. I also did some work on the side covers. Fully stripped and drilled. Here they are:
I like how the side covers look like they have an face. I have the emblems which will be super duper glued on because I broke the mounting tabs lol.
This site uses cookies to help personalise content, tailor your experience and to keep you logged in if you register.
By continuing to use this site, you are consenting to our use of cookies.


") .
.