
We noticed you are blocking ads. DO THE TON only works with community supporters. Most are active members of the site with small businesses. Please consider disabling your ad blocking tool and checking out the businesses that help keep our site up and free.
You are using an out of date browser. It may not display this or other websites correctly.
You should upgrade or use an alternative browser.
You should upgrade or use an alternative browser.
Next Project - Plate Alloy 5.5m Xtracab
- Thread starter XS750AU
- Start date
XS750AU
Coast to Coast
I am thinking that I will vinyl wrap it. Any thoughts????cxman said:that is some awesome work
you should be very proud
your going to need a big powder coat over
a few layers of zinc chromate then some nice .....
Wow. Cheers!
well applied vinyl wrap will stay on over 100mph they put it on all the offshore race boats
i did rip one decal off but it was in rough seas at over 80mph
that said i would still be worried about corrosion creeping under it
i would still rather see you lay a few layer of epoxy zinc chromate powdercoat everywhere
you cant get better application than either submerge or electrostatic
i did rip one decal off but it was in rough seas at over 80mph
that said i would still be worried about corrosion creeping under it
i would still rather see you lay a few layer of epoxy zinc chromate powdercoat everywhere
you cant get better application than either submerge or electrostatic
XS750AU
Coast to Coast
cxman said:well applied vinyl wrap will stay on over 100mph they put it on all the offshore race boats
i did rip one decal off but it was in rough seas at over 80mph
CX, I admire your optimism. With a 16 degree deadrise there is no way I want air time!!! ;D
And with 130hp I realistically should only expect 40 knots, so if it is applied correctly and has the edges sealed it could be OK.
Agree that powdercoat would be a better long term solution, but with the difference in dollars I can get the vinyl replaced 4 times for the cost of powder.
XS750AU
Coast to Coast
The aluminium plate used in the kit is grade 5083 which is one of the most corrosion resistant grades available. Many commercial alloy boat leave the plate natural as it is naturally (due to anodised surface) corrosion resistant AS LONG as you avoid electrolysis with dissimilar metals. All my rod holders and cleats are alloy, I am avoiding stainless fittings. The only major stainless item is the anchor winch, which is made from 316 stainless and mounted on nylon isolation pads and bushes to minimise the risk of electrolysis. The other issue is isolating the electrical system from the hull to again avoid electrolysis.cxman said:what do you do about sealing the bilge inside from corrosion?
So in short, the bilge will have about 1.5 cubic metres of buoyancy foam but no coatings. The foam is in sheet form rather than poured so as to avoid crevice corrosion.
XS750AU
Coast to Coast
I decided to contact 3M on the subject of vinyl wrap that is suitable for marine applications. I received a response within 24hrs and it is
"Thank you for your enquiry. We have 2 products that are suitable for boat wraps. For printed graphics I would recommend 3M IJ180mC with 8548G overlaminate and for a coloured wrap the best choice would be 3M 1080 Wrap Film. I have attached product data sheets for both these products.
We do recommend that the edges of the wrap be sealed with 3M 3950 Edge Sealer. It is also important that the wrap be installed only above the static waterline."
Given the 3M support, I am locked in on their products
XS750AU
Coast to Coast
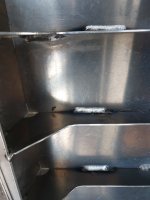
Welding, welding, welding, torturous bending and twisting to get into all the stringers. Not a fun weekend but it has to be done. 2 small bottles of argon consumed.
All stringers are welded.
Keel line is welded in all but the bow and stern bay.
Inner chine is welded in the 2 center bays.
Next weekend should see the inside welded out - I hope.
All stringers are welded.
Keel line is welded in all but the bow and stern bay.
Inner chine is welded in the 2 center bays.
Next weekend should see the inside welded out - I hope.
XS750AU
Coast to Coast
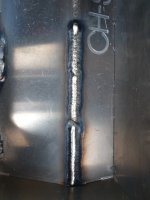
After a frustrating last weekend, I might of finally dialed in the welder and myself.
Last weekend I must of overheated the torch. The teflon liner was melted where it joined the coil and restricting the wire feed. I rebuilt the torch with a new liner, gas diffuser, tip carrier & tip. The wire is now feeding perfectly. Another bit of advice I was given during the week was to have a wet towel and between welds wrap the torch in the wet towel to cool it down. Finally I traded up to the next size of gas bottle. More than 2X the gas for 1.5X the cost. ;D
All this meant I got a lot welded up today.
The inner chine was welded using 100amps
The stringers were welded using 140amps
Both using double pulse on 0.5Hz.
Attachments
SONICJK
Reminds me of...me No, I'm sure of it. I hate him
Looking good!
Nothing more frustrating than a welder that won't weld.
As to vinyl wrap, no issues on a boat above waterline. The wakeboard boat guys do it all the time. Crazy graphics and full wraps are fairly normal and they hold up well.
Only downside is you can't buff out or touchup a scratch.
Nothing more frustrating than a welder that won't weld.
As to vinyl wrap, no issues on a boat above waterline. The wakeboard boat guys do it all the time. Crazy graphics and full wraps are fairly normal and they hold up well.
Only downside is you can't buff out or touchup a scratch.
XS750AU
Coast to Coast
Finished the weld out of the inside on Saturday, the vertical weld for the intermediate frame was interesting and worked best by welding down rather than up. Also zigzagged from frame to side plate with each pulse.
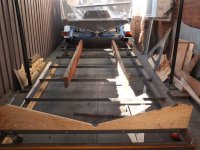
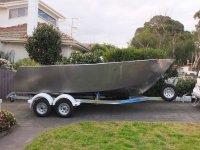
Sunday, jacked up the front and pulled all the plywood stations out except for the rear station. Then I bolted in 2 large wood slabs 8' X 1' x 4" for the hull to slide down. 4 casters were tacked onto the hardback. Then the hull was lowered down onto the slabs, all the hardback jack screws raised so it was rolling on the casters.
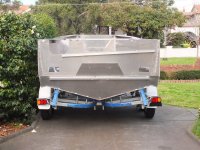
The winching on was an anticlimax. The hull slid off the hardback and onto the trailer beautifully. ;D
Next is to take it up to farm and use a couple of front end loaders to lift and roll so I can weld up the external seams.
Sunday, jacked up the front and pulled all the plywood stations out except for the rear station. Then I bolted in 2 large wood slabs 8' X 1' x 4" for the hull to slide down. 4 casters were tacked onto the hardback. Then the hull was lowered down onto the slabs, all the hardback jack screws raised so it was rolling on the casters.
The winching on was an anticlimax. The hull slid off the hardback and onto the trailer beautifully. ;D
Next is to take it up to farm and use a couple of front end loaders to lift and roll so I can weld up the external seams.
Attachments
stroker crazy
crazy as a fox
Brilliant!
Crazy
Crazy


