Triton Build

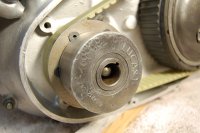
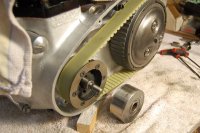
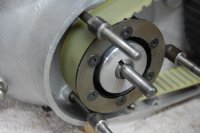
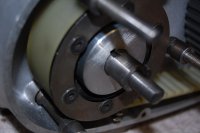
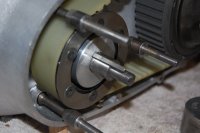
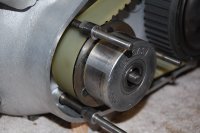
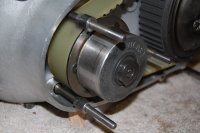
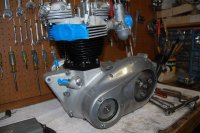
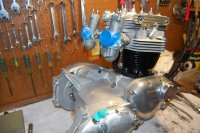
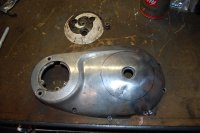
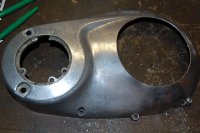
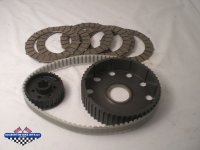
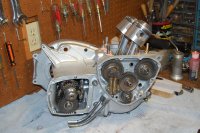
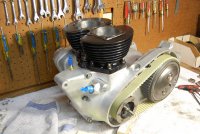
Started to cut up my primary cover for a belt drive application. Don't worry, the primary cover had damage that made it a good candidate for such things. The damage sort of limited the design I could use. This design exposes the clutch pressure plate. Still thinking about what I want to do in the front for more holes or design. For those wondering why? Exposing the primary creates airflow and helps the clutch run cooler. This system has a history of running hot with no airflow.
 

Attachments

  • DSC_0749.JPG
    DSC_0749.JPG
    419.9 KB · Views: 254
  • DSC_0751.JPG
    DSC_0751.JPG
    406.3 KB · Views: 250
Looks good, nice cut. What belt drive system do you plan to use?

I always have liked the idea of primary cover opened up with a Manx triskelion design.
 
I really like the Manx Triskelion design as well. The damage on this one would not allow this design to be clean. The funny thing about the belt drive is it is generic. Does not seem to list a MFG anywhere. It is sometimes referred to as the UK model. Seems most of the websites in the UK stock this one. It uses the stock clutch. I am hoping this is not a issue. The Newberry is about twice the money but uses a upgraded clutch. Some of that $ is the clutch. I purchased mine about a year and a half ago. We will see....
 

Attachments

  • CIMG1834.jpg
    CIMG1834.jpg
    44.7 KB · Views: 244
Points cover arrived yesterday. Will be working on the primary cover more this weekend as well as cleaning up the hubs for a wheel rebuild.
 

Attachments

  • DSC_0752.JPG
    DSC_0752.JPG
    427.5 KB · Views: 268
Bottom end is pretty much done. Some issues with the belt drive kit. Nothing a friend and a lathe cannot cure.
 

Attachments

  • DSC_0795.JPG
    DSC_0795.JPG
    437.5 KB · Views: 240
Swan, you have every reason to call me out. You helped me out on another site for wheel offset and I thank you again. Going to order some wheel bearings tomorrow and get these built! I will have photo updates later this week. All kinds of problems with that cheep belt drive. As we all have experienced, some money saved today will cost you later. I will post photos on both sites. Still issues with getting the primary cover on.
 
Ahhh, the other site, Britbike.com ? I remember posting information for your wheel alignment and rear offset.

As you have learned, you get what you pay for. Buy decent brand name wheel bearings instead of saving a couple of bucks on cheap bearings. SKF, FAG, Hoffman, RHP, Timken et al are quality bearing manufacturers. I use Simply Bearings UK for most of my British bike bearings, including my magneto and dynamo bearings that arrived yesterday. http://simplybearings.co.uk/shop/

Keep posting images, we love images...
 
Here is the last photo I took. Added a breather in the front because this motor breaths through the primary and this system is more effective. The belt drive was far from a plug and play. My friend with a lathe has been busy making shims and spacers. I will post this Thursday. It's at his house and need to take photos. Swan, thanks for the link on bearings. As a rule I don't use cheep bearings either and have not heard of this co.

The next issue is the really nice oil feed needs to be turned down. It won't seal against the rocker covers. That may need to be exchanged from the guy I purchased it from. That and the stator wire is preventing the primary cover going on. This hopefully will be just some dremel work.
 

Attachments

  • 7050700841_1517fc5583_b.jpg
    7050700841_1517fc5583_b.jpg
    430.6 KB · Views: 254
You probably want to fit a larger diameter breather, I think 3/4"~ 7/8" was about minimum to prevent crankcase pressure causing leaks?
Can you get something in to back of timing cover?
 
Not sure I follow you on a second breather. The one installed is MUCH larger than stock system. The breather is helps to rid the engine of excessive pressure but is also to vent off the gases that is a by-product of burning fuel. It also has a pressure release valve for this which if working properly should avoid excessive pressure. I took this from Classic Bike Mag June 2005 and Ron Peck http://www.ronpeckmotorcycles.com/?page_id=5. You need to scroll down to see it. He did a single, like mine, on a '66 motor. He also did a double barb on a earlier motor. I contacted him and he said a second was over kill on my motor. He blocked off his original breather pipe which was connected to the intake cam timed breather. I don't know if I would have done this but to each his own. I will say Ron knows a hell of a lot more about these bikes than I do. Some say this helps with engine leaks. I think proper seals and do more to help with this.
 
Big breather is needed for racing, it helps reduce pumping losses
I tend to overbuild everything ;)
The early motors didn't use the primary as a plenum chamber so just about anything improve matters
The later motors where there was a level hole drilled to use engine oil in primary and extra holes to vent crankcase were much more oil tight
The timed breather works real well as long as rpm doesn't get too high
Thanks for the link to Ron Peck, I always like to see if I can pick up something new or justify what I already do ;D
 
So here was the issue with the belt drive kit I had. This is why you buy a quality kit and avoid this...

The rotor is to be attached to the end of the crank and driven on a key. As you can see my rotor does not even touch the end of the keyed area. This would mean the rotor would not be spinning on the crank.
 

Attachments

  • DSC_0802.JPG
    DSC_0802.JPG
    440.6 KB · Views: 250
  • DSC_0801.JPG
    DSC_0801.JPG
    415.8 KB · Views: 258
First he made what is mostly a large spacer that fits inside the belt drive cog.

Then a shim with a key way cut into it to match the end of the crank.
 

Attachments

  • DSC_0805.JPG
    DSC_0805.JPG
    446.7 KB · Views: 267
  • DSC_0807.JPG
    DSC_0807.JPG
    449 KB · Views: 265
Then made a key that was stepped. The stud that threads into the end of the crank was also re-made much longer to accommodate the rotor and the nut to tighten it all up The nut was also custom to a little larger diameter. Now the rotor is driven by the end of the crank as intended.
 

Attachments

  • DSC_0808.JPG
    DSC_0808.JPG
    443.7 KB · Views: 267
  • DSC_0809.JPG
    DSC_0809.JPG
    360.7 KB · Views: 246
  • DSC_0810.JPG
    DSC_0810.JPG
    432.2 KB · Views: 252
Here is the motor mostly buttoned up. The covers have not been polished yet and some odds and ends still need to be done. But mostly ready for the frame and dry build.
 

Attachments

  • DSC_0811.JPG
    DSC_0811.JPG
    395.2 KB · Views: 225
  • DSC_0812.JPG
    DSC_0812.JPG
    406.2 KB · Views: 238
Back
Top Bottom