1970 Honda CL350 Cafe Racer Project Bike Newbie

plyzo

1970 Honda CL 350
So I finally got around to buying a bike that I wanted to convert to a cafe racer. Its a 1970 Honda CL350. I started removing all the parts and waiting on a seat to start modifying the frame a little. Once I get it I will then send the frame to powder coat. This is my first time doing a complete bike, and am a little worried I might not be be able to put it all back together but I figured this will probably be the best way I will learn things.
 

Attachments

  • IMG_0574.JPG
    IMG_0574.JPG
    606.9 KB · Views: 255
  • IMG_0579.JPG
    IMG_0579.JPG
    631 KB · Views: 279
Here is a pic of the tank, I molded some knee dents into it.
 

Attachments

  • tankdents.jpg
    tankdents.jpg
    56 KB · Views: 1,402
Attached is a pic of the tear down. Nothing left to remove. Was actually surprised how easy it was to tear this down. Do you guys know if they can powder coat aluminum?
 

Attachments

  • biketeardown.jpg
    biketeardown.jpg
    84.8 KB · Views: 1,467
I had a question that I hope I can get some help on. I got the lower steering stem removed but I can't figure out how to get out the stem from the lower bracket off. I am not sure if I need to completely remove that to send to the powder coater.

I can post some pics as I don't know some of the names of the parts so learning as I go.

hahaha
 
Plyzo,

Please fill in the basics on your profile so we tell where you are from.

In answer to your questions:
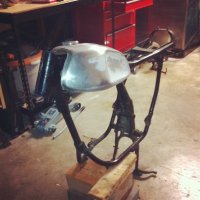
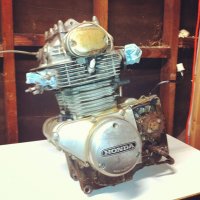
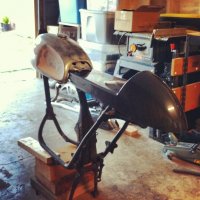
Aluminum can be powder coated. Powder can look very good if the surface is smooth, but it is way more expensive than paint. More durable too but for those of us that change our minds a lot, it's not always the best idea. Have you completed a dry build to know for sure that you will not need to add, subtract or modify anything on the frame?

The trick is to dry build and get it running and modify things that didn't work teh way you planned it, and when you are satisfied with the whole package, strip and paint/powder coat it.

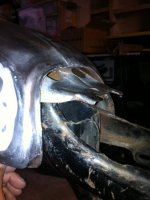
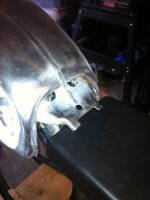
Lower triple doe not need to have the stem machined out or pressed out. I usually hit those with a rattle can. Cost about $2 (1/4 can). I have tried rattle cans, powder, spray guns, professional paint and I come back to rattle cans. Client build might get a pro paint job bit race bikes don't and neither do my street bikes.
 
Teazer-

Ya I am waiting on my seat and then figuring out the battery placement. That is pretty much all I need to do before I send the frame off to powder coating. Went ahead and updated my profile.

Does anyone have a source for rear shocks? I wanted to get new aftermarket ones as the ones I got now aren't that great.
 
check out:

http://www.cmsnl.com/

http://www.dimecitycycles.com/cafe-racer-parts/vintage-honda-caferacer-cafe-racer-bobber-brat-chopper-custom-motorcycle-parts/vintage-honda-bobber-brat-chopper-custom-motorcycle-parts/honda-cb-cl-bobber-brat-chopper-forks-suspension-steering.html
 
Need to also figure out rear sets for this bike. I was wondering what might be the best find on ebay that is easy to mount.

Anyone got any ideas on what will work the best?
 
Look at Chris Durgam's rear sets. He has a post in the for sale section for the 350's. For the money you can't go wrong. I used his and modified the brake side slightly to use the original brake light switch and pivot point for the brake lever. Although they work fine as-is.

Kev
 
Here is a pic of the engine removed. I want to get the exterior cleaned up on the engine. What would be the best way to do this? Simple Green? I don't have a full shop so its a little tricky to be able to do some of the cleaning I would like. I also want to paint the engine but fear the removal of engine components and putting it back together properly.
 

Attachments

  • engine350.jpg
    engine350.jpg
    90.1 KB · Views: 1,338
Simple green will definitely help, but you'll probably need a lot of elbow grease too ;D FWIW, I painted my CL350 engine without disassembling and it went well (there should be a pic in my thread). Just be sure to tape things off well.
 
You could paint it all together for sure. Make sure it is with something that can handle heat okay though.

Don't be affraid to tear into it though, it is the only way to really learn!
 
Does anyone know where I can get a steering damper rod that has the knob on it? On my bike that was completed broken. Do I even need to add that or can I just take it out and just add a new Stem nut and call it good?
 
Seat arrived from Dime City and quickly just put on the frame. I feel like i need to trim a bit of the bottom of the tail section and figure out how far back I need to place it. Also finding it a bit tough to get the tank to work properly with the seat.
 

Attachments

  • 557036_10151241068039136_1088480300_n.jpg
    557036_10151241068039136_1088480300_n.jpg
    100.3 KB · Views: 1,130
Here is a pic of the engine partial painted. Will post final results when I get it all completed.
 

Attachments

  • b72cce72fa1b11e1ab4322000a1d0377_7.jpg
    b72cce72fa1b11e1ab4322000a1d0377_7.jpg
    107.1 KB · Views: 746
Here is a pic of how much higher the tank needs to be in order to line up correctly with the tail section. Need to figure out the best way to get this to work. I almost feel like cutting the original tank mount that goes to the frame and figuring out a way to fabricate some other piece that connects to the tank that allows it to sit higher.
 

Attachments

  • image-3.jpg
    image-3.jpg
    50.1 KB · Views: 634
  • image-4.jpg
    image-4.jpg
    43.1 KB · Views: 642
What about cutting the front of the seat pan to sit into the tanks profile better. Then use foam in your seat pad profile to come up a bit to fill in that empty space where the tank sits. Also get the seat foam professionally covered with contrast stitching. It'll look awesome.
 
Ya I can do that but then the tank sits a lot lower and doesnt have a good streamline with the tail section. It should flow across like a perfect line from the bottom of the tank all the way to the tail section. I feel like I just need to cut what is on the tank for mounting and create a new way to mount the tank with some rubber grommets of some sort.
 
Back
Top Bottom