Follow along with the video below to see how to install our site as a web app on your home screen.
Note: This feature currently requires accessing the site using the built-in Safari browser.
We noticed you are blocking ads. DO THE TON only works with community supporters. Most are active members of the site with small businesses. Please consider disabling your ad blocking tool and checking out the businesses that help keep our site up and free.
Hello this is my first post to the forum. I just completed a restoration/cafe conversion of a 1973 BMW R60/5 bike and thought I would share with the forum. I got inspired to try this projection from various posts I read on this forum so hopefully I can inspire someone else.
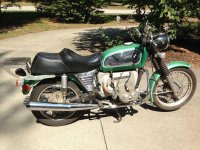
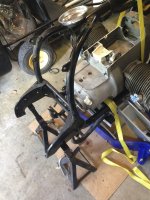
I started with a 1973 R60/5 bike that I located in someone's barn. Good news was the person rode the bike around his apple farm occasionally so most things worked on the bike, bad news was it had not been cleaned for probably 20 years. This is what I started with:
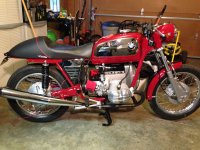
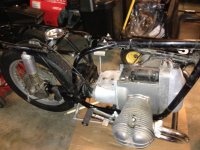
After about 4 months of work the project ended up like this:
I will post additional pictures and descriptions of some the work I did along the way in the future but wanted to just get the thread going with the before and after pictures.
Thanks for the replies. It runs good but have only been able to put 30 miles on it thanks to the Indiana winter weather. I was able to get the rings seated between Christmas and New Years when the temp outside was above 40. Sad to say the 30 miles only wetted my appetite and now I am dying for spring to get here so i can put some real miles on it. :'(
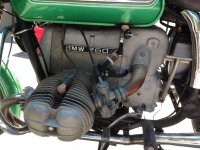
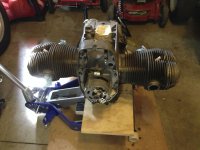
I documented most of the build but looking back i should have taken more photos. Lessons learned i guess. Attached are some of the early photos of the tear down. Ended up tearing it down to the engine. Spent a lot of time with the Clymer's manual and lots of zip lock bags to keep everything separate and marked as to what it was for.
As i post pictures and describe some of what i went through i want to give credit the people or companies that helped me along the way. My thanks is to jkluesner who posted his project of the /5 toaster tank in the forums. His post was very helpful and gave me the idea of wanting to do this.
Second person that inspired the final design is Josh Withers at www.beemersandbits.com. He has created two great cafe racer bikes out of BMWs all out of his garage in his spare time.
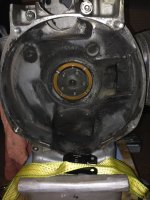
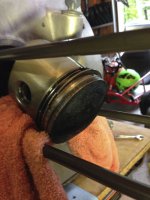
Once i had everything torn down it was time to start putting the list together of what i needed. The list was long and kept expanding. Need first new piston rings as they were worn and out of spec also had to replace most gaskets and seals. As you can see the rear main seal was shot and had been leaking for some time.
Got most of the BMW parts from Hucky's BMW. Hans was great to work with and had everything i needed in the way of BMW original parts. Purchased not only the various gaskets and seals from him but also a complete fastener kit from him to replace all of the old rusted ones.
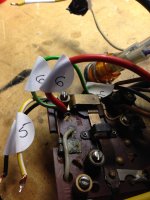
When it came to the wiring i found it helpful to label the wires with numbers and take pictures as to what they went to. i made sure the numbered labels remained on the wires until i was ready to reassemble. During the reassembly i just reviewed the pictures to see what each number was attached to.
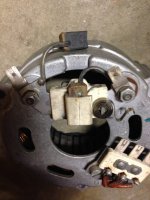
While i had it torn apart i went ahead and replaced the rotor brushes.
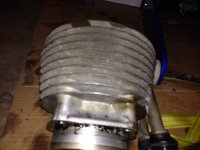
Cleaning the aluminum parts such as the cylinder heads became very time consuming and i tried various methods. The method that seem to work the best was using Simply Green on a 50/50 mixture and wire brushes. Shouts out to Harbor Freight as the best place to buy cheap tools that you will only use a few times. I made several trips to Harbor Freight to buy items such as the wire brushes that run on the end of a drill.
After cleaning the parts with Simply Green and wire brush i would follow up with mothers or autusol aluminum polish. On aluminum parts such as the front cover i would use a buffing wheel with black or rouge sticks to get to the finish i was looking for. I did not go for the polished mirror finish on the parts but more of a clean brushed satin look.
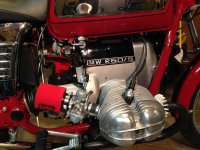
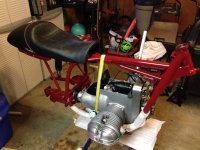
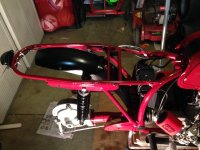
The color of the bike had to change from the original green. After some research and trying to use period correct colors i settled on the Granada Red. It took a little work with the painter to get the right paint code for it but after looking through old paint books we found the code.
Decided that i would have the frame painted the same color as the rest of the bike as opposed to having it powder coated black. I am glad i did as i like the red frame. Happy day when i got the first batch of parts back from the painter as reassembly could begin
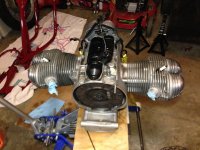
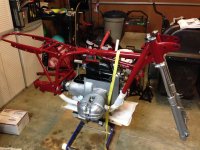
Engine is back together at this point and back in the frame. So far following items done to the engine:
* Replaced piston rings
* Replaced rear main seal and front timing cover gasket
* New set of points
* New set of rotor brushes
* De-Carbonized piston and heads
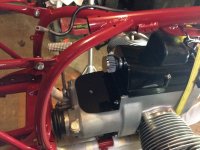
* Cleaned up starter with wire brush and degreaser, rattle canned it with a new coat of black paint
* Cleaned and polished heads and valve covers
One note on soda blasting. I did a lot of reading about the benefits of soda blasting so i picked up $99 unit at Harbor Freight to use on the project. Overall i had mixed results with it and not sure overall it was worth the investment. I used it on the cylinder heads and engine block to clean them up but i think wire brush, simply green and elbow grease did a better job. The one area that soda blasting did seem to work well with and saved me time was de-carbonizing the pistons and valves. Did a good job and saved me time on getting them cleaned, however in doing it over again i would have saved the money and used more elbow grease to get the carbon off. My $.02.
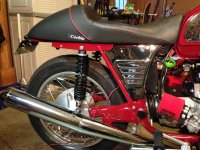
Time to decide on a seat. I ended up going with the Corbin gunfighter seat vs my other choice of a fiber glass tail from BoxerCafe.com. Given it was my first build i decided i had enough other work to do without having to fit the BoxerCafe tail section and getting the seat pan upholstered. Cost wise i think it would have been a wash. The Corbin seat has the bomber jacket leather for the seat area and red pin striping to match the paint.
I removed the air filter box and got the block off plate from boxer metal. I got a mini breather tank and modified it to sit above the starter with a hole drilled in the block off plate for the breather. The block off plate and starter cover i ended up having powder coated black. Seems to work so far and gave the engine a cleaner look.
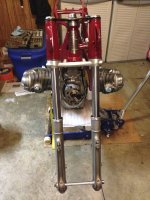
Got the front forks re-installed. Decided to upgrade the internal components on the forks using the products from Race Tech. I installed a set of their gold valve emulators plus a set of their springs. Project took about a 1/2 day to complete with their easy to follow instructions on their website.
Front end much stiffer now and does not have the vintage spongy feel to it.
Used an angle grinder to cut down the rear fender in order for it to be hidden under the seat. Also installed new set of IKON shocks on the rear end.
Ended up replacing original Bing carbs for a set of Mikuni ones from Rocky Point Cycle. After about a 20 min conversation with Rocky Point on the phone regarding my bike and where i live they where able to send out a set of pre jetted carbs unique to my needs along with all the hardware to get them installed on the bike.
After some research and hearing all the pros and cons of pod filters i ended up going with a set of UNI filters. I felt they would give me a little more protection to the engine then the K&N pods plus they came in red foam which added to the color scheme of the bike.
Nice work! I've got an R60/6 that I'm slowly working on but nowhere near as clean as yours!
Do your Mikuni springs have enough umph to return the throttle? I've got zero return on mine at the moment with VM28's installed and it's driving me nuts!
ManizieRacer the springs in my Mikuni's will return the throttle. I would not say it is a strong return but it does return. When I got the carbs from Rocky Point they also sent along new cables for the carbs. Given the level of tension I have in my throttle return it would not take much for me to have your problem.
I couple of things to think about that may help: Are you using new cables? Also I noticed I had to have the throttle assembly really cleaned well to make sure it moved freely. did you change out the bars as 7/8" bars are a little larger in diameter then stock and that can cause the throttle grip to not turn freely. I had to sand down the bar under the grip some to make sure it turned without touching the bar. I also noticed on mine that I have to have the Throttle Grip Tensioner out as it does not take much to have it get hung up and not return.
This site uses cookies to help personalise content, tailor your experience and to keep you logged in if you register.
By continuing to use this site, you are consenting to our use of cookies.