Follow along with the video below to see how to install our site as a web app on your home screen.
Note: This feature currently requires accessing the site using the built-in Safari browser.
We noticed you are blocking ads. DO THE TON only works with community supporters. Most are active members of the site with small businesses. Please consider disabling your ad blocking tool and checking out the businesses that help keep our site up and free.
Got some more steel and will complete rack tomorrow. Thanks for the info on the POR 15. Will have to find that around here and give it a try.
Found this on Ebay if your at all interested:
http://www.ebay.com/itm/82-gs450L-gs450-gs-450-L-rear-back-grab-bar-suzuki-/220799387581?pt=Motorcycles_Parts_Accessories&vxp=mtr&hash=item3368ab47bd
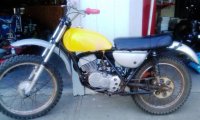
Got the rear rack done today. All I had was my cell camera. Lighting is not that great:
Here's the bike with the rack and bag attahced:
My no frills all purpose bike rack painted:
My blinkers attached (blinkers are actually license plate illumination lights, LED) Front will get same treatment:
Looks like the blinkers are hidden behind brake light, but they actually stick out about 2 inches beyond. Don't really know much
about LED's as blinkers except you have to find the right flasher unit for them. Since this is a 6V system, I wonder what will have to be done?
Mate that rack turned out real nice! Thanks for the link too, although not quite the right one for my bike... there's a few around the 'bay usually.
You may find it easier with the turn signals to keep the stock flasher and add a resistor to each LED. I'm not sure what the value of the resistor would be though... essentially you need to keep the same load on the relay as if you had a normal bulb there. If you find out what resistor is used for the 12v setup, I'd just halve the value for the 6v setup.
I've never heard of a 6v LED flasher relay but that doesn't mean they don't exist...
Thanks! Pretty excited that it turned out. All function. I found my old dirt bike boots and my old helmet. Can't wait to take it out this spring. Want to get a group together and ride the trails in northern Michigan. Can ride for hundreds of miles and not hit same trail twice. Thats why I'm putting the rear bag on. Now, where do I put the ax?
Small updates for today: I was reading that the blinkers for the bike were an option. All electrical is there, but it was a dealer option. All the dealer had to do was plug it in and go. Sooooo, all my wiring should be there, I just have to look for it.
Today I got a bunch of goodies in to help finish up this project. Got the battery strap, air filter and fork seals.
Everything went in without issue. Took the right fork out to replace seal, and I noticed that it has absolutely no rust or pitting under the headlight ears. Thats the first I've seen that, usually there something hiding under there. This thing is actually turning out to be a great bike. $400, and only 2728 miles. And everything is there!
Replaced only one today as time did not permit me to do both. Easy peasy. Question is, how much fork fluid do I put back in? If anybody knows for sure, could use the help. Thanks
Just a small undate. I changed the fork seals and fork oil with new. So maintenance wise, it is all done except for the new sprockets and chain that I'll get once I have some extra money laying around. : One thing that was really bothering me is that I thought I was going to have to buy a lock for my gas cap as the one that was in there was broke. This is what I came up with:
Pretty simple project, but it has been alot of fun so far. Can't wait to really ride this thing. I rode it around after I put the air filter in and can bring the front wheel off the ground no problem.
Well it sounds like it's going to be in the 40's here (Michigan) all this week. Maybe time to get the plate and some insurance and ride this thing. I've got a question maybe you all can help me with. How do you know the oil injection is working? I guess I could put mixed gas in the tank, mark the level of the oil in the 2 cycle oil reservoir , ride around and see if it dropped any? Or is there an easier way. Thanks
Bike Bandit, in their drawings, said that the second hole in the head was for a compression release (as previously stated.) But when I got it in the mail, it was just a big bolt. Screwed it in and only went half way in. So I just stuck a shorter spark plug in there and called it good. Also, couldn't wait till spring, I ordered the chain and sprockets. Got the title switched in my name today, no problems there So, just a little more and this thing is legal and roadworthy. Want to order a tank bag also, just don't know which one is going to fit. There is not a lot of space on that small tank. May have to make something myself. Still looking for a 6V electronic flasher unit. I can't seem to find one at the auto stores around here, so I may have to look on Ebay.
Here's my '74. My Dad had a 71 when I was kid. A buddy gave me this one a few years ago after it sat in his shed for 15 years or so. I fixed it up and ride it around my yard now. The plug in the head is if you want to install a compression release, but they just had a plug like the one you got if not. It should have a copper washer under it to seal.
cyclhed, that explains it. Yep, I got the washer too.
Still waiting for a few parts to finsih. I can't believe how excited I am to get this running. Probably because it reminds me alot of my old Yamaha 185 enduro. I really loved that bike. Even the same color
You mentioned something about not being able to get the plug into the compression release hole. I'd bet there is some carbon in the threads. You might have to "chase" the threads to clean them out. There is a simple tool you can get for that. Be sure to put a little anti-seize on the threads before you put the plug in. Do that with spark plugs, too.
This site uses cookies to help personalise content, tailor your experience and to keep you logged in if you register.
By continuing to use this site, you are consenting to our use of cookies.


")