1980 XT500 BUILD

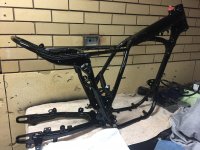
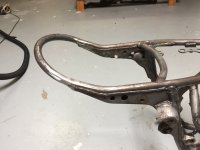
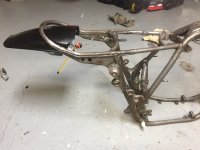
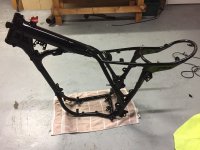
I feel the frame is too long. i have taken 9.5cm out of the rear loop. Only for aesthetic reasons, the seat i want to make will be a little bit smaller.
I have welded it back together and it looks pretty good and worked great.

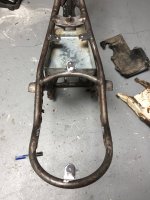
im going to try and fit a TT500 rear fender. the original wont work now, because i have changed the rear loop.
 

Attachments

  • IMG_0291.JPG
    IMG_0291.JPG
    1.5 MB · Views: 510
I welded some tabs for the rear TT fender. works pretty good,
i think it looks ok.
 

Attachments

  • IMG_0359.JPG
    IMG_0359.JPG
    1.9 MB · Views: 496
Just mocking up a battery and wiring box. welded some tabs for the box.
i know it looks rough, but its just a mock up.
 

Attachments

  • IMG_0358.JPG
    IMG_0358.JPG
    1.2 MB · Views: 491
Some parts have arrived so i rebuild the carb.

Check out the hydro blasting job on the carby. ohhhhhh wow! i love hydro blasting. looks sick.
 

Attachments

  • IMG_0361.JPG
    IMG_0361.JPG
    893.6 KB · Views: 476
New parts arrived so i fix the kick start stopping plate.
feels good when you find a problem, and get it fixed.
 

Attachments

  • IMG_0310.JPG
    IMG_0310.JPG
    1.3 MB · Views: 480
Hi guys, frame is painted and looks great. just getting some cleaning of old parts done, while i wait for new parts to arrive.
 

Attachments

  • IMG_0399.JPG
    IMG_0399.JPG
    1.3 MB · Views: 463
Always the best way to remove old spokes, i started taking them off , but they were a little rusty and doing my head in, so the grinder jumped off the wall and was begging me to use it.
 

Attachments

  • IMG_0389.JPG
    IMG_0389.JPG
    1.1 MB · Views: 465
Just wondering if anyone knows if there is a torque setting for this nut?
Its the nut that holds on the contact breaker drive pinion

Any help would be much appreciated.
 

Attachments

  • IMG_0316.JPG
    IMG_0316.JPG
    1.3 MB · Views: 468
stripped the tank today, need to repaint, ill probably go with a yamaha yellow and gloss black tank, im not sure yet.
 

Attachments

  • IMG_0418.JPG
    IMG_0418.JPG
    1.2 MB · Views: 473
interceptor said:
Cool project you got going. BTW, I like the tank bare ::)
Thanks mate! Yeah the bare tank does look awesome. But it has a few too many scratches and dings. Unfortunately painting might be the best option.
 
MCKAY34 said:
Just wondering if anyone knows if there is a torque setting for this nut?
Its the nut that holds on the contact breaker drive pinion

Any help would be much appreciated.
This nut needs 60 Nm, and use Loctite medium (243), or somthing similar.

Martin
 
Martin M said:
This nut needs 60 Nm, and use Loctite medium (243), or somthing similar.

Martin
Awesome Martin thanks for the reply and information, I will do exactly that. I appreciate the advice. Going to start the rebuild this week
 
Hello all, thanks everyone for all the feedback so far.
i have just noticed a little issue with the valve guides. i am just about to start rebuilding the bike, so the fun stuff is about to begin.
however, take a look at the valve guide on the right. its smooth and different to the other guide, given that the manual images show that both valve guides are supposed to be the same, with groves to hold the stem seal etc. but this is doesnt have those groves.

Does any one have some feedback? who knows what has been done by previous owners.
Do you think i should buy a new valve guide and replace this plain one, so it will match the other. or perhaps this is standard? i cant find any info about it.

i hope this is clear. any help would be great.
 

Attachments

  • IMG_0448.JPG
    IMG_0448.JPG
    2.7 MB · Views: 471
Yay!!!!! new piston rings have arrived, just setting the gaps at the moment before i install the rings.
 

Attachments

  • IMG_0452.JPG
    IMG_0452.JPG
    1.8 MB · Views: 471
Im super excited about the process at the moment, building and putting the bike back together is going to be awesome.
cleaning parts and re greasing at the moment, The swing arm components where all in great condition, they were just dirty and had 30 year old grease on them. cleaned everything and replaced what was needed. I just put the swing arm back together and its so solid and smooth now.

I moved my work desk in front of my timber shooting board, now i have no where to fire pucks! sucks.
 

Attachments

  • IMG_0465.JPG
    IMG_0465.JPG
    2 MB · Views: 471
Parts arrived so started putting the engine back together, new rings and honed cylinder

i dont know why my pictures are sideways.
 

Attachments

  • IMG_0533.JPG
    IMG_0533.JPG
    1.2 MB · Views: 455
Completely rebuild wheel hubs, new pads, new bearings new clean grease, should be sweet
 

Attachments

  • IMG_0534.JPG
    IMG_0534.JPG
    770.7 KB · Views: 470
I just had the new valve lapping done, installed the new valves and new springs. nice and clean looks good. pretty happy so far.
 

Attachments

  • IMG_0539.JPG
    IMG_0539.JPG
    2.1 MB · Views: 472
  • IMG_0538.JPG
    IMG_0538.JPG
    2.3 MB · Views: 463
Finally got a new bolt to hold the Camshaft on,
and realised something is horribly wrong with the camshaft. its missing or has snapped off a guide that holds the sprocket on straight. its not there.
So the sprocket doesnt sit on and has heaps of movement. Wish i have know this ages ago.
So now its time for a new camshaft. sucks. more delays!
 

Attachments

  • IMG_0708.JPG
    IMG_0708.JPG
    826.4 KB · Views: 439
Back
Top Bottom