
Wheels look great. I like that style a lot, the 550 has the slightly less cooler and more 80's version of those :'(
We noticed you are blocking ads. DO THE TON only works with community supporters. Most are active members of the site with small businesses. Please consider disabling your ad blocking tool and checking out the businesses that help keep our site up and free.
You are using an out of date browser. It may not display this or other websites correctly.
You should upgrade or use an alternative browser.
You should upgrade or use an alternative browser.
1981 Suzuki GS450L - Cruiser to Scrambler
- Thread starter Northish
- Start date
I have to agree with you there, they are a neat style for the late 70's/early 80's. I'll be selling the original 19" front and 16" rear wheels if someone were looking for them.adventurco said:Wheels look great. I like that style a lot, the 550 has the slightly less cooler and more 80's version of those :'(

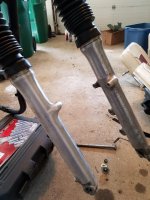
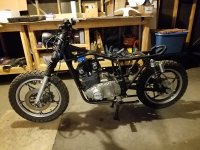
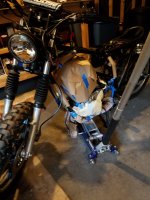
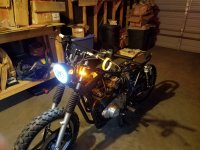
A few more progress pictures to share with the community Things have started to come back together now after stripping the frame bare and blasting and painting. A fair amount of time has been spent lately just reassembling things. Also got the front forks shined back up and clear-coated.
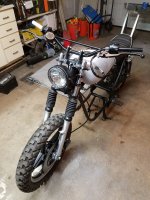
Spent some time researching new controls for the bike. Several new parts have been ordered including: Bar risers, handlebars, left and right hand controls, clutch lever with switch, brake-lever with master cylinder, headlight & mount, fork boots. I've mounted them but they aren't necessarily in their final position and they'll still need to be wired up. Just mostly check fit and clearance and making sure they make sense with where the bike is heading.
I put the primered tank and seat back on to see how things were shaping up, but it's really hard to tell with out the engine in place. The gaping hole in the center of the frame makes all the other dimensions look a bit weird to me. I'm thinking it will all come together when the engine is back in its home. You'll have to use your imagination a bit for the time being
Things have started to come back together now after stripping the frame bare and blasting and painting. A fair amount of time has been spent lately just reassembling things. Also got the front forks shined back up and clear-coated.Spent some time researching new controls for the bike. Several new parts have been ordered including: Bar risers, handlebars, left and right hand controls, clutch lever with switch, brake-lever with master cylinder, headlight & mount, fork boots. I've mounted them but they aren't necessarily in their final position and they'll still need to be wired up. Just mostly check fit and clearance and making sure they make sense with where the bike is heading.
I put the primered tank and seat back on to see how things were shaping up, but it's really hard to tell with out the engine in place. The gaping hole in the center of the frame makes all the other dimensions look a bit weird to me. I'm thinking it will all come together when the engine is back in its home. You'll have to use your imagination a bit for the time being
Attachments
It's been a busy last couple of weeks for me but I've got some progress shots to share with anyone interested.
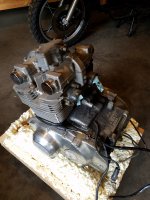
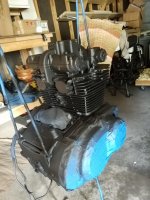
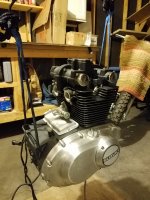
I've put some time into getting the engine cleaned back up to a more presentable state. Lots of time with cleaners and tiny brushes. The fresh paint is high temp. & oil resistant via rattlecan. The edges of the fins were polished up and also sealed with high temp. clear coat.
The majority of the Phillips-head bolts have been replaced with SS hex. Also got some replacement acorn nuts for the tops of the cylinder head studs.
Attachments
ceggertcrowe
New Member
Engine looks great! So does the build so far.
Can I ask how you masked your polished bits? I'm trying to do something similar and I keep coming up with complicated ways to get the mask right, but wondering if it's just as simple as being careful with your tape lines.
Thanks
Can I ask how you masked your polished bits? I'm trying to do something similar and I keep coming up with complicated ways to get the mask right, but wondering if it's just as simple as being careful with your tape lines.
Thanks
PhillyThump said:Engine looks great! So does the build so far.
Can I ask how you masked your polished bits? I'm trying to do something similar and I keep coming up with complicated ways to get the mask right, but wondering if it's just as simple as being careful with your tape lines.
Thanks
Thx, Philly! Glad you like the look so far.
As far as masking went, I really just had to be careful with the tape lines. It did take me over an hour to mask everything. If you can find some thinner tape it makes things much easier. Wish there was a magic shortcut, though. My best tool was a very sharp razor blade to take care of places where there were odd lines or where I needed to mask off a flat surface with irregular edges (ie. the exhaust ports.)
ceggertcrowe
New Member
Thanks a lot!
Hey djmaynard - The black headlight is now an aftermarket unit with a halo (for a little something different) from DCC. When I near the end of needing parts I plan to post a "Parts Used" list in case anyone is interested in specifics.djmaynard said:Maybe I missed it, but was that the original headlight or aftermarket?
putting an engine in solo is always fun. looks sharp.
pretty sure you're supposed to take the rubber dust boots off the front fork lowers when you run gaiters though they look a bit scrunched up the way you got em installed
pretty sure you're supposed to take the rubber dust boots off the front fork lowers when you run gaiters though
they look a bit scrunched up the way you got em installedadventurco said:pretty sure you're supposed to take the rubber dust boots off the front fork lowers when you run gaiters though
adventureco - You are very right; I've been meaning to do just that for awhile now. I put the gaiters on thinking I would "just see how it looks real quick" but procrastination has gotten the best of me. I'll be using VHB to attach my flexible LED blinkers to the upper part of the shocks so I better get those dust caps off before I do that!
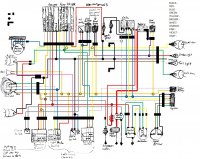
When I can't be in the garage physically working on the bike I've been spending time on the wiring and electronics side. I think I'm more or less done figuring out how to re-wire the thing. The wiring situation as the bike was received was a bit of a spaghetti bowl of old and new, with lots of those quick splice connectors and wire nuts. I decided that since I was upgrading the hand controls and all lighting to new units and I'm also integrating in a new multi-function digital gauge system (Koso DB-03R) that I would just start from scratch with all new wires and connectors.
So, I just finished up making a new diagram integrating everything together again. Maybe this will help someone else in the future? Let me know if you catch something that doesn't look right!
So, I just finished up making a new diagram integrating everything together again. Maybe this will help someone else in the future? Let me know if you catch something that doesn't look right!
Attachments
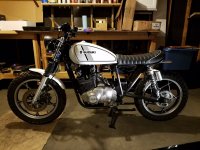
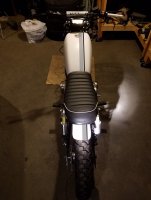
I've been day-dreaming and trying out different paint options in my mind and on the computer for some time now. I think I've finally settled on a design I like, so I'll share with the community.
I put the tank and fenders on and did some "photoshopping" (actually more like "powerpointing") and came up with these two somewhat crude/quick renderings. I'm pretty excited about them, to be honest. The inspiration for the offset stripes have come from several other builders' rides on here. They give it a retro feel, while the "almond" pin-striping on the tank harks back to the original striping that the bike came with from the factory. Looking at the picture it still looks empty without the carbs, battery, and filters; and the bars need to come down a bit. Overall, though I'm pretty happy with it and more importantly I think I can handle it.
As this build has progressed since January, I've been honing in on the direction I want to take the build and I think now I have it pretty well defined: I'd like to make a GS450 Scrambler/Tracker version as if Suzuki tried to do a revival similar to what Ducati has done today with their modern Scrambler line-up.
I think I'll start going for it.
Attachments
Paint mockup looks great, man. I say go for it, I have a soft spot for offset stripes. If you need any decals made up, shoot me a PM.
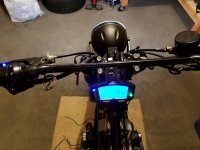
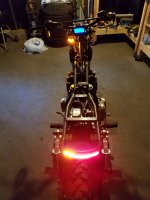
Electronics are now working New wires, connectors, lithium battery, LED lights, digital gauge, LED blinker relay all seem to be working so far. First try, even!
I will have to wait until I can start the bike to verify that the new rec/reg and charging system are wired up correctly, but fingers are crossed. Would really hate to fry that new stuff. There is a 20 amp fuse I put in line as a little insurance.
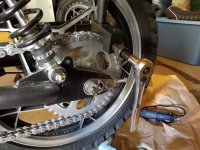
Also, had time to finally get the new chain riveted on with the new tool I had bought. Things are starting come together much quicker as summer is fading fast and I'm eager to try this thing out!
New wires, connectors, lithium battery, LED lights, digital gauge, LED blinker relay all seem to be working so far. First try, even! I will have to wait until I can start the bike to verify that the new rec/reg and charging system are wired up correctly, but fingers are crossed. Would really hate to fry that new stuff. There is a 20 amp fuse I put in line as a little insurance.
Also, had time to finally get the new chain riveted on with the new tool I had bought. Things are starting come together much quicker as summer is fading fast and I'm eager to try this thing out!
Attachments
Wondering if anyone can help here.... I'm in the process of re-building and re-jetting the carbs at the moment in between painting steps.
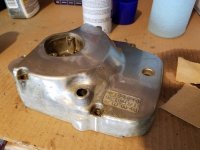
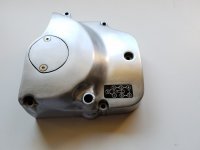
The problem I need help with is finding a new throttle butterfly end cap. See the attached picture. It looks like one of the many previous owners tried to drill out and remove the EPA cap that sealed off the mixture screw, but rather than drilling the mixture cap they started drilling the butterfly cap. If there was a "forehead slap" emoticon I'd use that about now. I thought I'd have more luck finding one but I'm coming up blank. Anyone have any ideas?
The carbs for an '81 GS450 are Mikuni BS34SS.
Thanks for your help!
Attachments

Glad you like that gauge - It's pretty awesome. It can learn gear position and I've got a cylinder head temp. sensor feeding into it. Since I've messed with the wheels and diameters it gives me a lot flexibility. It's pretty compact which was my biggest draw. I've mounted it with a modified aluminum cell phone mount which worked out great.djmaynard said:Wow, LOVE that digital gage! Dime City tail light?
And you are correct, I got that tail light from DCC. You can find it a fair bit cheaper elsewhere but I like to support the U.S. retailers.


