Follow along with the video below to see how to install our site as a web app on your home screen.
Note: This feature currently requires accessing the site using the built-in Safari browser.
We noticed you are blocking ads. DO THE TON only works with community supporters. Most are active members of the site with small businesses. Please consider disabling your ad blocking tool and checking out the businesses that help keep our site up and free.
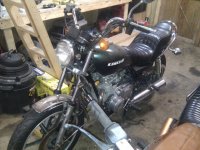
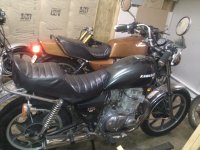
Well my fellow cafe builders/lovers here we go with my winter project. I have lots of pictures to upload with this but lets go over the build plan. Start with a 1982 Kawasaki KZ440 LTD and turn it to a cafe racer. Im departing from the normal cafe in the following areas: Custom fuel injection system (hidden), Garrett GT1241 Turbocharger (as hidden as you can with a turbo), Liquid to air intercooler system (hidden of course), Retain belt drive (you just don't see that), Spoke wheel conversion (for old school look), Custom Carbon/Kevlar tank and seat, and a whole lot of additional custom work. The goal will be to do 99% of the work myself only contracting manufacturers on things I just don't have the equipment to do. So now you have the beginings of what will be in this build. Project completion goal is Spring 2014. I work on this every weekend and will update photos on Sunday/Monday to show what work was done over the weekend. Obviously there maybe times Ill be waiting for supplies but I will at least put an update of where the project stands. No sitting in the dark. So this project is already underway but the good news is I have been doing photos from day one so I had better get started uploading. Hope you enjoy.
What a pain to do these photos. I take super high resolution photos so I have to go through my photos and drop them down so the site will take them. Well I can't complain it is for all of you that I do it. So this next set is the tear down. I know we know what they look like but want to make sure it is completely detailed as possible. This may take some time to get all my photos up so please be patient.
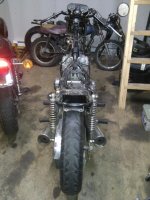
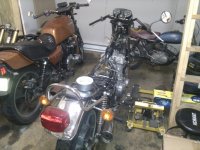
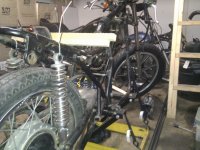
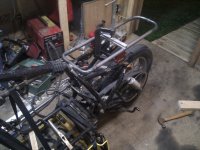
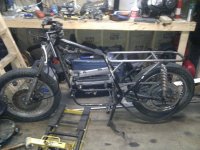
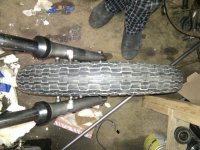
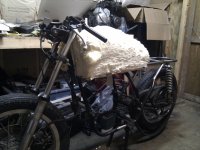
Jumped ahead a bit skipping bike with engine only sitting in frame. So now we are at our begin of build phase. These photos show the bare frame and the addition of the rear spoked wheel. The rear spoke is from a 1976 KZ400. All Balls Racing was instrumental in selecting my spoke wheels. I found what bikes used the same bearings and looked for spoke wheels that fit them. I will have more details on that conversion comming soon. These photos do not show the front spoke yet. So this still has the factory 19" mag. Originally equiped with 19" front and 16" rear. The new setup is a 19" front spoke with a 18" spoke rear. Well on with this show.
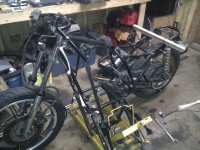
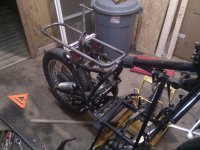
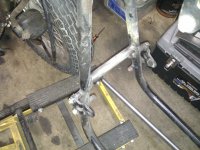
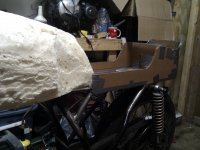
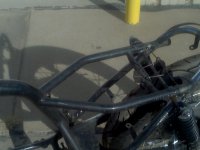
The part Im sure most will be waiting.... The removal of the old rear subframe and the new cafe addition. So these show how I modified the frame to reflect a more traditional cafe profile. My BIG THANKS to Dime City Cycles for they gave me the method to achieve it. I mocked mine after what they sell as a kit. (Their kit is higher quality than what I achieved but Im happy with my current results) Mostly just to see how close I could come to doing it. The tubing used is 7/8 .120 wall DOM steel. What a pain in the butt to bend and in this series of photos you will see some things I really didnt like in the upper hoop bends. Fixes will be posted later to show the correction. So time for more photos.
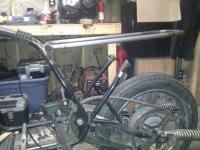
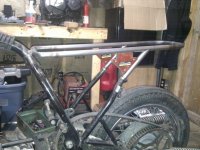
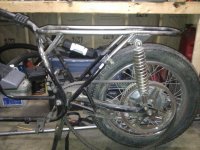
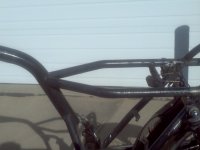
So now as we see the hoop comming into its own we need to have it do something but float in mid air. Yes it would be awesome to leave just the hoop and talk about clean but I dont think the suspension or hoop would hold up very long. lol. So in this set we have the addition of the side support stantions. Sorry if some of the photos in any of this series seem a little foggy but I have not installed the vent in my shop yet. Its cold out and I get so wrapped up in what Im doing I kind of forget some of this work generates smoke and fumes. Good thing the building isnt entirely sealed yet. (Mental note really focus on safety). Oh and sorry didn't take photos of the front stantions in the last photo just welded them in place. My bad.
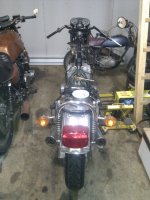
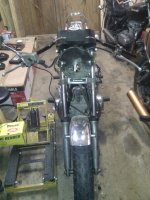
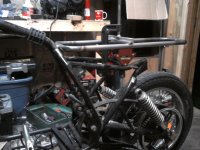
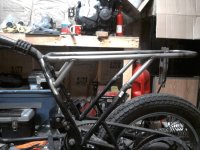
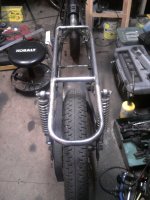
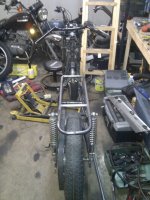
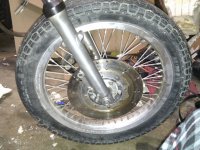
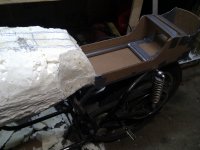
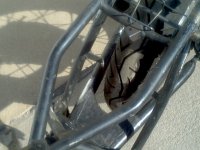
Getting close to wrapping up on the rear subframe modifications. Now its time to get those shocks mounted. I used 3/16 steel for the angle brackets and drilled them out to accept the OEM shock studs. They were not fun to remove from the old frame section but is anything worth doing ever easy. Also in this photo series will be the first glimpse at the front spoke wheel. The forks have not been adjusted from the factory setting yet and the rear shocks will be changed but they work as begining for this setup. The hoop was leveled to match up with the lower frame rails on the bike. This way I can set them up level and parallel with the ground and my seat will be level as well. I hope Im not forgeting anything at this point.
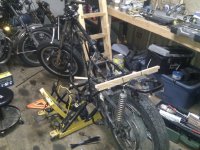
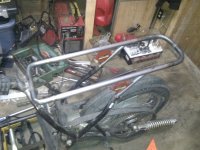
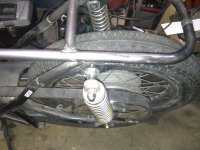
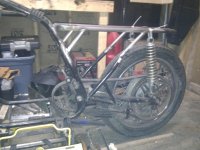
So its finally time to wrap up the rear subframe build. This set of photos will finish out the frame mod and bring you up to the current condition the frame is in minus details on the detabbing which I really didnt bother to photograph. I may go back and take pictures of those areas. This is also where you will see the change to the rear section of the upper hoop. I really didnt like the bends and the fact that is was welded in the center of the rear section. So to fix that I bent up a new rear section and cut the old off about 2" aft of the shock mounts. Then using a inner support rod and some nice rosett welds I spliced the section in. This also allowed me to move the rear section aft to get the rear of the frame to be just half way between the pulley and the end of the tire. Included is the front frame brace I installed to better triangulate the front of the frame and try and help with any flex that it may have had factory. I want this thing to really handle well. This is by no means where the project is currently at but this will wrap up todays postinings. I hope you like what you see so far. Enjoy.
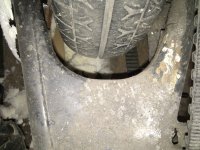
Looking good! I can tell from your pictures, but will your rear tire clear the subframe when the shocks are compressed? Mine just barely has clearance.
What's up, man? Appropriate avatar. ;D Gonna follow your post so I can keep up with the pics. Now we just need to get the other guys to build some cafe's.
Not sure what your leading to in the reconcider of the front section but the decision was based off my GPZ1100 frame in which Kawasaki inserted bracing lower in the frame to tie in the lower frame rails and triangulate the front end. The brace was placed in ensuring I cleared the lower case and the chain adjuster up front. Factory frames arent known for being all that structurally efficient. I would like to thank you for the input however and let me know if there was something specific about the mod that caught your eye.
coldfuzion76 said:
What's up, man? Appropriate avatar. ;D Gonna follow your post so I can keep up with the pics. Now we just need to get the other guys to build some cafe's.
I see you found me. lol. I thought the avatar was fitting. Good my texting the few pics takes forever. lmao. I think we could get the "shirt" to go for it but "Mr. Outdoors" I think would be a hard sale. Now to just spend a bunch of time getting the rest of the photos up on here.
Roman-dog
Thanks man. Glad you found the build. The tire does look close but it clears in compression. This is only the early stages of the build and the shocks I am going to be using are actually longer than the factory ones so it will be raising the back slightly. I made sure to put the cross brace and rear bar at points outside of the highest arch in the tire as well. Good eye though. Hows your baby doing. Any luck with the throttle issue? Ill keep checking your thread and help anyway I can.
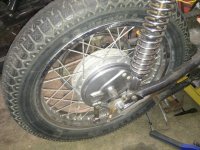
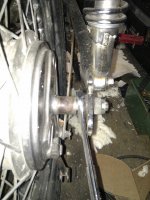
While the frame isn't fully complete, i.e. finish detabbing, add seat and tank mounts, add intercooler mount points, etc... I figure now would be a good time to include some information about the wheels. I have seen a few people inquire about the interchangeability from mag to spoke on these bikes and seeing how I wanted spokes I figured what better way than to try and see where it leads. Ill start with the rear wheel. The donor bike was a 1976 KZ400 and according to All Balls Racing website it uses the same bearings as originally found on the 82 KZ440 LTD. Well that was true. Axle slid right in no problem and no play. So the next question especially for me was the ability to use my Belt pulley and cush drive. Well this is a negative for a direct interchange. The Aluminum cush drive is to small in diameter to properly seal the hub and the cush rubbers are to thick. So I ordered the aluminum cush from the same person I got the wheel from and a set of cush rubbers for the 76. Well these parts came in and we had lift off. The drive being from a 76 fit perfectly as would be expected but would the pulley transfer? That would be a yes as well. So know with the 82's left spacer seating up nicely with the 76 cush drive and giving me the exact same pulley position as before it was time to address the brake drum. Well it turned out to no surprise the 82 drum is also to small in diameter. I had known this when I ordered the cush so I had ordered the drum at the same time. Of course with the factory 76 drum installed in the 76 wheel it worked as originally produced. The only thing you would need to complete this mix of parts is a right hand spacer. It was really weird to me but the 82 Left hand spacer set the wheel up dead center. The brake assembly lined up with the factory brace bar but the right hand spacer was way to short. Some sort of fuzzy math there. No fear I am making custom axle spacers to get everything in place. So before we move on to the front lets get some photos on here of what it looked like with the incompatible components, then with the compatible.
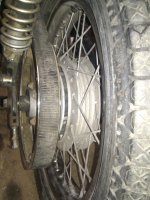
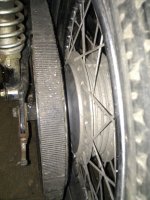
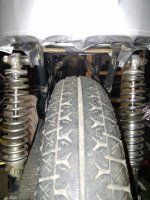
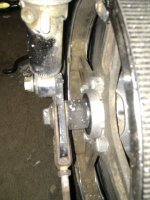
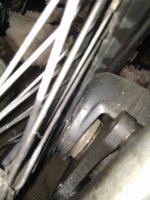
Realized in the previous post that I had not included the compatible cush drive photo. As it turned out I never took one so I went out and snap some additional photos. If anyone is following this build or starts to on a regular basis and wishes to have something specifically shot I will be more than happy to do it. Of course if you want a weld shot after the frame is powder coated, for example, I won't be able to pull that one off. Well as I mentioned I went and snapped some more photos so we could pick up where I left off. Seing how I was discussing the spacer issues on the right rear I thought it might be nice to include and actual representation. The photos are the spacing of the wheel between the swing arm, a rear view looking forward, The left side spacer where it should be, and the all important right side spacer that must be corrected. As you can see it is quite short. Of further note the rear wheel is currently a 18X1.85 rim. I will be ordering a Buchanan 18X2.75 Aluminum rim with stainless steel swaged spokes and completely rebuilding the wheel. Time for show and tell.
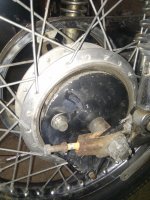
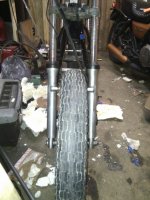
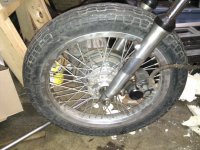
All right so we have covered the back end and can gladly move forward. (pun intended. lol) So the factory front mag for this bike is a 19X1.85 (Why does that sound familiar?) Well the front spoke wheel came from a 1981 KZ650. Its a exact fit bearing wise (thank you All Balls) and it just so happens to be a 19X1.85 Aluminum rim. Well as any good bench racer/builder/genuis knows you cant just leave well enough alone. Ok may have been pushing one of those. lol. I have decided to once again to rely on Buchanan and purchase their 19X2.15 aluminum wheel with another set of stainless steel swaged spokes. The changes in sizes on these wheels is to as closely match the recommended size for the tires I will be running. So with the knowns out of the way it is time for the challenges. 1) the right hand factory spacer will not work with the right hand metal cover. The spacer is a bigger diameter than the hole. Good news here is you can use the plastic one of the original wheel it bolts right up. Or like I am doing you can eliminate it and install a disc brake. Im running dual front discs. With that out of the way the spacer does work and initial analysis has it right at the correct position for centerline. Still verifying that though. 2) The gear driven speedometer wont work on this wheel even if you remove the 650's speedometer drive. The tangs are to big for the wheel notches in the hub. I did trim them down with my dremel as a test and it will drive the speedometer BUT the spacing width is off by about a 1/4 inch. This affects the disc alignment and moves it away from the piston, which it normally rides really close to on the original setup. In turn this whole combination grows the end to end spacing which would require forcing the forks out to get the wheel to fit. BAD JU JU. For me this is no big deal for in choosing to make my own custom spacers and go with dual discs I have also decided on a electronic pick up for wheel speed. So eliminated the need to keep the factory speed drive. I feel if you purchased the spacers and drive for the spoke wheel you would be fine but can not say that for fact. One last tid bit of info on this one is the disc rotors. The rotors are the same diameter, spacing, etc... except that the mounting holes are smaller diameter on the mag wheel than the spoke. I would imagine a small drill increase and problem solved on that one but drilling mounting flanges on brakes not in my comfort zone with out some structural analysis. Hope this helps.
One last thing on the front wheel before we move along is that the spoke 7 photo in the previous post was not slid to the right all the way and there is currently no spacer on the left. That is the reason it looks off center in that photo. One last photo for the front wheel is the clearence for the brake caliber when it is properly positioned. Oh and those of you who are very detail oriented yes I put the left rotor on the right side. The reason was to check fit and the other was to keep it from accidentally binding on the caliper until I can get the spacers made. Next up fiberglass mold construction for tank and seat. Well at least what not to do. lol.
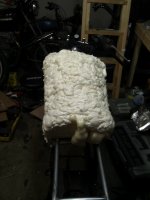
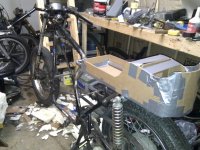
For those of you who are actually enjoying following along with this one thank you for bearing with me. I tend to be over descriptive so if the text gets to be to much let me know and I will try and cut it down for better reading. So I work nights and on my days off I and up at all hours of the night. Being courteous of my neighbors I choose not to grind away at the tabs on the frame at 2am. So I began working on the plugs for the mold construction of the seat and tank. As we all know do it right the first time and be patient. Well I wasn't. Instead of waiting till I ordered and received my two part polyurethane foam to create the plugs I choose to experiment. I built up a basic container in the general outline of what the tank was to be. I left alot of extra to cut down slowly to a rough shape then sand and finalize. Well at said time the only thing open was Walmart. So off I went to be inventive. As you probably guessed I found the good old expanding foam in a can and picked up a couple. Well in the end it took 5 cans to fill my form. That is where the promising turned ugly. So without the details here is the lesson learned.
1) Though $20 was the investment the foam does not rise equally.
2) Not all the foam cures in this size of mass and you will discovered that when you start trimming.
3) Big air voids inside the foam along with the uncured goo. Which does cure and expand when exposed to air again.
4) If this wasnt enough the foam does firm up quite well but is still not as stiff as needed to make a plug.
5) The killer in all this was the fact the this foam wont sand worth a crap. It was taking the grit off my 80 grit sandpaper. All the sandpaper I tried failed. So you would be unable to get any fine details with this stuff.
So now you know why I had foam pieces just laying around in the last few photos and here are some pictures of what not to do.
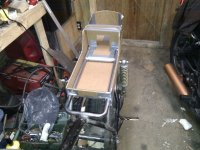
Well this finally brings us up to today. The tank foam seen in the previous photo is scraped. I have ordered my two part foam from Fibreglast.com and it should be on its way out today and hopefully have it for tomorrow. I have a 5 day holiday comming up so that means 4 good days of work on the bike. To date I have been working on it a total of 8 days spread over a few weekends so it is moving fairly well. So the next thing to show you is my plug build up for the seat/fairing. As I mentioned at the begining the final part will be a Kevlar/Carbon composite. Stage one in this is the plug build. It will be the exact part that will be eventually on the bike. Once the plug is done I'll make a fiberglass mold from the plug. Once the mold is done we make the real part. There are other methods but this is the method Im using that way should something happen I can make an exact duplicate. Who knows someone could actually want one for their KZ and I would have the mold to build it. So yesterday I made my form to hold the foam. What you see in the photo looks higher than the actual part. The seat base will sit 1 1/2 inches off the top of the frame. It also drops between the forward area of the frame rails even with the bottom of the tubes. Though the form is vertical on the sides the part will be angled inward for a nice contour on the sides. The rear fairing will become the home for the battery, fuel injection computer, and main power relays/fuses. A bulkead seperates this area from the forward area. The reason is two fold. First is any fire back there will be contained for a short period instead of traveling under my rump. Second and more importantly is that there is a liquid cooling reservoir being built into the seat pan for the liquid/air intercooler. Remember Im hiding as much as I can as best as I can to maintain the classic look. There will be alot more surprises on this part so for now enjoy the pictures, ask questions, or just provide your input. Enjoy.
Stroker,
Thank you for your post. Im really looking forward to doing the composite. I will provide as much info as I can on that and will always provide the I did this and it didnt work info as well. We all have different levels of experience but if you take all our experiences and put them together we defininetly have a wealth of information. I too am looking forward to the rest of the build.
Nebr_Rex,
I didn't take it as raining on my parade. I always appreciate input. After all I tend to overthink things and when your focused on so many details at once its easy to overlook things. What you dont see in my mod is the gusset and mounts that will be installed in that area. I haven't built them yet. This attatchment was based off Dime City Cycles hoop kit and the way I did it is the same way they do. Plus on my design you may also notice I have two short stantions to each side on the front that the KZ400 doesn't. I originally thought about running the tubes to the sides of the main hoop and bringing them all the way forward to the neck parallel to the backbone but decided it would be overkill. Thank you very much for your insight and I look forward to your input once the bracing is in place up front. Or any input as this project goes forward.
I want to take the time to wish everyone happy holidays, safe riding, and perfection in your own personal projects and bikes.
This site uses cookies to help personalise content, tailor your experience and to keep you logged in if you register.
By continuing to use this site, you are consenting to our use of cookies.