
We noticed you are blocking ads. DO THE TON only works with community supporters. Most are active members of the site with small businesses. Please consider disabling your ad blocking tool and checking out the businesses that help keep our site up and free.
You are using an out of date browser. It may not display this or other websites correctly.
You should upgrade or use an alternative browser.
You should upgrade or use an alternative browser.
69 Honda CL450 Scrambler Restoration
- Thread starter jchek779
- Start date
jchek779
Leave the gun. Take the cannoli.
OK guys - been a while since I've posted. I got lazy on Saturday and didn't work on the bike at all. Sunday was a different story. I set the polisher on a workstand outside of my garage and went to work. I had to go all the way back to 150 grit greaseless compound, 220, then 320. From there, I went black/brown/white rouge and finally finished polishing all of the aluminum 7 hours later. It's not perfect, but I've moved on.
It's been tough to get out in the garage during the week. I'm taking a welding class on Mon and Tues nights after work and then still need to find the time to 'sustain' life around the house.
Last week I tore the shift shaft seal while installing the shift shaft - My DCC order arrived last night and I was able to get the new seal in and get my new clutch plates soaking in oil. Tonight should allow me to button up the clutch side of the engine then start working my way up the top end. Things should get going real quick.
Attachments
reesea17
I'm probably gonna ask a lot of questions...
jchek779 said:Here's something I wanted to share with you guys real quick - I used to leave my Dremel and associated arbors/bits in the box the dremel came it. It used to piss me off when I had to fish around the bottom of a box for whatever bit I was looking for. I grabbed some of the green foam that faux flower displays are set in from Wal-Mart for about $2 along with a rubbermaid container for another $2, and Viola! - A dremel/bit container to keep things organized.
Which bits did you use to do the initial removal/polishing?
jchek779
Leave the gun. Take the cannoli.
Which bits did you use to do the initial removal/polishing?
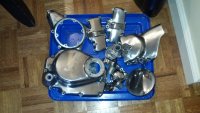
My polishing experience wasn't that fun. All of the parts had a very resilient haze of pitting and oxidation as seen below.
Untitled

I had never polished anything like this before, so I was learning as I went and failed to properly research the topic before hand, per usual, because I'm a glutton for punishment. I also didn't own an electric buffer/polishing motor when I started. I figured I'd sand everything by hand and then do all of the final polishing using 3-1/2" wheels on my cordless drill. Wrong.
I sanded everything by hand using 80/100/150/220/400/800 grit sandpaper.
Untitled

Then went to the black rouge/tripoli/white rouge compounds. After doing all of that, there were still some of the deeper sanding scratches in there. I don't have a detailed enough pic to demonstrate the scatches left behind. You couldn't see them from 10ft away, but they were still there.
I ordered greaseless cutting compounds in 150/220/320 grit to start over again and buff out the scratches left by the 80 and 100 grit. I got the compounds from http://www.baylandproducts.com/. Each tube was only $9 and I now have a lifetime supply.
2013-02-03_13-59-49_312

Then back to the black/brown/white rouge compounds. Moving through those left uniform sufrace finishes on most of the parts. i wasn't able to get out all of the pitting on some of the more contoured parts, nor was I able to polish some of the really tight stuff like around the kickstart opening in the clutch cover.
If I was to do it all over again, I probably wouldn't have wasted so much time hand sanding everything. I was trying to use sandpaper wrapped around artist paint brushes, pen tips, and anything else I could find to try to sand every contour on the parts. I'd just order the greaseless cutting compounds and start there on a sisal wheel.
I'm really glad polishing is over.
My polishing experience wasn't that fun. All of the parts had a very resilient haze of pitting and oxidation as seen below.
Untitled
I had never polished anything like this before, so I was learning as I went and failed to properly research the topic before hand, per usual, because I'm a glutton for punishment. I also didn't own an electric buffer/polishing motor when I started. I figured I'd sand everything by hand and then do all of the final polishing using 3-1/2" wheels on my cordless drill. Wrong.
I sanded everything by hand using 80/100/150/220/400/800 grit sandpaper.
Untitled
Then went to the black rouge/tripoli/white rouge compounds. After doing all of that, there were still some of the deeper sanding scratches in there. I don't have a detailed enough pic to demonstrate the scatches left behind. You couldn't see them from 10ft away, but they were still there.
I ordered greaseless cutting compounds in 150/220/320 grit to start over again and buff out the scratches left by the 80 and 100 grit. I got the compounds from http://www.baylandproducts.com/. Each tube was only $9 and I now have a lifetime supply.
2013-02-03_13-59-49_312
Then back to the black/brown/white rouge compounds. Moving through those left uniform sufrace finishes on most of the parts. i wasn't able to get out all of the pitting on some of the more contoured parts, nor was I able to polish some of the really tight stuff like around the kickstart opening in the clutch cover.
If I was to do it all over again, I probably wouldn't have wasted so much time hand sanding everything. I was trying to use sandpaper wrapped around artist paint brushes, pen tips, and anything else I could find to try to sand every contour on the parts. I'd just order the greaseless cutting compounds and start there on a sisal wheel.
I'm really glad polishing is over.
reesea17
I'm probably gonna ask a lot of questions...
Good tips and thanks for such an in-depth response. I've been looking at finding a way to get this done without hand sanding everything even though it is unavoidable in certain situations.
Are these greaseless compounds used in conjunction with a polisher then? I've been contemplating getting the one from harbor freight but I am not honestly looking for a mirror finish at all, and more of a polished/brushed look.
Thanks!
Are these greaseless compounds used in conjunction with a polisher then? I've been contemplating getting the one from harbor freight but I am not honestly looking for a mirror finish at all, and more of a polished/brushed look.
Thanks!
edhaeuser
Been Around the Block
jchek779 said:Which bits did you use to do the initial removal/polishing?
I ordered greaseless cutting compounds in 150/220/320 grit to start over again and buff out the scratches left by the 80 and 100 grit. I got the compounds from http://www.baylandproducts.com/. Each tube was only $9 and I now have a lifetime supply.
2013-02-03_13-59-49_312
Then back to the black/brown/white rouge compounds. Moving through those left uniform sufrace finishes on most of the parts. i wasn't able to get out all of the pitting on some of the more contoured parts, nor was I able to polish some of the really tight stuff like around the kickstart opening in the clutch cover.
If I was to do it all over again, I probably wouldn't have wasted so much time hand sanding everything. I was trying to use sandpaper wrapped around artist paint brushes, pen tips, and anything else I could find to try to sand every contour on the parts. I'd just order the greaseless cutting compounds and start there on a sisal wheel.
I'm really glad polishing is over.
I need to look into that greasless stuff. Sounds promising.
Ed
jchek779
Leave the gun. Take the cannoli.
I had high hopes for progress today, but once again, got derailed by unforeseen issues.
The first was the jigsaw puzzle of cam cap gaskets that Athena sent me. Turns out, they misplaced a bolt hole on 2 gaskets by a few millimeters. Not a big deal, but frustrating nonetheless. The second came about when the stainless allen head bolt kit came up 3 short for my cylinder head covers.
It was sunny and warm today, so I took the afternoon off to play golf, have a few beers, and watch supercross live on Speed tonight. Hopefully, I'll have a more productive Sunday.
Attachments
reesea17
I'm probably gonna ask a lot of questions...
I'm about to start tackling my motor as well, and I'm hoping the gasket kit I got from DCC is correct. I've heard problems with bolt holes being out of place before.
One last question about the polishing as well. How exactly do you use the greaseless compounds.. Like you when you started at least, I have zero knowledge of this part of the restoration/build process. Do you put it on a buffing wheel on the mechanical buffer? Or somehow else?
One last question about the polishing as well. How exactly do you use the greaseless compounds.. Like you when you started at least, I have zero knowledge of this part of the restoration/build process. Do you put it on a buffing wheel on the mechanical buffer? Or somehow else?
jchek779
Leave the gun. Take the cannoli.
reesea17 said:One last question about the polishing as well. How exactly do you use the greaseless compounds.. Like you when you started at least, I have zero knowledge of this part of the restoration/build process. Do you put it on a buffing wheel on the mechanical buffer? Or somehow else?
I watched a few videos on YouTube regarding applying the greaseless compound to the wheels. It mentioned switching the buffer motor on/off quickly using the friction of the wheel at the compound as a brake to generate enough heat to melt the compound and get the wheel to 'take it'. For whatever reason, I couldn't get the wheels to take the compound. I ended up just having to apply it at speed, which makes a huge mess. Do it outside - everything gets covered when the wheel starts slinging this stuff around.
Safety glasses are a no-brainer but I also suggest wearing a dust mask.
frogman
'74 CB360, '71 CB450, '75 CB550SS
I had same issues with the cam gaskets and I can tell you right now not to even bother with them until you are ready to spec out out the cam end clearance as the aftermarket gaskets most times are too thin anyway. At least mine were.
There is also a special one JUST for the left exhaust side as it it has an oil channel that the others don't. If you block it you will fry the exhaust cam.
Go to autozone or the like and get some gasket paper, its like 8 bucks for a roll and its plenty thick enough to allow you to space the cams as needed. Use the aftermarkets as templates and just cut out what you need.
Its nice to have around too when you accidentally tear one and don't feel like waiting a week for one to come in the mail.
jchek779
Leave the gun. Take the cannoli.
frogman said:There is also a special one JUST for the left exhaust side as it it has an oil channel that the others don't. If you block it you will fry the exhaust cam.
Damn - I just put my head together and checked my cam/cap clearance. I'll have to pull the mag side exhaust cap again to see if the oil channel is there. I know that 2 of them fit fine and the other 2 had the bolt hole in the wrong spot. I though the 2 I had to modify were the intakes...
jchek779
Leave the gun. Take the cannoli.
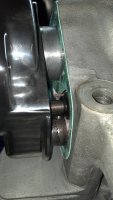
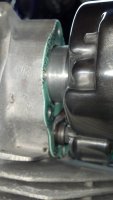
I pulled the mag side ex cam cap out a bit last night to take a look for the oil channel that Frogman spoke of. This was one of the gaskets that didn't require modification. I took a few pics - can someone point out where the oil channel is/needs to be? I'm not 100% sure what I'm looking for.
Attachments
frogman
'74 CB360, '71 CB450, '75 CB550SS
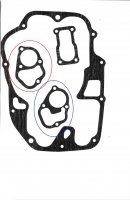
Ok this is out of the parts fiche its tough but you can see which ones I am gonna point out. Notice #7 is all the same and # 23 is the odd one.

Here is a better pic the blue one has 3 copies, the RED has one. There is an oil gallery that gets covered if you use the wrong one in the wrong place. I've got a folder of scans if you want them.
Here is a better pic the blue one has 3 copies, the RED has one. There is an oil gallery that gets covered if you use the wrong one in the wrong place. I've got a folder of scans if you want them.
Attachments
jchek779
Leave the gun. Take the cannoli.
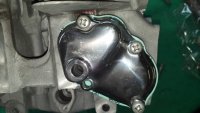
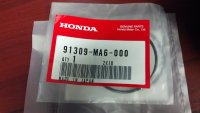
For you 450 guys - If you're sick of dropping $5 per oil filter cap o-ring at the dealer, I used an o-ring sizing tool at work to find that the Honda O-rings are -030 x 0.070" cross section diameter. The tool takes the guess work out of stretching or squeezing the o-ring when trying to measure with a set of calipers.
The McMaster-Carr part number for a pack of Buna-N o-rings is 9452K117. $8 for a pack of 100. That should last you and the bike a while.
http://www.mcmaster.com/#o-rings/=lh3fcv
The McMaster-Carr part number for a pack of Buna-N o-rings is 9452K117. $8 for a pack of 100. That should last you and the bike a while.
http://www.mcmaster.com/#o-rings/=lh3fcv
Attachments
jchek779
Leave the gun. Take the cannoli.
Hey Guys,
Been a while since I've made any progress with the bike. Between some other things and travelling for work, I haven't touched the bike in what seems like 2 weeks. I got out there today and tried to finish up rebuilding the engine. It seems like for every 2 steps forward, it's 1 step backwards. Today was no different.
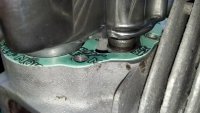
I was trying to finish building the cylinder head but found zero side-side clearance at the cam to cam cap clearance, just as was described by Frogman. Once tightened up, I had zero cam cap clearance to the cam shoulder. I bought 1/32" gasket paper from Napa and made my own cam cap gaskets to get the right clearance.
2013-02-23_11-53-37_785

Then it was time to install the pistons and new rings. I had to file the rings a little to get the proper end gap. Then I was able to make my own ring compressor with a piece of scrap left over from modifying the ring compressor I bought - I really enjoy the cylinder reliefs incorporated into late model single cylinder bikes. I've rebuilt over 40 engines and never struggled at the level I struggled with this one.
2013-02-23_16-51-31_509

I finally got the cylinders on and the head. The final 1/8" of the cylinders wouldn't install because of the o-rings at the based of the cylinders. It just doesn't seem right - there is no relief or zone for the o-rings to squeeze into at either the cylinder or the crankcase base. I tried tightening things up, but didn't like the base gasket squeeze. I'm half tempted to remove the o-rings around the cylinders to get proper compression of the base gasket.
Been a while since I've made any progress with the bike. Between some other things and travelling for work, I haven't touched the bike in what seems like 2 weeks. I got out there today and tried to finish up rebuilding the engine. It seems like for every 2 steps forward, it's 1 step backwards. Today was no different.
I was trying to finish building the cylinder head but found zero side-side clearance at the cam to cam cap clearance, just as was described by Frogman. Once tightened up, I had zero cam cap clearance to the cam shoulder. I bought 1/32" gasket paper from Napa and made my own cam cap gaskets to get the right clearance.
2013-02-23_11-53-37_785
Then it was time to install the pistons and new rings. I had to file the rings a little to get the proper end gap. Then I was able to make my own ring compressor with a piece of scrap left over from modifying the ring compressor I bought - I really enjoy the cylinder reliefs incorporated into late model single cylinder bikes. I've rebuilt over 40 engines and never struggled at the level I struggled with this one.
2013-02-23_16-51-31_509
I finally got the cylinders on and the head. The final 1/8" of the cylinders wouldn't install because of the o-rings at the based of the cylinders. It just doesn't seem right - there is no relief or zone for the o-rings to squeeze into at either the cylinder or the crankcase base. I tried tightening things up, but didn't like the base gasket squeeze. I'm half tempted to remove the o-rings around the cylinders to get proper compression of the base gasket.
jchek779
Leave the gun. Take the cannoli.
I have been having really good luck cleaning rusted chrome with aluminum foil and water. Another old school trick I wanted to try was soaking the parts in a mix of water with oxalic acid. Oxalic acid is the primary ingredient in wood bleach, and was easily obtainable at Sherwin Williams for $10. I took a large rubbermaid bin and filled it with the mix of hot water and wood bleach, subsiding in my bathtub in case the acid ate through the plastic. I took most of my chrome parts and submerged them in the solution.
2013-02-13_19-25-33_601

2013-02-14_05-12-21_108

Following the dip, I rinsed the parts off then gave them a clean up with a cloth. Some turtle wax polishing compound and I was good to go.
Here's a before of the brake pedal:
CL450 Restoration

...and after
2013-02-22_12-04-14_439

The pitting is still present, but I was able to remove the rust in places that I just couldn't get to with wadded up aluminum foil. It's not perfect, but it's not the cost of having new chrome laid.
2013-02-22_12-03-55_681

2013-02-13_19-25-33_601
2013-02-14_05-12-21_108
Following the dip, I rinsed the parts off then gave them a clean up with a cloth. Some turtle wax polishing compound and I was good to go.
Here's a before of the brake pedal:
CL450 Restoration
...and after
2013-02-22_12-04-14_439
The pitting is still present, but I was able to remove the rust in places that I just couldn't get to with wadded up aluminum foil. It's not perfect, but it's not the cost of having new chrome laid.
2013-02-22_12-03-55_681


