Follow along with the video below to see how to install our site as a web app on your home screen.
Note: This feature currently requires accessing the site using the built-in Safari browser.
We noticed you are blocking ads. DO THE TON only works with community supporters. Most are active members of the site with small businesses. Please consider disabling your ad blocking tool and checking out the businesses that help keep our site up and free.
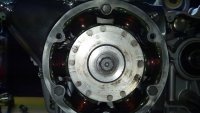
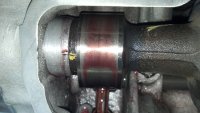
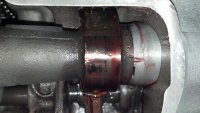
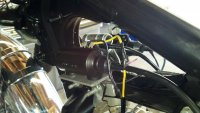
I absolutely hate to post this "is my cam timing correct" post, but I figured I'll let experience trump intuition. I've attached the 3 timing pics for the mag, exhaust, and intake cams. Take a look and let me know if I'm looking good. I had the timing marks on either side of the cam cap marks and feel most comfortable with this arrangement. As the chain elongates, the timing marks should move more into alignment.
Second question - this chain is tight. Way too tight. It'll "break in" but it's scary to think of the load this chain is putting on the cam and crank bearings. I've researched other posts that have said that this EK 29H chain is tight. Are there any decent alternatives? I'd gladly eat the $45 for peace of mind knowing that there is a better option out there.
Third question - I picked up the master link from DCC with the solid pin master links. Do any of you guys have advice on how to peen over the end of the pin without depositing metal into the cylinder head valve spring cavity?
Here is a file that will help with cam timing, I believe that your exhaust is off, but there is no reall telling as there are many ways over there years that honda made the marks.
Cam chains will be tight, as long as you can feel some play through the tensioner hole on the back of the engine you should be fine, 1/4" is plenty. It will loosen as you run the engine.
There are other maste rlinks that are easier to mushroom, I have NO idea how you are supposed to do the all steel ones. Might check with your local dealer/parts house.
Thanks for the info frogman. I remembered reading that the OEM Honda master links have the hollow pins. I'll have to order some of them along with a new cam chain. This thing is way too tight - I don't have a 1/4" of displacement - it's more like a 1/4" of deflection. I have to apply some decent force to get the chain strand to move when pushing through the tensioner hole. To get the chain on I would have to pry on the ex. cam sprocket to feed just enough slack into the cam-cam strand, which would allow me just enough in cam rotation to get the other end of the chain just engaging the teeth. Then I'd have to roll the motor over a few degrees to get the chain rollers to sit in the tooth root. I rolled the motor over a few times checking chain tension along the way - this chain is tension the whole way around. I can't see how any type of oil film will survive at the cam bearing journals having to carry that much load.
The rubber dampening rings on the cams are what makes it tight I think. Whoever cut the chains and packaged them I think used cams that didn't have the rings on them.
For what its worth I went back and looked through my pics and I used the exact same chain on my bike. It's got about 100 miles on it of just fooling around waiting on spring and so far no issues that I can see or hear.
I'm back after a brief hiatus. I took some time off from the bike due to travelling the last few weekends. If you've never been to Savannah for St. Patrick's Day, I suggest you get down there. The lax open container rules make for a great experience. I had a blast doing a pub crawl pedaling this beast between bars 2013-03-15_14-36-48_750
I finally got around to getting my cams timed and finishing the engine build. The last time I checked in, I mentioned how unhappy I was with how tight the slack stand in the timing chain is. I ordered a DID BF05Mx128 chain...only to find it was slightly shorter than the EK219 I got from DCC. That was a waste of $55, because I went back to the EK chain.
My timing marks aren't dead nuts, but that's as close as I could get it. I tried different configurations of ex cam, in cam, and crank sprocket configurations. With absolutely zero slack in the chain, it made things pretty difficult to get timed. My finger tips are actually pretty gnarfed up from dicking around with it this morning.
This thing is getting stuffed in the freshly powdered frame tomorrow - tonight will be dedicated to waxing beers on the couch watching the live supercross from Toronto.
Here's a quick question for you guys - I riveted my cam chain today using a chain break tool that I modified to rivet. I used a master link from Honda with the hollow ends. It seems that I can't peen over the "rivets" far enough to take up all the lateral slack. It seems like the hollowed ends aren't long enough to allow this.
Is the slight lateral play in the master link (roughly 0.010") an issue?
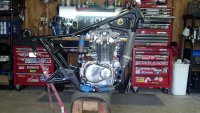
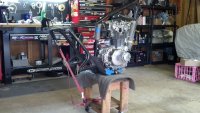
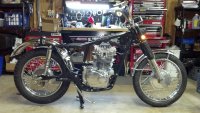
It felt awesome to finally get the engine back into the frame yesterday. Leading up to taking some time off from the bike, I was getting pretty fed up with the not-so-complete "complete" gasket kit, missing O-rings, a clutch lifter seal that didn't fit, a zero-slack timing chain, and every other hurdle that goes with restoring an old bike.
I also threw some casters on a wooden bike stand I've had kicking around for a while, so I can roll this thing out of the way when need be.
The smartest thing I've done in a while is install my steering stem bearing races in the frame before installing the engine. I used the old lower race to drive the new race past flush and seated in the bore. Two taps with the hammer and drift and the old race was out again.
I'm back into it again - I'm looking forward to making some progress this coming holiday weekend.
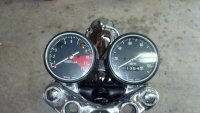
I was pressed for time tonight, but still managed to make some progress. After polishing all of the engine parts at once, I was seemingly dreading more polishing. Doing only a few items at a time definitely keeps things moving and keeps me motivated by being able to knock things out. I got the top triple clamp and carb covers polished up and ready to install.
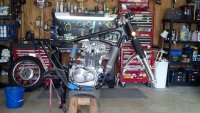
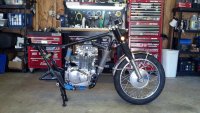
I made a decent amount of progress over the course of the long holiday weekend. I spent most of the time polishing hubs, cleaning spokes, and scrubbing rust from chromed bolts, handlebars, and wheels. I was able to assemble more of the bike and should be ready to bolt the wheels on next and get this thing on the ground.
It's been a while since I've posted - I've been working on the bike a good bit and taking photos, but have been so busy otherwise that I really haven't had time to post. I've been having a lot of good luck with the bike going together.
I scrapped my first whack at a universal coil mount. I made a new one for the universal coils I picked up from DCC out of angle aluminum. I also slipped in a condenser mount. This could have been made a lot more efficient if I had a TIG welder in my garage, but this should work. Besides that, it's just been a lot of polishing, cleaning, and installing.
There is a small dent in my tank that I'm hoping can be removed via paintless dent removal. I'm also seeking out a local upholstery shop to lay new seat foam and reinstall the factory seat cover.
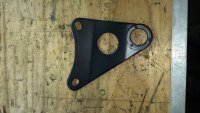
It attaches the muffler to the left passenger peg bracket. There is some kind of rubber bushing that goes in the large hole and there are 2 studs on the back if the muffler.
It attaches the muffler to the left passenger peg bracket. There is some kind of rubber bushing that goes in the large hole and there are 2 studs on the back if the muffler.
Nice - thanks for the help. I was wondering where that grommet went as well. I labeled 95% of what I took off too. It's incredible how quick one forgets.
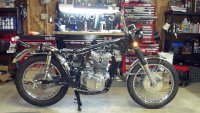
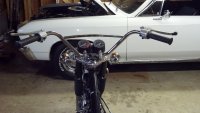
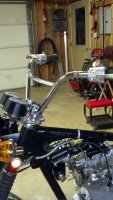
I worked on the bike for a few hours tonight - It's pretty much just bolting things on at this point, which feel good because I can see the end. Unfortunately, the new cables I picked up from DCC won't be long enough to reach the front brake, clutch, or throttle with the Scrambler high bars.
I was really pumped with how well the handlebars cleaned up. The chrome looks great and I'd really like to stick with the original style bars, rather than swapping them out to a lower bend bar. So my options are - 1) swap bars, shorten the control wires, and use the cables I picked up or 2) make my own cables with a mix of new/old fittings, ferrules, crimps, and cables. I'm inclined to take the hard route and make my own cables. I don't want to go the NOS route because I'd like to switch the cable housings over to be black.
Any suggestions? I've looked into motion pro - they don't have anything listed for the CL.
Nice job on the restoration. I worked part time at a local Honda shop when I was in High School, my first assignment was unpacking a new 1969 CL450. I was instantly in love with 450 Hondas, but unfortunately it would be a few more years (1973) before I could afford one.
Rider
For the cables you might dig through ebay or the like and look for 10" extended sets, possibly for the CB bikes, the earlier ones had drum brakes. That MIGHT be just about right for your setup. Motion pro may have something like that as well.
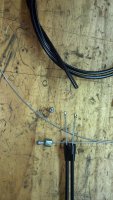
I decided that I'll try to paint the frt brk and clutch cable housings black, use the black tach cable I have, and make a throttle cable with parts from the too-short cable I have coupled with 1.6mm cable/housing that I picked up at a local bike shop.
To make the throttle cable, I'm using the 1 into 2 and the 2 individual end cables from the short cable I have from Motion Pro. I cut the grip end barrel off with a dremel/ cut off wheel, then drilled through it with a 1/16 drill. I also added a slight coutersink in the outside end to allow solder to wedge. Then I cut the ends of the too short housing next to the ferruls. Running a drill backwards in the ferrul usually is enough to backout the remaining steel coil liner and any remaining vinyl housing. The end already soldered to the new cable will work with the 1 into 2 cable piece with only slight modifications and a little grinding.
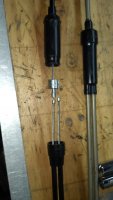
The next steps were to measure the lengths necessary for the cable and housing based on the old one. I used the cut off wheel again to make all of my cuts, then ran a drill bit by hand inside the housing ends to clean them up. I build the cable with all of the necessary pieces, put my barrel end on, then splayed the very end of the cable to provide the solder with a place to grab and create a wedge of sorts.
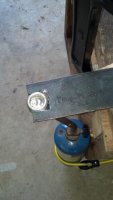
I made a redneck solder pot with a galvanized pipe plug and my propane torch. The dish in the underside of the pipe plug was perfect for holding solder to dip the cable end in place. After running the torch and getting the solder liquefied, I fluxed the cable and barrel and dipped it into the pot just enough to submerge the barrel. After about 10 seconds of letting everything come up to temperature, I pulled the cable out to find that my barrel end had completely melted. Fail. I'll have to order some ends from Flanders and give it another try. I think one of my multi-meters has a TC input so I may be able to read the solder temp and get it closer to 400F.
This site uses cookies to help personalise content, tailor your experience and to keep you logged in if you register.
By continuing to use this site, you are consenting to our use of cookies.