
We noticed you are blocking ads. DO THE TON only works with community supporters. Most are active members of the site with small businesses. Please consider disabling your ad blocking tool and checking out the businesses that help keep our site up and free.
You are using an out of date browser. It may not display this or other websites correctly.
You should upgrade or use an alternative browser.
You should upgrade or use an alternative browser.
71' Yamaha R5-Mckay Moto Works
- Thread starter theprep
- Start date


theprep
Been Around the Block
Re: 71' Yamaha R5-Mckay Moto Works (new pics 03/21/12)
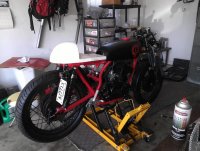
Some more progress over the weekend. Waiting on a few parts, should have it smoking in 2 weeks.


On the Dyno in May:
http://youtu.be/J3fcIHx00L4
Some Spring/Summer shots, we hit a deadline in April, some shortcuts were taken which are now being addressed in the reply below:


Some more progress over the weekend. Waiting on a few parts, should have it smoking in 2 weeks.
On the Dyno in May:
http://youtu.be/J3fcIHx00L4
Some Spring/Summer shots, we hit a deadline in April, some shortcuts were taken which are now being addressed in the reply below:
theprep
Been Around the Block
Re: 71' Yamaha R5-Mckay Moto Works (new pics 03/25/12)
Update: I've added clipon's, the late model RD clutch assembly to alleviate clutch slip, Airtech-Streamline Bridgestone 175 seat.
Currently fabricating seat mounts using Bung King coped risers flipped upside down. Wish I had thought of this before I PC'd the frame last year, I'd prefer them welded on.
Also adding a Lucas style light w/tag mount, plan to fab a bracket off the bottom of the sub pan, center it with seat.
Purchasing the mini speedo/tach w/LED lighting, adding RFID ignition switch to eliminate the now too tall stock switch.
I've covered the wiring harness in Tek loom, added it to the brake line, the black/silver almost gives it a braided stainless look from a distance. I'll use heat shrink to finish each end for a polished look.
Last, I plan to repaint a gloss black, clear over the tank logo's.


https://lh3.googleusercontent.com/-5BjnW7vQlno/UOCkod-dQGI/AAAAAAAACCI/uYawUShye7c/s512/WP_000392.jpg
Update: I've added clipon's, the late model RD clutch assembly to alleviate clutch slip, Airtech-Streamline Bridgestone 175 seat.
Currently fabricating seat mounts using Bung King coped risers flipped upside down. Wish I had thought of this before I PC'd the frame last year, I'd prefer them welded on.
Also adding a Lucas style light w/tag mount, plan to fab a bracket off the bottom of the sub pan, center it with seat.
Purchasing the mini speedo/tach w/LED lighting, adding RFID ignition switch to eliminate the now too tall stock switch.
I've covered the wiring harness in Tek loom, added it to the brake line, the black/silver almost gives it a braided stainless look from a distance. I'll use heat shrink to finish each end for a polished look.
Last, I plan to repaint a gloss black, clear over the tank logo's.
https://lh3.googleusercontent.com/-5BjnW7vQlno/UOCkod-dQGI/AAAAAAAACCI/uYawUShye7c/s512/WP_000392.jpg
theprep
Been Around the Block
Re: 71' Yamaha R5-Mckay Moto Works (new pics 12/30/12)
I've been under the weather and waiting on the Airtech Bridgestone 350 seat, I first tried the 175, was a hair too slim, did not clear the back rails where I have JB Weld/painted the frame cuts, rubbed the top portion, other than that the JB fill looks almost factory.
The biggest issue I've had since completing the build last April, was the Hot Wings Glass seat. Was too large, I bobbed it down, was close but still did not look right, so I moved it on Ebay. I also lost my job last June, and have to work with a limited budget. Luckily, I had done all the major work prior to layoff. It's just a matter of cleaning up the shortcuts, I highly recommend to never sell a perfectly good car to finish a over the top moto build.
I recently replaced the stock gauges with the mini's from Mike XS, nice look and quality for the money. Went back and soldered all connections, used heat shrink, covered harness in braided PET loom/Tek loom. Looks amazing, provides added protection.
Starting with the build and through out, I have been tempted to make it more modern, but have reigned in myself as I wanted to keep it close to original as possible. So I've kept the drums, forks, suspension, original tank etc.
For a complete mod run down:
frame, side cases, wheels/hubs, swing arm fenders powder coated (Dupont Black Magic and Red Baron)
Stage II port, rebore 2nd over and crank rework SCR (Scott Clough Racing)
Wossner cast pistons
MZB CDI
Spec II Classic expansion pipes
Vintage Smoke CNC rear sets
Barnett Kevlar Racing clutch
All seals, bearings replaced (Sudco, All Balls)
late model RD six speed transmission and clutch assembly
premix
custom harness
Hella parabolic light
Lucas LED repop tail w/tag
Progressive springs and shocks
Bridgestone BattleAx 45's
complete rebuild of Mikuni VM 28's
theprep
Been Around the Block
I have been going back and forth whether I should repaint. The tank was sprayed in Dupont Black Magic (low gloss matte) as it has Bondo where the tank badges were, so no baking in the oven.
The tank paint is not very scratch/fuel resistant, but also is not terrible. Almost has that vintage worn look similar to a lot of the WrenchMonkee's builds. So I've thought of putting attention elsewhere, leaving the black to have that vintage look. After all, it is a 71'.
When the bike is washed, it looks like a rare vintage model, many times people ask what a Mckay Moto Works is. It's hard when you see over the top builds with expensive body work, you want to top it! But I sunk that money in performance and rebuild.
Awaiting the parts to come in so I can bolt it all back together, all that's left is to have the seat pan insert wrapped.
theprep
Been Around the Block
Dyno was back in May, hit 29hp peak. Talked it over with Scott prior to engine build, we discussed Spec II's and Y-boot, he said I may get between 45-50hp peak with the above and his port work. The Spec II's have a nice hit between 5500-6000, smooth all through the band when the bike was last running in Sept, the timing on the MZB had yet again slipped.
Added beefier hardware, set it at 2.0mm per Gary's instructions vs the original 1.8. Have yet to test it since I've been sorting the seat and other tidbits out. I was still playing with jetting too, at 40 pilot and 150 mains, still at 3rd position on the clip.
For the dyno run, we started at 190 worked down to 170, last size I had at that time. HP kept climbing. I'll know more when the seat is installed. I feel confident I am pretty close, went premix, so the 40 pilot should be good, 150-140 mains. I think it was the timing that was off, odd it was punching hard back in June, then changed overnight. Logic tells me the timing must have slipped, advancing where it was in the sweet spot briefly.
What complicated the process was I ran way over budget, reused some hardware that became an issue during the tuning process. I've since replaced the components, looking forward to getting it dialed in perfect for once.
theprep
Been Around the Block
Excuse the mess in the garage, made some progress. New seat is in, fits nice and snug. Needs sanding, priming, sanding and paint.
Also need to wrap pan insert, I may try it myself or source it out as I do not have a sewing machine.
Fabricated a metal pan that mounts in old air box mounts, bent upwards creating a wall inside seat hump to house Ballistic.
I'll need to fab a bracket for the Lucas tail light that come from under the battery mount, angles up to center with hump.

Gauges mounted, replaced a lot of the hardware with stainless allen caps and polished out some:

Covered tach/speedo/brake/clutch cables in braided PET loom, sealed with heat shrink:

From a distance, the brake cable appears stainless with PET loom, inexpensive way to clean up wiring/cables:

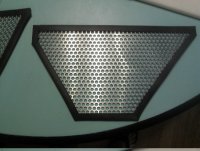
Made template for mesh side panels:


Light bracket will mount from under seat, centering Lucas light on hump:

Also need to wrap pan insert, I may try it myself or source it out as I do not have a sewing machine.
Fabricated a metal pan that mounts in old air box mounts, bent upwards creating a wall inside seat hump to house Ballistic.
I'll need to fab a bracket for the Lucas tail light that come from under the battery mount, angles up to center with hump.
Gauges mounted, replaced a lot of the hardware with stainless allen caps and polished out some:
Covered tach/speedo/brake/clutch cables in braided PET loom, sealed with heat shrink:
From a distance, the brake cable appears stainless with PET loom, inexpensive way to clean up wiring/cables:
Made template for mesh side panels:
Light bracket will mount from under seat, centering Lucas light on hump:
theprep
Been Around the Block
RE: 71' Yamaha R5-Mckay Moto Works
It had a slew of issues on that May dyno run, since addressed. Also only had a short selection of jets on hand at the time.
Premix now, 40 pilot, 150 mains.
No pink for me, its DuPont Red Baron, late evening shot on a soso 5M cam.
Sent from my Radar 4G using Board Express
It had a slew of issues on that May dyno run, since addressed. Also only had a short selection of jets on hand at the time.
Premix now, 40 pilot, 150 mains.
No pink for me, its DuPont Red Baron, late evening shot on a soso 5M cam.
Sent from my Radar 4G using Board Express
")
theprep
Been Around the Block
Bit of a stumble, appears the suspension travel will cause the rear tire to hit the bottom of the seat. I called Progressive, I can expect about 3.80 of travel. The first pic below I measure 2" tire to seat, if I use 1" coped risers, I get the needed clearance but still needing an inch, but it throws the seat bottom lines off from the bottom tank lines.
Once option is to notch the hump to accommodate the tire, the Lucas light and tag will cover most of the area. I've got to really put some thought into this to address first the safety function and the cosmetic aspect second.
Seat on frame rails, perfect height for clipons and rearsets:

1" coped risers, throws off the seat and tank lines. Bit higher in the seat, not as agressive:


Once option is to notch the hump to accommodate the tire, the Lucas light and tag will cover most of the area. I've got to really put some thought into this to address first the safety function and the cosmetic aspect second.
Seat on frame rails, perfect height for clipons and rearsets:
1" coped risers, throws off the seat and tank lines. Bit higher in the seat, not as agressive:
I'm not telling you anything that you don't already know, but the seat does look better when it lines up with the tank. I suspect the clearance issue comes from where the rear edge of the hump is. It's almost exactly over the top of the tire with the least clearance. A longer hump would create more clearance and would probably look better in that it's less dumpy and a more swoopy - stretched out look.
Check out a Vesco Big Butt seat for ideas of what else might work. The other possibility is to stretch the seat so that the hump moves rearwards. And a final idea is to notch the rear lower edge of the seat the same way as some of the works Hondas did back in the day.
Check out a Vesco Big Butt seat for ideas of what else might work. The other possibility is to stretch the seat so that the hump moves rearwards. And a final idea is to notch the rear lower edge of the seat the same way as some of the works Hondas did back in the day.
theprep
Been Around the Block
Previously had a few bigger seats, never looked right to me. I like it short and bobbed, to me, it looks more aggressive.
I adjusted the suspension, awaiting new throttle assembly before I can test it, fingers crossed.
In this position, it feels really nice in the saddle so worse case as stated, notch the rear.
I adjusted the suspension, awaiting new throttle assembly before I can test it, fingers crossed.
In this position, it feels really nice in the saddle so worse case as stated, notch the rear.
theprep
Been Around the Block
An idea that just came to me is to cut a horizontal slot in the center of the hump, slide 1/8 flat bar through and fabricate inside the hump two threads epoxied. Fabricate two pieces with mount holes that attach to the flat bar, one inside to attach to threads, one on the outside to mount Lucas light.
The key is to get it perfectly centered and the right height. Searching for grommet now that will make it clean.
The key is to get it perfectly centered and the right height. Searching for grommet now that will make it clean.
theprep
Been Around the Block
Phase 3 of cosmetic revamp is about complete. Waiting on new Woodcraft clip ons, somehow USPS is late....
Also waiting on vinyl to deliver so I can wrap seat pan, paint the tail section. Done
Replaced almost all bolts with stainless cap, really tidies up the look. Polished out axle nuts etc.
New LED gauges, rewire, new custom LED tail light, new seat with insert pan wrapped with red stitch.
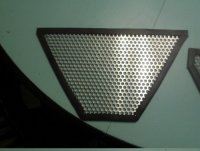
Made some side panel to cover previous oil tank and side cover areas. First attempt, not perfect enough, will try one more time.
Also waiting on vinyl to deliver so I can wrap seat pan, paint the tail section. Done
Replaced almost all bolts with stainless cap, really tidies up the look. Polished out axle nuts etc.
New LED gauges, rewire, new custom LED tail light, new seat with insert pan wrapped with red stitch.
Made some side panel to cover previous oil tank and side cover areas. First attempt, not perfect enough, will try one more time.
Attachments


theprep
Been Around the Block
Small update albeit without photo's at this time. Decided to go back to Autolube injection to make it easier on myself while travelling, pain to carry oil bottles and a Ratio-Rite.
Also sold the Woodcraft's, swapped to Tomaselli clubman's, having seat pan redone in leather and to match back tank opening, new aluminum rims w/spokes, black gloss powder to replace flat black on engine cases/triples/triple clamps, custom Speedhut GPS speedo, tach and a few custom machined pieces. Finally done, on to the next project......
Spent quiet a bit of time tracking down Japanese accessories to insure my build stays as close to 100% Japanese parts as possible, personal preference. Webike has a wealth of what I was after, new DRC clutch lever with MotoGP style cable adjuster, yet still have a period look, Posh head light stay. Having WM brake lever perch modified to house DRC cable adjuster assembly to keep pair matched visually and in function.
Took me almost 3.5 years of building/riding/experimenting to get it just the way I want. What you see above is Phase III, this will be the 4th and final phase.
Huge wallet strain.
Researching local CNC/machinist companies for my next build, teaching myself AutoCAD so I'll be able to have the ability to fabricate my own custom pieces from as idea.
You can also keep up to date on my progress at:
www.mckaymotoworks.wordpress.com


