Follow along with the video below to see how to install our site as a web app on your home screen.
Note: This feature currently requires accessing the site using the built-in Safari browser.
We noticed you are blocking ads. DO THE TON only works with community supporters. Most are active members of the site with small businesses. Please consider disabling your ad blocking tool and checking out the businesses that help keep our site up and free.
The numbers post from the manual say the CB should by 16/38... but I always thought it was 16/34, like you said... weird...
Also... I noticed while looking at the oil drilling photos that the stock retainers and springs seem to sit a lot higher than what I now have on mine. On my head, the valve stems stick up a lot further.... cause for concern?
As long as they are locked correctly and the valve length has not changed then no. Only thing I would worry about is making everything fit together under the valve cover. Maybe put the cam in and bolt the valve cover down and see what setting clearances looks like before building the entire motor. At least make sure you have enough room to adjust things.
Yeah... definitely in the plan... With so many aftermarket parts I'm measuring everything as I go. Nothing sucks more than starting her up for the first time expecting to hear lovely exhaust notes and instead watching chunks of metal fly everywhere.
That reminds me, I need to pick up some modeling clay.
the brass speedo mount and electronics tray look pretty badass sonreir. I stripped my bike down completely and trash all the ancient electronics. I am at the point where I need to build a tray and wasn't sure the exact size. All I need is space for the rectifier and battery correct?
Depends on what you want to mount where. There's also your regulator (if your rectifier isn't a two-in-one type unit) and your flasher for your turn signals. If you're like me and going with an aftermarket ignition assist, then that needs to be mounted as well.
While I've got you all here, I'm hoping to get a quick sanity check. I'm ready to seal up the top and bottom cases (or at least I think I am) and I'm hoping to get some comments as to what I may have missed. I've been through the manual once and I'm getting ready to double-check, but here's a list of the things currently installed:
*Kickstart assembly
*Transmission shaft and countershaft
*Crank
*Cam chain
*Tensioner arm
*Cam chain bar and tensioner bolt
*Knock pins x2
Bottom end assembled last night. Three times. The first time I hadn't properly aligned one of the bearings on the main transmission shaft and so everything had to come off. The second time, I'd just finished putting the clutch together and putting it on along with the oil filter and noticed a gear sitting off to the side. Turned out it had slipped off the main transmission shaft, somehow.
On the plus side, the third time went smoothly and the bottom end internals are all set. I put on the clutch, shift lever, oil filter, and oil pump. I still need to do the oil pickup though. The head bolts are in place as well and tonight or tomorrow will likely see the pistons and cylinder jug go on along with the head. I've got some modeling clay I'm going to use to test the valve-to-piston clearance and I'll take a look at the clearances on the valve springs and retainers as well.
One thing that was a bit funny, but I suppose one wouldn't notice it during normal operation... It's very difficult to shift into 1st and 5th gear unless I turn the crank at the same time. Cause for concern?
I never noticed any difficulty shifting into first on my CJ without the crank moving before tearing it down. Not sure about fifth. Also not sure if it's cause for concern, just my experience.
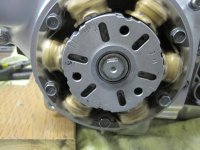
Can I get a quick sanity check, please?
I'm in the process of dry assembling the engine to check clearances and I'd just like to be certain that I have the crank and cam properly lined up... pics attached should be self-explanitory.
ehhhhhhhh..... you need to be more precise than that, you could be off a tooth and still look somewhat okay from the outside. do you have a manual? It should show how to properly do that. I can try to tell you here, but if you have a manual it would be easier to understand.
-here's me telling you on here.
take the rocker cover off, align to left tdc, the cam sprocket should now have the two lines perfectly horizontal, if they're not, then you need to take the tension off, and see if you can slip the chain over the sprocket enough to advance or retard properly. if you can't, then you'll have to take the sprocket off and adjust, then reattach and tension
Thanks, man. I do have a manual and I did align the marks on the cam sprocket to be parallel to the top of the head, but like you said, it seems easy to be off a tooth or so. Is there somewhere I can look to get a more precise measurement? You mention advancing and retarding... I assume this doesn't have to do with the settings on the points?
OK... I got the engine dry assembled this weekend to check all the specs and clearances. Unsurprisingly, the cam was out of spec for side-to-side movement. I have a thrust washer and a new oil seal on the way from CMSNL and it will hopefully be here before the next weekend.
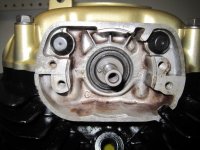
Below is the pic of the right piston at TDC before the bottom gasket had be compressed. This looks like a pretty good squish area, no? Also, you can notice the head bolts have been polished to (hopefully) help a bit with oil flow.
A bit of modeling clay has been laid down to check the valve-to-piston clearances.
Looks good to me! The valves barely made a dent on intake and the exhaust valve didn't break all the way through on the other end of things.
Re: '77 CJ360T (Café SOS) - Seat and Tank in progress
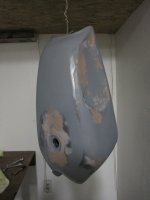
OK... so I'm finally starting on the seat/tail and I've done a bit more to the tank.
For the seat and tail, I'm going the florist foam route and I've cut and sanded a rough shape of what I'm after. It's not too bad so far, but I have a bit more to do before I'm ready for 'glass.
The tank got even more sanding and a bit more filler to take care of air bubbles and other crap from the last time around. While the tank has been sitting, it's gotten a nice coating of rust on the inside, so I'll need to deal with that now, too.
Re: '77 CJ360T (Café SOS) - Seat and Tank in progress
Crazy weekend... Ended up taking the kids to the museum on Saturday and Sunday was the Oregon Vintage Motorcycle show. Between those two events and working on our garage conversion, I didn't get much time in with the "other Mrs". I did receive a new thrust washer from CMSNL on Friday and so I now have the engine assembled. I also put some paint down onto the engine mounts. Hoping to get some time to work on the tank over a few nights this week... more pics to come...
Re: '77 CJ360T (Café SOS) - Seat and Tank in progress
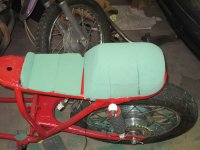
OK.. screw fabbing my own tail. Fiberglass is obviously not my medium with which to work. I think I'm gonna pick up a pre-fabbed unit and modify it a bit at a time until I get the hang of this stuff...
At least I did get my engine mounted up on the bike though. I also had to modify the front sprocket to get it to fit. Also put back in place is the speedo cable (still need to figure out some way of keeping the cables out of the way) and coils. Hand controls will be mounted this week and more sanding on the tank...
Problem - New 18 tooth front sprocket is too wide to fit
Solution - Bench grinder and a steel straight edge
Tight fit, but I think it will work. I'll have to keep an eye out for abnormal wear.
This site uses cookies to help personalise content, tailor your experience and to keep you logged in if you register.
By continuing to use this site, you are consenting to our use of cookies.