BigSherm's '03 Z1000 cafe!

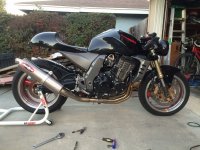
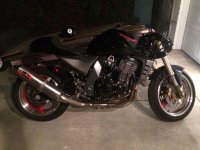
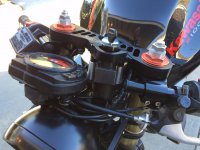
I originally wanted to make the tail section much thinner under the seat, but left it larger so the unmodified electronics and their brackets would fit under it.

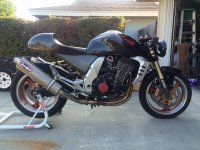
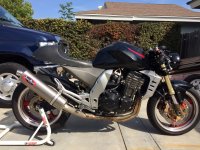
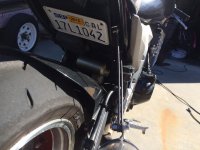
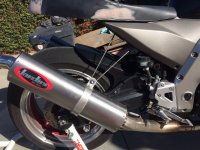
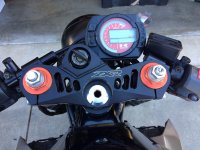
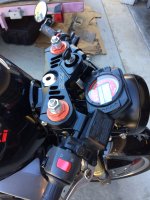
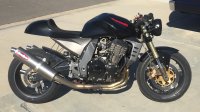
After staring at it for a while, I slightly modified the brackets to make them lower, and I trimmed another 3/4" off the bottom, going from this, to this-
 

Attachments

  • image.jpg
    image.jpg
    995.3 KB · Views: 252
  • image.jpg
    image.jpg
    1 MB · Views: 234
That brought the seat pan level down past the emissions lines on the back of the tank, so I had to deal with those.
 

Attachments

  • image.jpg
    image.jpg
    886.6 KB · Views: 242
Until now, the main use for the bike is getting to the airport fast, and taking advantage of their free motorcycle parking! A work trip was looming, so I zip-tied the excess wiring up under the tail, half-assed a temporary tail light, and stuck the license plate under the tail to get to the airport.

Even with no seat pad, this thing is a blast to ride!

That big black headlight way out front, the stretched-out riding position to the low clipons, and the compact tail section take this bike from solid, but with aging styling, to the feel of a cool, custom old bike.

Another benefit is with the windshield gone, and an open-face helmet on, it's more exciting to ride at 70 - 75mph, instead of being at 85 before I know it. Less of a speeding ticket magnet this way.

I see motorcycle riding for fun back in my future!

Until more work takes place, here's a shot of my constant companion when I work in the driveway-
 

Attachments

  • image.jpg
    image.jpg
    805.8 KB · Views: 246
Back at it!

I've trimmed the unneeded passenger peg supports from the stock rearsets. They turned out pretty well.

That left the mufflers without support, so I made some hangers out of steel rod.
They turned out like I had hoped!

-Sherm
 

Attachments

  • image.jpg
    image.jpg
    720.8 KB · Views: 229
  • image.jpg
    image.jpg
    947.7 KB · Views: 230
I spent a while Reshaping the left rearset, which turned out great.

I repainted the frame covers, radiator shrouds, and rearsets from an aluminum color to a darker graphite color.

I've been going back and forth about what taillight to use.

I tried a strip of LEDs with the individual lights poking through individual holes in the tail section. It takes a LOT of care to drill 24 tiny holes in a perfectly straight line around the back of the tail section! After I got them in, it was a little too futuristic looking, so I pulled it out, and filled in all those holes.

I considered a Benjie's-style single 4" round taillight, but just didn't think it was what I wanted. I went with a temporarily mounted strip near the rear wheel hugger, but I believe I'll soon put a straight strip LED there permanently.

That decision let me finally finish the tail section! It's freaking amazing what can be accomplished with spray can auto paint!

This is two cans of a Chrysler color, with a can of clear coat, followed by 1000 grit wet sanding, then about a solid hour of rubbing with rubbing compound.
 

Attachments

  • image.jpg
    image.jpg
    893.7 KB · Views: 230
  • image.jpg
    image.jpg
    714.6 KB · Views: 222
Some painstaking work trimming the seat pad followed.

I used 3/4" foam from AirTech, and it's open-cell, instead of smooth closed-cell like I used on my Honda. The foam seems like it'll be good, but I'm not sure about the adhesive film that came attached to it. Time will tell if that foam will stay.

Anyway, about 12:30 last night I took it out for a blast around town. The thing is a blast to ride!
 

Attachments

  • image.jpg
    image.jpg
    684.8 KB · Views: 226
This thing is so much fun that after a couple years of mainly using the bike to blast through LA traffic to the airport, and take advantage of free motorcycle parking there, I'm back to riding just for fun!

Here's a ride to the world famous Rock Store on Mulholland-
 

Attachments

  • image.jpg
    image.jpg
    1.2 MB · Views: 225
Bigsherm;
That is a very fine looking bike. Not a traditional Cafe, but a great look and it appears to be totally usable. Very nice seat especially, it is rare to see someone put an old school seat so seamlessly into a contemporary aesthetic, well done sir.
 
Thanks, RunDown, I really appreciate that!

I was always impressed that you could find this fuel-injected, 125hp rocket in great shape, and dead reliable, for $2200 a couple years ago.

The look and feel of the stock bike were kind of dated to me, and modifying it into this retro cafe has been a revelation!

Every time I see the bike I'm thrilled at how well it turned out, every time I ride it I love it more, and every time I park it someone wants to talk to me about it.

Riding a naked bike again, being in every bit of the elements, is also more fun at a more reasonable speed than being isolated by the windshield and cushy seat like before.

-Sherm
 
What an amazing difference! It is crazy how the whole vibe of the bike changed so much by what you've done.
Looks great.
 
Impressive transformation. I like it too! ;D
 
Awesome work!!! :p

This bike is not the one I prefer but your version is funny like that!!!
If I can put a personal comment, the smoothy shape of the back of your seat break a little the general lines of the bike, more angular...
But You did a really clean work I'm envious !!
 
Thanks for the comments, guys!

I replaced the top triple clamp with an aftermarket '06-'07 ZX-10R piece I found on eBay for $170.

That got rid of the old top clamp, with its now-unused handlebar mounts, and it also let me slide the clipons about an inch higher because the new triple clamp is about half the thickness of the stock piece. An inch higher made a big difference in comfort, now the handlebar height feels about the same as a typical sport bike.

The offset and fork spacing match, but I had to get the steering stem hole bored out by about 2mm. There's still plenty of material around the stem area.

That let me build a new bracket from steel rod to hold the stock gauges. After painting the bracket, it pretty much disappears from being noticed.

Now that area looks a lot better!
 

Attachments

  • image.jpg
    image.jpg
    788.3 KB · Views: 244
  • image.jpg
    image.jpg
    830.6 KB · Views: 234
  • image.jpg
    image.jpg
    783.7 KB · Views: 243
A small update.
I plasti-dipped the wheels!
The polished stock wheels were really holding back the look of the bike, I think.
I considered ZX-14 wheels, but this was nearly free!
 

Attachments

  • image.jpeg
    image.jpeg
    1 MB · Views: 206
Back
Top Bottom