cbx550 cafe build

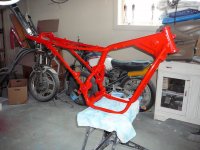
So I installed new tapered steering head bearings in the frame and onto the bottom yoke. Yes I did pack them with grease after this pic was taken!
SDC10990.jpg

Next up was to reinstall the engine, I was dreading this part because of the danger of scratching the frame. As it happens I did manage to scratch it once on one of the exhaust studs, but I think it will be hidden behind the exhaust clamp where the down pipes connect to the engine. Made me feel sick when I did it though! Never mind... :'(
SDC10993.jpg

I laid the engine on it's side and lowered the frame over it. Not as simple as it sounds I can assure you! After much wriggling around it went on, then it was a matter of getting a bolt in at a time and gradually line the mounts up.
SDC10997.jpg

Swing arm and shock is on, this was quite straight forward and ok to do. Started putting on footrest mounts etc so moving on at a reasonable pace for a change. :)
 
More progress this week, seems to be not a lot of progress but loads of time spent! First job on the list was to install the carbs which was fine apart from needing very small japanese type fingers to do up all the awkward little 6mm bolts holding the carbs to the engine block.
I thought that was a pain in the a** until I had to tackle the airbox.....now this should be an easy job as access is pretty good, however one of the rubber/plastic boots just would not go on the carb body no matter how hard I tried. I heated the boots up with a hair dryer, soaked them in hot water and coated the insides with washing up liquid to no avail. After a couple of hours of frustration I realised that I could seperate the boots from the actual airbox part and then reconnect them after I had installed the boots. The clips where all twisted and generally in poor condition so I purchased some new ones and connected the boots up, I think maybe that age has robbed them of s
ome of there flexibility but eventually I got it all connected. Not entirely happy with them but we will see how they go.
After that I put the disc, new sprocket and spacer, cush drive rubbers onto the rear wheel and reinstalled the lot on the swing arm.
SDC11004.jpg

Looks pretty sharp I thought. The gold sprocket stands out nicely against the black wheel.
SDC11000.jpg

One problem I have encountered is the brake stay that I have welded to the swing arm, it all connects wonderfully but it only gives me about 5mm adjustment on the chain as the support bracket for the caliper comes straight off the rear axle. I don't know why I did'nt see that coming but hey ho..it's fine for now but a small redesign will be needed shortly.
SDC11003.jpg

So the chain is on which feels like a major milestone to me! Back to the electrics now to relocate the rectifier and relays etc.
 
youve been doing lots of really nice work. interested to see the final project. is the swinger steel or AL?
 
Erskine said:
Bloody brilliant stuff. Not far to go now ........................... and then snagging ;)
Thanks for your comment. I am already seeing things I want to change later!! ;D
 
dcmspikes said:
youve been doing lots of really nice work. interested to see the final project. is the swinger steel or AL?
The swing arm is ally, a friend welded the brackets for the brake stay and mudguard mount onto it and made a nice job of it. It's going to need some alteration to the brake stay though before I can adjust the chain other than a couple of mm.
 
Following along here an looking forward to how it turns out.
Check your travel on the rear, the modified loop looks like it may interfere.
 
Yes, I have been avoiding thinking about that one! What's the fix if i do have a problem? Longer shock? ???
 
The rear suspension has 100mm travel. If it is close you may be able to get away with bending up the frame loop.
A longer shock will cause its own issues. Handling will be affected as you will effectively decrease the rake in the front end. Finding a longer shock with the appropriate spring rate will be a challenge. And raising the rear may just not astetically look right.
I changed out the shock on my CBX with one from a 90's CBR600 mainly to get the adjustability. The stock air shock is okay but not good. To fit it, the shock mount required to be moved as the CBR shock is longer.
You can also consider extending the loop further back.
Or run 100+ PSI in the shock to keep it from fully travelling. It would make the ride bumpy.
 

Attachments

  • Frame.jpg
    Frame.jpg
    242 KB · Views: 301
  • Mission 2004.jpg
    Mission 2004.jpg
    117.1 KB · Views: 326
CBXStan said:
The rear suspension has 100mm travel. If it is close you may be able to get away with bending up the frame loop.
A longer shock will cause its own issues. Handling will be affected as you will effectively decrease the rake in the front end. Finding a longer shock with the appropriate spring rate will be a challenge. And raising the rear may just not astetically look right.
I changed out the shock on my CBX with one from a 90's CBR600 mainly to get the adjustability. The stock air shock is okay but not good. To fit it, the shock mount required to be moved as the CBR shock is longer.
You can also consider extending the loop further back.
Or run 100+ PSI in the shock to keep it from fully travelling. It would make the ride bumpy.

Thanks, I think I will try the stock one first.What is the standard pressure for the shock do you know?
 
I just read through this thread and I am really glad I did. The bike is looking great. I'm very interested too see the look of it as it comes together. It really looks to be top notch. Nice work.
 
Deviant1 said:
I just read through this thread and I am really glad I did. The bike is looking great. I'm very interested too see the look of it as it comes together. It really looks to be top notch. Nice work.

Thanks it's nice to know other people are interested in what you are doing.I am trying to do the best job I can with a limited budget which makes me do and learn stuff that I might have got others to do if I had the finance.
Thanks again for your positive comments. :)
 
Hay mate will definitely be following this one.

I have seen it before but why do you put the foam on the frame just to protect the paint? Or when do you rest the engine on it before it’s bolted onto the mounts???
 
deepwaterimports said:
Hay mate will definitely be following this one.

I have seen it before but why do you put the foam on the frame just to protect the paint? Or when do you rest the engine on it before it’s bolted onto the mounts???

Hi, yes it is purely for protecting the paint although I still managed to scratch mine.! For me it was a case of lowering the frame over the engine whilst the engine is laid on it's side, easier said than done ;D as the engine in this bike weighs a ton! If you had a smaller capacity engine you could maybe lift it into the frame with it upright.
 
Is it a motorcycle....?

After a couple of hours with the Nitromors I have a very clean, fully stripped petrol tank. Deadly stuff but it works a treat, just make sure you have your hands and arms covered whilst you use it. Probably a good idea to wear a pair of goggles to.
SDC11015.jpg

Looks excellent apart from three very small dents which will be taken care of later.
SDC11012.jpg

So gave the tank to my lovely work colleague who is going to do all the paint for me. Going for gloss black for it's classic appeal and simplicity. Black goes with anything right? I have some gold Honda wing decals for the tank which should look great against the black.
Started building up the front end to see what will require modification if anything. Attached the clipons I bought from a company called Motopike which are gold anodised aluminium, they look fantastic in contrast to all the black. they where not cheap but they where worth it.
SDC11035.jpg

Just put them on without any switch gear to see what they look like.
SDC11032.jpg

Moving to the other end I did some electrical work which included lengthening the cables to the rectifier so I could mount it under the seat. As the battery is staying in it's original home there is plenty of room.
SDC11018.jpg

I mounted the rectifier on a piece of foam to help with any vibration issues. Left the other cable in the picture it's original length as I thought why introduce another connection? It will be tucked away underneath the seat anyway so it's all good.
SDC11017.jpg

Just the indicators and rear lamp to wire in when I have mounted them. I have to make a bracket for the rear lamp and number plate to get the clearance from the tyre.
With the forks and front wheel attached it's actually starting to look like a bike again!
SDC11038.jpg

Now that the front is on I am not so worried about the size of the rear hump as it is balancing out the more stuff that I put on.
SDC11041.jpg

So I am getting close now! Well a few jobs to do yet before it's ready for riding. Onward and upwards.
 
Thanks Erskine. :)

Just been notified of a slight error in my last post..I actually mounted the cdi/ignitor under the seat not a rectifier.... ::) Thanks Swivel.
 
Hi, apologies that it's been so long since my last update(if anyones interested!), work and money has got in the way for a while.
Ok on with the show, doing a lot of small jobs in the run up to the finish hopefully in a couple of weeks time, fingers crossed.
I moved the indicator relay up under the seat which involved lengthening the battery live lead and various other wires.Sorry no pictures of that. Made a couple of brackets up for the front indicators so they stick out just either side of the fork legs for visibility. They are unpainted in the pic.
SDC11061.jpg

Also made a couple of mounts for the new speedo and tacho. The mounts are small enough that they will hardly be seen when painted. I think the gauges look great although I may need to lower them slightly later...I will see what they look like once the headlight is attached.
SDC11062.jpg

Got the front end all mounted up but when doing a test bounce of the forks I noticed both fork seals where leaking so two steps back and took it all off again. I have never tackled this job before but they where ok to get apart. Glad I did really as I found the oil was in a disgusting state and someone has damaged the stanchions when removing the seals before. I used a small oil stone to get rid of the sharp edges but maybe I will have to replace them later if they leak again. I also managed to lose one of the sealing washers for the bottom fork bolt so I am waiting for delivery of a couple of new ones before I can put it back together again. Updates on that later.
20120605_154817.jpg

Whilst the front end was on I attached the new clipons which look fantastic. Connected the throttle cables which was a right pig to do. I think if you have to do this job then it would be easier to remove the carbs to connect them rather than struggle for hours like I did! Oh well live and learn. On went the grips and clutch and choke cables, the choke cable I found was too stretched to reuse so I bought a new one.
While the bike was on it's wheels I did a trial fit of the exhausts. The down pipes will be painted black, expected some problems here but they seem to fit with the new slipons really well and mount ok to my original hangers.
20120609_115435.jpg

Now to the best bit, the tank and mudguards are painted!Yeah!!! Applied the decals I bought from the US and they look great. Went on really well to, easy to apply. Just the lacquer to apply and it's done. My painter has done a fantastic job. Anyway here it is in all it's glory.
20120708_083103.jpg

Other side.
20120708_084500.jpg

Getting close now, just a few niggles to get over before lift off. Hope you like.
 
Ok a bit of a frustrating few weeks trying to sort out the last bits before start up. First up I manufactured a aluminium side panel to cover the battery.
SDC11075.jpg

This is mk2 as I did'nt like the look of the first one. Bit ugly initially but in the next pic it has paint on and I think it blends in better. Very difficult area to do anything with, that looks ok anyway.
SDC11076.jpg

Not too bad I think? If you are alert you will notice the lovely Honda emblem decals I put on the panel, the wrong way around! :p Off they came, new ones on the way.
Also in the picture above you can see the freshly painted exhaust down pipes.
On the other side I made up a flat plate from the same aluminium and just stuck it to the side of the airbox to hide the ugly shape.
Next up I made a bracket stroke fork brace to mount the freshly painted front mudguard. Really pleased with this effort.
SDC11087.jpg

SDC11088.jpg

On the subject of mudguards I found that the rear mudguard would probably foul the underside of the rear section of the frame when in use so although gutted I had to cut it down a bit. Looks ok though.
SDC11086.jpg

Also this week I stripped all the brake calipers and replaced all the seals and gave everything a good clean up. When I put the rear brake together I found that I could'nt get it to hold the pressure. I am using an old bit of tube in the bottle trick which is'nt working so well so I ordered a one way valve bleeding thing so I will see what happens then.
Pumped up the forks pressure and the rear shock which is not as easy as it sounds due to it being very difficult to get a fitting onto the valve due to it's close proximity to the frame. Eventually I purchased a 200mm long valve rubber extension which I can leave on the bike and just tuck it away. The shock is now quite hard so that the rear subframe does not contact the tyre under load. I will take a bit out at a time to find the right balance later.
Fitted the headlamp mounts and lamp itself and a new horn.
SDC11071.jpg

Here is a couple more pics from the rear of the exhausts.
SDC11078.jpg

SDC11079.jpg

New number plate later I think. Hope to get the bike outside this week to start it up and then all being well off to the testing station. ;)
 
Back
Top Bottom