We noticed you are blocking ads. DO THE TON only works with community supporters. Most are active members of the site with small businesses. Please consider disabling your ad blocking tool and checking out the businesses that help keep our site up and free.
You are using an out of date browser. It may not display this or other websites correctly.
You should upgrade or use an alternative browser.
You should upgrade or use an alternative browser.
cx'y 500
- Thread starter IED
- Start date
Bl0at3r
New Member
What an awesome build, when I started reading the thread I thought I was reading about my own CX500 project!
And there the similarities ended!!
Here is my project album - https://picasaweb.google.com/thebloater/CX500CafeRacerProject
I will be following your progress closely.
Alan
- I am from Essex, UK too
- My CX has done approx 70K miles
- I am turning a boring plastic maggot into a cafe racer
- I have also mod'ed my frame and have similar inspiration from the wrench monkees bike
And there the similarities ended!!
- You have done more in a month than I have managed in about 6!
- Your skills, dedication and end results appear to be at the complete other end of the spectrum to mine!
- You'll actually finish yours this century :
")
- I'm using the word 'patina' to excuse the lack of proper refurbishment that is taking place
Here is my project album - https://picasaweb.google.com/thebloater/CX500CafeRacerProject
I will be following your progress closely.
Alan
IED
Been Around the Block
Hey Alan, thank you for those kind words mate.
Where in Essex you from fella? we might live in the next street to one and other ;D .
While I was at work today I was thinking how racer it would be to drill the battery box to lighten it up a bit. I really dont think it will make that much difference, but it might look cool.
When I got in I marked out a grid and dot punched it, then drilled smal pilot holes.

Then opened the holes slightly with a bigger bit.

Until I got to where I was happy with the hole size.
Might not look much now, but I think it will add to the over all effect.

Swing arm was next.

Be really carfull removing the wheel because the pads are made with asbestos and there may be dust in the drum you'll want to avoid, so for goodness sake dont blow it out and get a lung full.
Right, diff off next

The three nuts that held it on were really tight, so I stuck it in my vice to get em undun.

And thats the frame stripped ready to go for blasting and powdercoat.

While its gone I have plenty to get on with including new fork seals

And removing the tyres so I can get the rims refinished.

Where in Essex you from fella? we might live in the next street to one and other ;D .
While I was at work today I was thinking how racer it would be to drill the battery box to lighten it up a bit. I really dont think it will make that much difference, but it might look cool.
When I got in I marked out a grid and dot punched it, then drilled smal pilot holes.
Then opened the holes slightly with a bigger bit.
Until I got to where I was happy with the hole size.
Might not look much now, but I think it will add to the over all effect.
Swing arm was next.
Be really carfull removing the wheel because the pads are made with asbestos and there may be dust in the drum you'll want to avoid, so for goodness sake dont blow it out and get a lung full.
Right, diff off next
The three nuts that held it on were really tight, so I stuck it in my vice to get em undun.
And thats the frame stripped ready to go for blasting and powdercoat.
While its gone I have plenty to get on with including new fork seals
And removing the tyres so I can get the rims refinished.
IED
Been Around the Block
I was supposed to be working today building a garden wall, but the rain had other ideas about that.
I came home and started on the fan cowling

I cleaned it up a while back ready for painting, and removed the rubber baffels. They were cracked and perrished and need to be replaced.
I have no idea what Honda replacements would cost, if you can get them. So I decided to make my own from a thick lorry innertube.
First I used the old one to make a template

Next I cut a section of rubber and cleaned it with meths

Sat the template on it and held it flat with a few bolts, then gave it a dust over with spray paint.

Then cut it out with strong sissors

I'll cut the slots and holes once the cowel has been painted.

While I'm painting the cowel I thought I would prep a few other bit and bobs for paint.

So the dirt shield came off and got the treatment.

Make sure to remove any dirt and grease before painting to give the paint a good chance of keying to the metal.
I use meths, but pre-paint is also the business.

The Diff was ok, and looks a bit complicated so there is 2 good reasons to leave it alone. I'll give it a good clean and paint and stick it back on when the frame gets back.

I came home and started on the fan cowling
I cleaned it up a while back ready for painting, and removed the rubber baffels. They were cracked and perrished and need to be replaced.
I have no idea what Honda replacements would cost, if you can get them. So I decided to make my own from a thick lorry innertube.
First I used the old one to make a template
Next I cut a section of rubber and cleaned it with meths
Sat the template on it and held it flat with a few bolts, then gave it a dust over with spray paint.
Then cut it out with strong sissors
I'll cut the slots and holes once the cowel has been painted.
While I'm painting the cowel I thought I would prep a few other bit and bobs for paint.
So the dirt shield came off and got the treatment.
Make sure to remove any dirt and grease before painting to give the paint a good chance of keying to the metal.
I use meths, but pre-paint is also the business.
The Diff was ok, and looks a bit complicated so there is 2 good reasons to leave it alone. I'll give it a good clean and paint and stick it back on when the frame gets back.
IED
Been Around the Block
So this after noon I've been cleaning, preping and painting parts

Then turned my attentsion to my yokes. I want to paint the lower yoke and polish the top yoke.
Problem is these lines. They are left by the joint in the two sides of the mold when the part is cast.

and they go right round the part.

I guess the factory see them as unnessary costly to remove, bit I think the part looks better without them.
They are not hard to remove with a file and aluminium oxide paper

Take a little time and use round back or rat tail files


Theres a job I can do infront of the telly, flatten them off with wet and dry paper ready to polish.

The bottom yoke is made from cast steel so I gave that a blast of paint too.

Well the weather front seems to have passed over so tomorrow I'll go build the garden wall I was going to do today, that will cover the cost of the frame powder coating next Saturday.
Then turned my attentsion to my yokes. I want to paint the lower yoke and polish the top yoke.
Problem is these lines. They are left by the joint in the two sides of the mold when the part is cast.
and they go right round the part.
I guess the factory see them as unnessary costly to remove, bit I think the part looks better without them.
They are not hard to remove with a file and aluminium oxide paper
Take a little time and use round back or rat tail files
Theres a job I can do infront of the telly, flatten them off with wet and dry paper ready to polish.
The bottom yoke is made from cast steel so I gave that a blast of paint too.
Well the weather front seems to have passed over so tomorrow I'll go build the garden wall I was going to do today, that will cover the cost of the frame powder coating next Saturday.
Erskine
Over 1,000 Posts
el_simo
Zi goggles, Zey do Nothing !!
Hey Erskine,
Took your advice with the DS7 mate. Cracking on with polishing the hubs, yokes etc. Once sanded and polished do you coat them with anything to prevent future oxidization ? Just wondering seen as your posting relevant pics ! Nice thread by the way !
Took your advice with the DS7 mate. Cracking on with polishing the hubs, yokes etc. Once sanded and polished do you coat them with anything to prevent future oxidization ? Just wondering seen as your posting relevant pics ! Nice thread by the way !
IED
Been Around the Block
One of the sides has come away from my radiator, when I looked it had solder on the back of the joint.
I have soldering equipment so I thought I would have a go at repairing it myself.

First I added flux, this is an acid the will clean the surfaces when its heated.

Next I gently applied pressure to bring the two parts together with a clamp

Then applied heat to activate the flux then melt the lead solder

after a few moments the solder will bond

Then the clamp can be removed

I have soldering equipment so I thought I would have a go at repairing it myself.
First I added flux, this is an acid the will clean the surfaces when its heated.
Next I gently applied pressure to bring the two parts together with a clamp
Then applied heat to activate the flux then melt the lead solder
after a few moments the solder will bond
Then the clamp can be removed
IED
Been Around the Block
Theres a show on tv called Wheeler Dealers.
The host buys cars on a budget, then takes them to his mechanic, where he restores them and they then sell the car on for a profit.
I like the show, but one aspect of it bugs the life out of me.
The mechanic will fit a brand new shiney part then use rusty old screws and bolts to hold it in place.
Not me, not on this project.
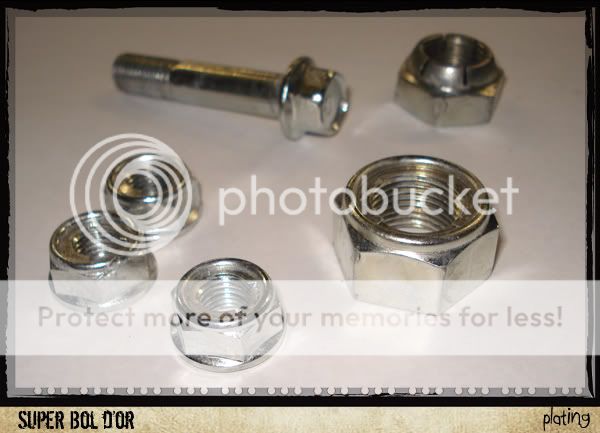
So tonight I decided to give all my bolts a good going over to brighten them right up

Its worth the effort, and will make a huge difference to the finished project

Well, if I wasnt doing this I'd just be stuck infront of the telly

another job, jobbed!!!
The host buys cars on a budget, then takes them to his mechanic, where he restores them and they then sell the car on for a profit.
I like the show, but one aspect of it bugs the life out of me.
The mechanic will fit a brand new shiney part then use rusty old screws and bolts to hold it in place.
Not me, not on this project.
So tonight I decided to give all my bolts a good going over to brighten them right up
Its worth the effort, and will make a huge difference to the finished project
Well, if I wasnt doing this I'd just be stuck infront of the telly
another job, jobbed!!!
dean owens
Pittsboro, NC
very nice. you've got little details going on that i wouldn't have thought of. but now.... i'll just be frustrated knowing what i should have done seriously, good work. i'm taking notes.
seriously, good work. i'm taking notes.bikeboy
Over 1,000 Posts
IED said:Theres a show on tv called Wheeler Dealers.
The mechanic will fit a brand new shiney part then use rusty old screws and bolts to hold it in place.
yep. We get that here too, and it also shits me to tears!
I've always taken the same approach as you, and consider the fasteners to be part of the rebuild. Just a word of caution tho, while they may look good now, you'll probably find you've wire-brushed the zinc coating off them, and they will eventually start to look a bit manky.
I'm betting it won't be long until you're looking at something like this to restore your nuts (or is that you're nuts? I know I am!):
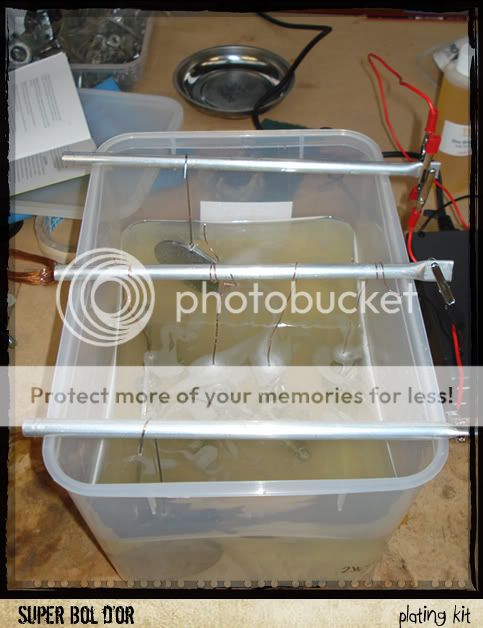
That's when you know you've crossed the line
I'll be waiting for you!
cheers mate
ian
dean owens
Pittsboro, NC
wow! color me interested. got any info on these kits? how much do they cost? how much time does it take?
bikeboy said:yep. We get that here too, and it also shits me to tears!
I've always taken the same approach as you, and consider the fasteners to be part of the rebuild. Just a word of caution tho, while they may look good now, you'll probably find you've wire-brushed the zinc coating off them, and they will eventually start to look a bit manky.
I'm betting it won't be long until you're looking at something like this to restore your nuts (or is that you're nuts? I know I am!):
That's when you know you've crossed the line
I'll be waiting for you!
cheers mate
ian
bikeboy
Over 1,000 Posts
dean owens said:wow! color me interested. got any info on these kits? how much do they cost? how much time does it take?
sure thing. I got mine here http://www.janekits.com.au/mainframe.php because they're in Aus, and a lot of the VJMC boys have used them. The main cost is for the variable current power supply, the chemicals themselves aren't all that expensive, and the electrolyte has lasted me about 6 months so far and is still good. I have the zinc kit, and with that you can also do the 'gold' zinc used on some fasteners.
Takes about 40 minutes for a nice coating, and I usually bead-blast them first, then wire brush them, drop them in and get to work on whatever part I'm working on. By the time I've finished that, the bolts are usually ready to slap it all back together.
It's a truly beautiful thing ;D
cheers
ian


