
We noticed you are blocking ads. DO THE TON only works with community supporters. Most are active members of the site with small businesses. Please consider disabling your ad blocking tool and checking out the businesses that help keep our site up and free.
You are using an out of date browser. It may not display this or other websites correctly.
You should upgrade or use an alternative browser.
You should upgrade or use an alternative browser.
Down under, an idiot and a 400F
- Thread starter neevo
- Start date
M
maduncle
Guest
When setting the rearset angle, I work on a 'keep your feet at 90 degrees to your shins' theory. Mine are currently set at around 7 o'clock, but I want to try and lift them up a little if I can.
Nice thing about the DCC fully indexable rearsets I am using is how adjustable they are.
Nice thing about the DCC fully indexable rearsets I am using is how adjustable they are.
pandknz
Been Around the Block
The position looks very close to where I have set mine up, when I sit on my bike and put my feet on the pegs I naturally lean forward over the tank and it puts the clip ons in a perfect position for my hands and the sole of my foot is at @ 45 deg, this is where the brake and gear shift should be, parrellel with your sole of your foot, I'm over 6' so you need to make it suit you.
crazypj
Split personality, I fake being smart
360 is almost same size as 400f, here's mine


I was 5'11" but since back is F.U. I'm down to about 5' 9 (an a bit)
32.5" inseam, (legs are still the same ;D ) position is just about perfect for me, 200+ mile 'day trip' wasn't a problem (it is since surgery last year, arm is also getting worse )
)
brake is about 30 ish degrees below horizontal
I was 5'11" but since back is F.U. I'm down to about 5' 9 (an a bit)
32.5" inseam, (legs are still the same ;D ) position is just about perfect for me, 200+ mile 'day trip' wasn't a problem (it is since surgery last year, arm is also getting worse
)brake is about 30 ish degrees below horizontal
neevo
Over 1,000 Posts
Thanks everyone! Seems like the footpeg on most bikes is around the same level as the swingarm bolt. Will try that on for size first and see if it works. Then drop a couple of tack welds on and try it for real.
Edit: just tried it on for size and it seems ok having the peg same height as the swingarm bolt. Tough genuinely testing it out with cable ties as the pegs move all over the place when you try and weight them. Put my feet on the frame and whilst it was way to high it felt not to bad, so obviously stability plays a big role.
Will tack it up level to kick it off and see how it feels from there, issue is to get the peg under my arse involves moving the pegs back an inch or so (due to stretching the tank) which also lifts it up on the frame rail too. Worst case I can weld the brackets and also affix some carriers to move it back further if required.
Perils of a non standard bike
neevo
Over 1,000 Posts
spotty said:you could take a leaf out of hyosungs book and make up a pair of plates with several sets of mounting holes, weld them on and move the pegs around to suit

That's a good idea. If I can't get them spot on that's a good solution and I can mount the bracket to the original rearsets mounts.
crazypj
Split personality, I fake being smart
It's probably the easiest thing to do, make a couple of 1/2" alloy plates to bolt to the frame mounting.
I would shape the steel piece to weld towardsinside of frame tube though, may end up with too much offset if they are completely centered on tube?
I would shape the steel piece to weld towardsinside of frame tube though, may end up with too much offset if they are completely centered on tube?
neevo
Over 1,000 Posts
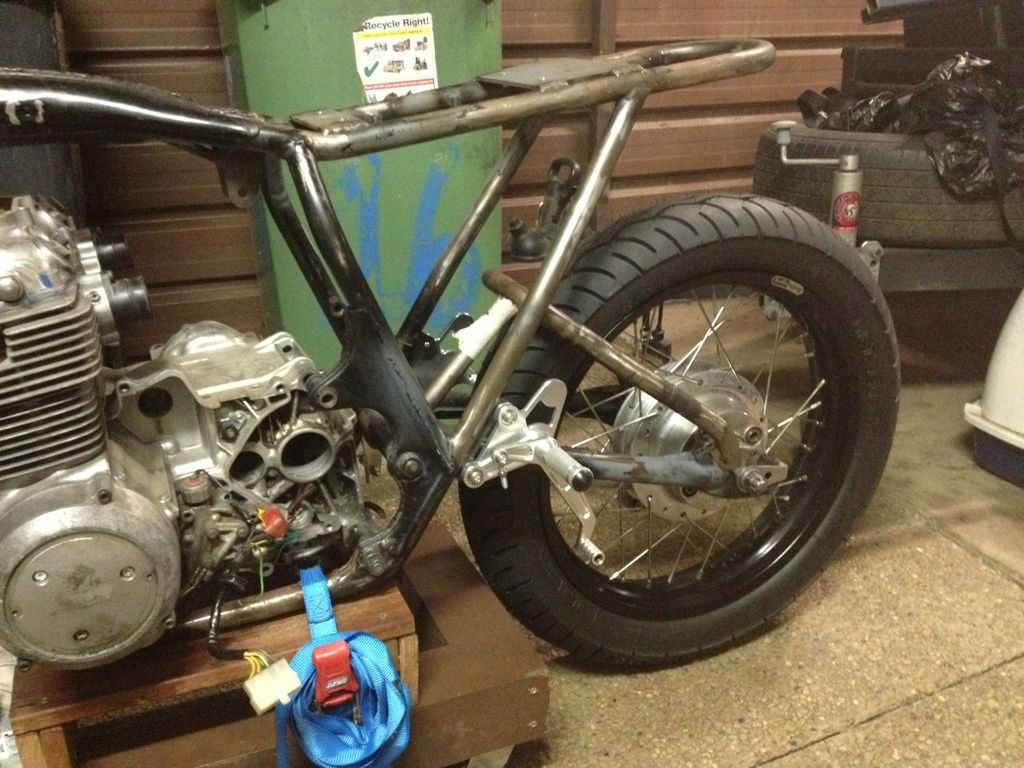
Couldn't resist a Friday night session seeing as I've not got much done over the past week or two. Today's order of business, remove the rear brake pivot tube and tack my billet beauty rearsets in place.
Preping the work area:
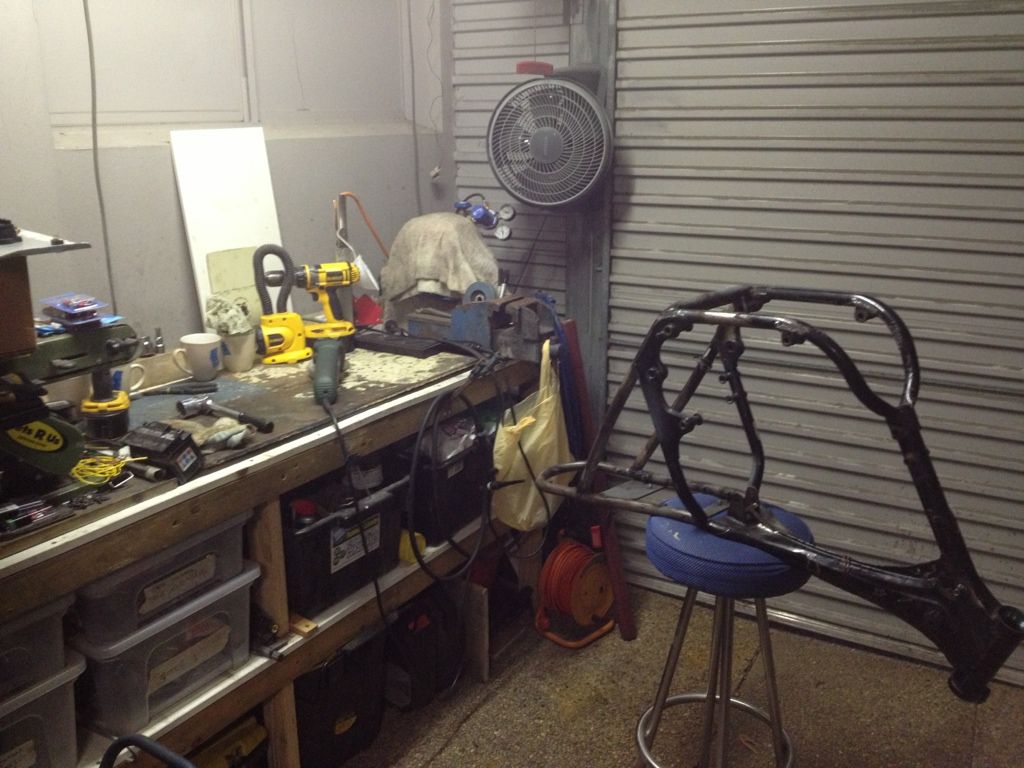
The offending article:
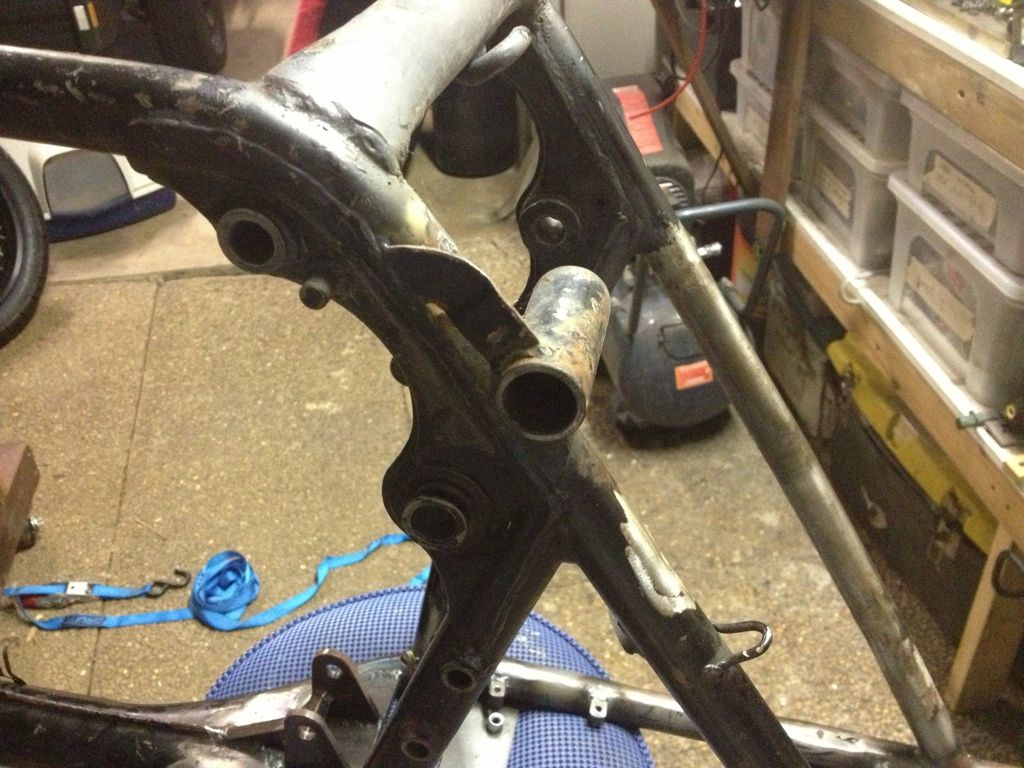
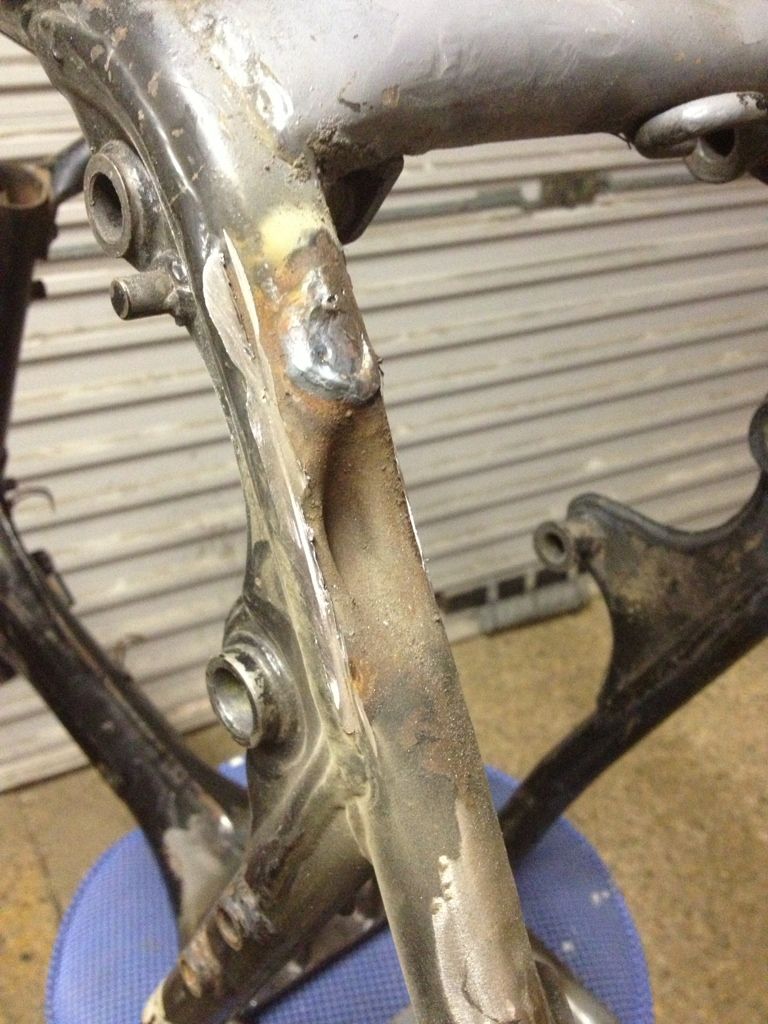
Trimmed and noticed the factory dent:
I tried the rearsets with cable ties this week and found putting the peg on the same plane as the swingarm bolt was the most comfortable. So I dropped a few tacks on and set about seeing how they looked:
Sat on the bike and finally put some weight on the pegs, pushing me forward on to the bars a bit but felt pretty good. Certainly didn't want them any higher but this is where I ran into a couple of issues with the rear brake setup.
1. The pedal contacts the rear brake pivot point. Not overly concerned as the pedal shouldn't come this far up when set correctly:

2. The pedal contacts the linkage arm when pressed down. This is going to be an issue:
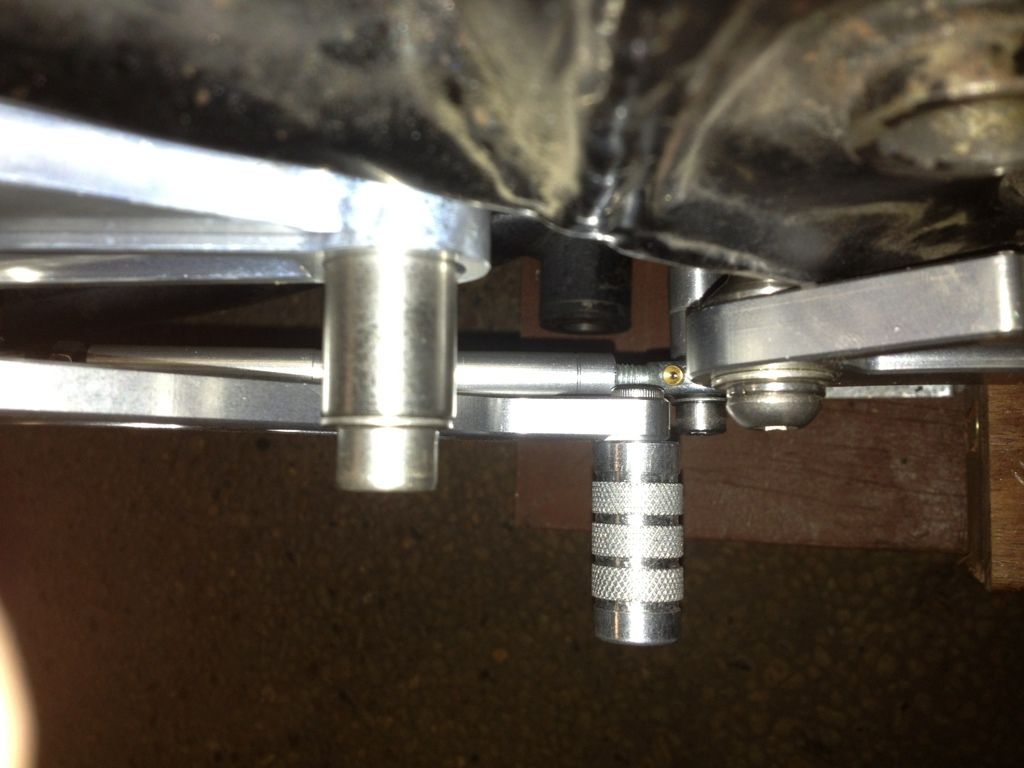
3. The linkage arm seems way too close to the frame:
What have I done wrong?
Preping the work area:
The offending article:
Trimmed and noticed the factory dent:
I tried the rearsets with cable ties this week and found putting the peg on the same plane as the swingarm bolt was the most comfortable. So I dropped a few tacks on and set about seeing how they looked:
Sat on the bike and finally put some weight on the pegs, pushing me forward on to the bars a bit but felt pretty good. Certainly didn't want them any higher but this is where I ran into a couple of issues with the rear brake setup.
1. The pedal contacts the rear brake pivot point. Not overly concerned as the pedal shouldn't come this far up when set correctly:
2. The pedal contacts the linkage arm when pressed down. This is going to be an issue:
3. The linkage arm seems way too close to the frame:
What have I done wrong?
M
maduncle
Guest
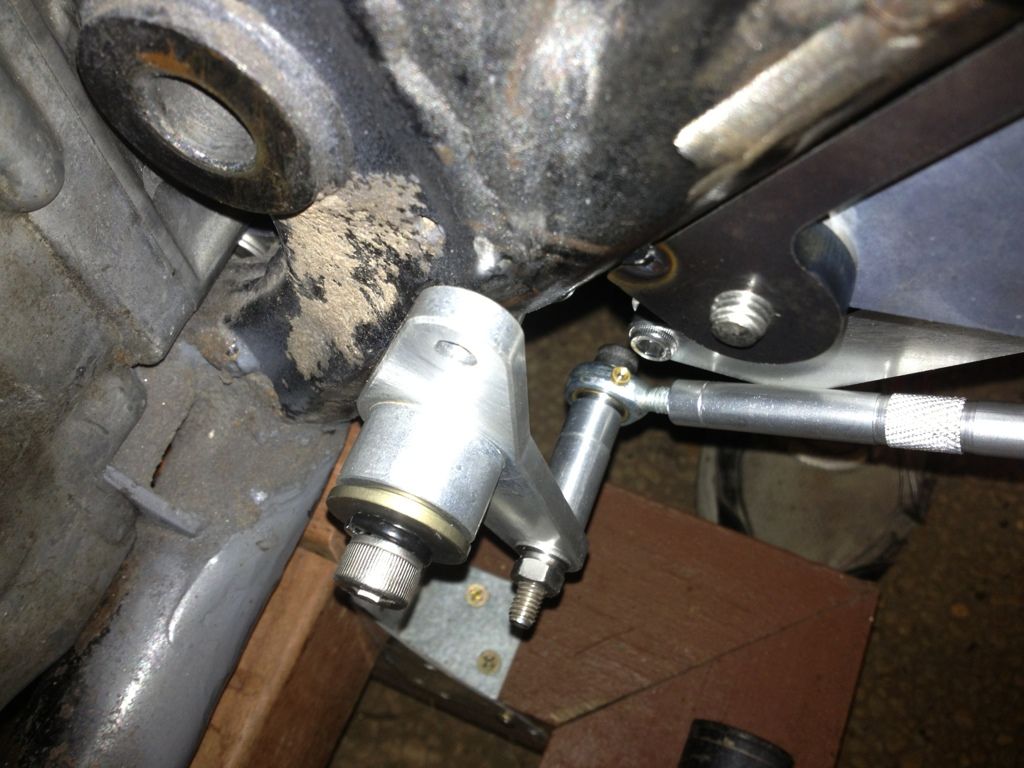
neevo said:The pedal contacts the rear brake pivot point. Not overly concerned as the pedal shouldn't come this far up when set correctly:
What have I done wrong?
I am not familiar with these rearsets, but it looks to me like the bolt sleeve on the outside of the rearset needs to be on the inside of the rearset (between the rearset and the tab welded to the frame) as this will move it out off the frame.
This should clear up your clearance issues and move the gear change linkage out too.
And should be more comfortable.
Anyway - just my two cents worth...
M
maduncle
Guest
neevo said:There's only 1 of those sleeves and I assume it acts as a stop for the lever coming up too far. You make a good point though, I could add a spacer behind each of the bolts to bring it out 6mm or so.
Thought I might have put it all together incorrectly.
Sounds like you put it all together right - but yes you might need to space the rearsets out off the tabs to get the clearance you need.
Great rearsets though, are they universal or model specific?
neevo
Over 1,000 Posts
They came with a spacer behind the bolts but its not done the job. Still convinced I've done something wrong.
They are a 400F specific model made by a chap in South Africa by the name of Kevin. Runs a store called TTR400 and makes amazing custom CB350/400 parts.
Edit: I emailed Kevin to work out the best fix. Pretty sure I've done something wrong like fixing them too low but fingers crossed he can point me in the right direction.
neevo
Over 1,000 Posts
Kevin got back to me already, top chap! Looks like these Hondas have some frame variation leading to my issues. I'm going to space the rearsets out approx 6mm with some spacers which should fix it up perfectly.
Might need some tweaking of the pivot on the inside to give it some clearance against the frame too but then we should be good to rock and roll.
Might need some tweaking of the pivot on the inside to give it some clearance against the frame too but then we should be good to rock and roll.
crazypj
Split personality, I fake being smart
I wouldn't space out the rearset, I would shorten the spacer stack on linkage bolt, it should work better as you won't have so much leverage on a shorter bolt.
Use spacer on brake pedal to move entire linkage 'inboard'
It will also move it 'inside' frame' (maybe?)
It isn't obvious from my pic but 360 has a 'flattened out' 'Z' shaped link and the mounting on pedal and actuator are 'twisted' about 10 degrees
Spacer looks like it should fit on left side to 'take up slack' on engine bolt?
I would fit stop on rearmost bolt to prevent pedal coming up too far (or 'hidden' on inside of frame
TTR stuff should look good, that 'lump' sticking out just doesn't look right
neevo
Over 1,000 Posts
I've got a few parts that have come in but will detail them when I get back into the shed.
Quick question about cam chains. Bought one and now thinking I have have ordered wrong. Anyone care to set me straight?
This is the description off eBay, will this work in my '76 CB400F Super Sport?
"GENUINE JAPANESE DID CAM CHAIN TO SUIT THE HONDA CB400 F1 & F2 FOURS FROM 1975 UP TO 1979.
THIS CHAIN WILL ALSO FIT THE FOLLOWING
THE HONDA CB175 TWIN 1974-1976 & THE CD175 TWIN FROM 1971-1978.
CHAIN SPEC IS TYPE 219T ENDLESS WITH 82 LINKS, IF YOU REQUIRE A RIVET LINK FOR THIS JUST PAY £1.00 MORE & WE WILL SUPPLY THE 219T DID RIVET LINK WITH YOUR PURCHASE."
evilaugust
Been Around the Block
Have you messed with your rearsets anymore?
crazypj
Split personality, I fake being smart
neevo said:I've got a few parts that have come in but will detail them when I get back into the shed.
Quick question about cam chains. Bought one and now thinking I have have ordered wrong. Anyone care to set me straight?
This is the description off eBay, will this work in my '76 CB400F Super Sport?
"GENUINE JAPANESE DID CAM CHAIN TO SUIT THE HONDA CB400 F1 & F2 FOURS FROM 1975 UP TO 1979.
THIS CHAIN WILL ALSO FIT THE FOLLOWING
THE HONDA CB175 TWIN 1974-1976 & THE CD175 TWIN FROM 1971-1978.
CHAIN SPEC IS TYPE 219T ENDLESS WITH 82 LINKS, IF YOU REQUIRE A RIVET LINK FOR THIS JUST PAY £1.00 MORE & WE WILL SUPPLY THE 219T DID RIVET LINK WITH YOUR PURCHASE."
Did you get rivet as well?
219 is pitch between pins and width, 350 is same as 400f
I use CB750/CB350 length and shorten it for 360
neevo
Over 1,000 Posts
Evil August said:Have you messed with your rearsets anymore?
Not yet, been away for work but I think the plan is going to be slightly space the rearsets on the mounts and do the same with the linkage too.
crazypj said:Did you get rivet as well?
219 is pitch between pins and width, 350 is same as 400f
I use CB750/CB350 length and shorten it for 360
No rivet. The motor is split so I was hoping not to use one. Worst case I get a link.


