Follow along with the video below to see how to install our site as a web app on your home screen.
Note: This feature currently requires accessing the site using the built-in Safari browser.
We noticed you are blocking ads. DO THE TON only works with community supporters. Most are active members of the site with small businesses. Please consider disabling your ad blocking tool and checking out the businesses that help keep our site up and free.
yes it was and it is “FRAGILE (FRA-GEE_LAY) it must be Italian!”
A reminder to my son that a woman is like a carburetor. " fra-gee-lay...It is a constant battle to find the right fuel air mixture. If you run too lean they burn up and if you run too rich they flood.
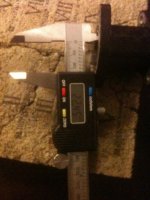
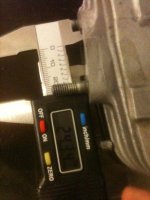
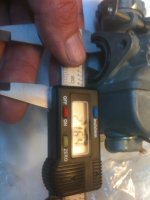
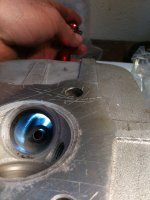
Yea I know about the o ring that connects to the manifold what i am curious about is in the middle of the stub...the first 14mm of the stub is aluminum and then there is a 14mm black band followed by 14-16mm of aluminum the black band is halfway into mounting stub is a black band it is dead center. I took another picture.
Pic 2 is the carb stubs attached to the head
acm177 I think it is a fancy hose like you fashioned for your carbs. It would make sense the stub is fluted moving from a smaller i.d. to a larger I.d the fuel and air move through a slick path to the rough black path (atomization) then slick and finally into the inlet. So if atomization takes place in the stub (assumption) can we polish the inlet??? Hmmm above my pay grade....where is Teazer when u need him?
From my past readings, I've noted that the intake tract should never be a mirror finish.
Generally when ported they are always a smooth path but rough finish.
There are some good reads from David Vizard about the attributes of proper combustion engines.
If you look hard enough I think you may find some PDFs from his books floating around.
It may also be inserted in there to bring the diameter of the manifold down to match the smaller cb200 carb. I believe that the 175 160 had larger carbs than the 200. 20mm? I'm not sure of the exact size...
The valve and surrounding areas deeper in the intake tract are where you often see people trying to maximize atomization. There's such techniques as dimpling and swirling valve finishes to aide in the process. Also beyond my pay grade... For what its worth.
Looking good. The rubber inl;ets are basically a molded version of what ACM did on his motor. They comprise two aluminum end flanges bonded to a rubber middle section to isolate the carbs from vibration. They are not a bad design.
Those inlets are just a sloppy casting and are supposed to be round. They may already be too large, so just check them to the inlet manifolds and try to remove as little metal as possible to get a reasonably smooth transition.
It is not considered to be good idea to polish inlets at all. Smooth finish is good but not polished. Back in the day we used to polish our in;lets until someone with a dyno and flow bench discovered that it isn't a good idea. Seems that fuel puddles out of suspension and that leads to loss of power and increased unburned hydrocarbons.
Serdi machines are my favorites for cutting valves and seats but do NOT try to lap them after they have been cut.
We swirl finish valves but I'm not convinced it has any effect - looks really trick though.
Fuel is atomized in the carb and intake charge swirl helps that as does a nice tight squish band. Suzuki have TSCC Twin Swirl combustion chambers to encourage the gas to flow and tumble. Triumph twins used to have intake ports more or less tangentially mounted so that the gas would flow in and swirl around the barrels as it fills. Honda has straight ports as a rule so it's hard to get that circular flow but it is theoretically possible to make gas flow in the port and tuners uses swirl meters to determine how much rotational direction the flow has.
We don't have a flow bench or dyno and it costs to have others do that work, so we do it on all new engines and rarely on a rebuild of an existing race bike. In the real world, that is all fascinating but not all that relevant. Those heads flow more than enough air for a 250 or bigger motor. Where they are a little restricted is the exhaust ports. They are fine for the street but a good clean up doesn't hurt.
160 carbs are OK but 22mm CB72 carbs are better. The ports would be better matched to say a 24mm carb but that's a lot of work for a street motor and needs a cam to make it run hard enough.
Looking good. The rubber inl;ets are basically a molded version of what ACM did on his motor. They comprise two aluminum end flanges bonded to a rubber middle section to isolate the carbs from vibration. They are not a bad design.
Those inlets are just a sloppy casting and are supposed to be round. They may already be too large, so just check them to the inlet manifolds and try to remove as little metal as possible to get a reasonably smooth transition.
Teazer thanks and I read your other posts on Serdi cutting how you just "popped" them in without lapping! I was perplexed after looking for places to improve the flow through on the head. The only place in question was the valves and valve seat. In the book Tuning for speed he said that reducing the contact of the valve face to the seat by multiple angle cuts was the best way to do that...Now to the manifold...the inlet is BIGGER 24.34 than the stub 22.56 already! Looks like somebody was lazy in adapting the 175 mold for the 200? Have you opened up the effective venturi to make it round instead of oval? Can you imagine how many questions I have to field from mini-me?
It may also be inserted in there to bring the diameter of the manifold down to match the smaller cb200 carb. I believe that the 175 160 had larger carbs than the 200. 20mm? I'm not sure of the exact size...
"Honda's choice of an 18mm carb on the 200 perpetuates a steady decline away from the performance orientation of the CB160. That model had 22mm instruments; the CB175 carbs were 20mm in effective venturi area; now the CB200 is dished up with 18mm gas/air mixers. The rather predictable end result is that the CB200 is effectively strangled at high revs. Compared to the CB200, the CB160 was a racing bike"
So we are planning on making the venturi area more round than oval. Here is my question is their any difference between the two carb slides?
From the quote above I gathered that the the only way to increase the efficiency of adding more fuel with a bigger carb is that the cam HAS to be changed. As Teazer said the heads flow through can handle 250cc. It looks like there is no difference on the megacycle 160/175 cam and the 200 cam (the mild cam) I am wondering what the original 160 and 175 cam specs were?????
Don't believe everything you find on the internet.....
According to our notes,
CB160 carbs had slides which are roughly 20mm diameter so the venturi can only be opened up slightly from the 18.2mm tight spot. Those carbs were 20mm and the equivalent diameter of the figure 8 was approximately 20.5mm. It was 21.8mm tall and 18.2-18.5mm wide.
CB175 were 21.3 tall, 126.2-14.4 wide = 20.5mm average/equivalent.
CB200 were 21.9 tall and 16.1/16.5 wide equivalent to 19.6mm round and the slide is nominally 18mm diameter.
CB200 is a much larger engine breathing through a slightly smaller carb so it runs out of breath at lower revs. a 22mm carb gives almost identical gas velocity on a 200 as a 20mm does on a CB160 and should be fine. That said we use PW26 on a 181cc race motor without any issues and I have seen CB750 crabs on a CB160 - albeit that was a bit oversized and so was the motor!
When you clean up that venturi from figure 8 to oval shaped, remember to leave a margin around the slide. We don't want air sneaking around the slide. Let's start off with say 1mm margin, so with an 188mm slide we can open up the venturi to 16mm and it's already larger than that....
The two key areas in a port are the seat area and the Critical Port Diameter around the guide. The port is designed to neck down at the guide and then to increase in size after that. Get that bowl/pocket right and the rest can be left alone.
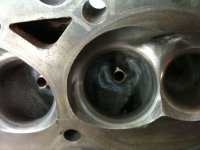
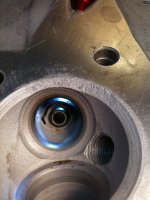
We got back from Wells Racing and they are gonna be able to Serdi cut our valves and seats. They gave is a tour and showed us their work. They marked up our head for porting on what they would do. What do you think? Any worries about the deterioration on the fire ring above the exhaust valve pic 2?
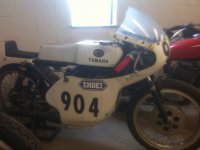
oh yea one day... the great thing about enamel is that it is easy to repair. The reason why I bought Perreault clip ons is the bars are easily replaceable. He is gonna dump it someday. We will fix that. He got all upset about some scratches he made in the tank...we fixed them. We had a blemish in the fender, we fixed that also. Repetition, repetition, repetition...
This pic is worth a thousand words. David @ wells racing said, "optimize, atomize, boom! boom! Boom! These guys build everything! Look at how the guide is made into a fin! The seats all serdi cut! The head design is wild!
This site uses cookies to help personalise content, tailor your experience and to keep you logged in if you register.
By continuing to use this site, you are consenting to our use of cookies.

")