First Build - 1981 XV750

ShadyOne

New Member
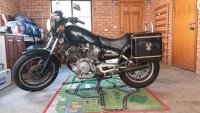
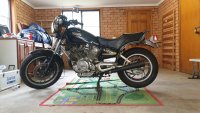
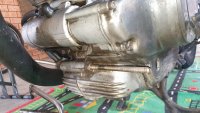
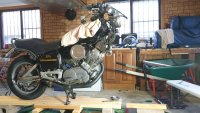
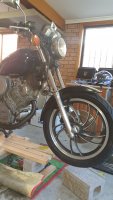
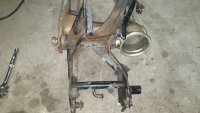
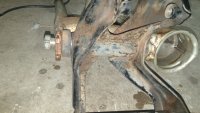
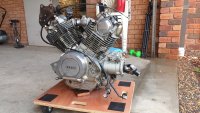
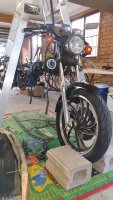
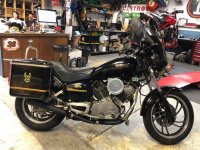
I've been looking for a project for a while and started looking at a 50yo cylinder mower to refurbished but it morphed into a motorbike and after some research about what one, I arrived at the same spot as plenty of people before....A pre 84 Mono Shock Virago. It took a few months to find one local and at the right price point..I envy you guys in the US picking these things up for a couple of hundred dollars, I thought I got a reasonable deal here in Sydney, Aus and picked this one up for $2100.. It ran rough, it had the usual "box of rocks" starter motor problem but it did run and all the electrics were working. The bike has aftermarket additions including panniers, engine/crash bars, alarm and single carby conversion with Mikuni TM40.

Plan for the bike?? Like many before me I was inspired by Greg Hageman's creations. I'm not ashamed to admit that I don't have a creative bone in my body so where ever the bike ends up, it's because I've copied someone else's ideas:p. A 'side plan' is to work on this with my 12yo son, spend some time together and teach him about bikes/mechanics like my dad taught me. On that note I grew up with dirt bikes but I havent owned a bike for over 12 years let alone taken a spanner to one, so my mechanical knowledge is limited and we'll both learn throughout this process.
 

Attachments

  • 78229803_10157806161367803_4560109895063437312_n.jpg
    78229803_10157806161367803_4560109895063437312_n.jpg
    109.3 KB · Views: 222
Last edited:
First jobs to do.

Fix oil leak in front cylinder cam chain inspection cap (not the tensioner on the rear)
Remove Panniers
Remove crash bars
Remove rear storage rack
 

Attachments

  • 20200410_132615.jpg
    20200410_132615.jpg
    4 MB · Views: 237
  • 20200410_154155.jpg
    20200410_154155.jpg
    3.7 MB · Views: 242
The cam chain inspection cap (I think this is all it is as I cant find any reference to it) has been leaking oil down over the starter motor and onto the exhaust. I took it off and the very old remains of what once was a gasket could be seen on the cap. I cleaned it up with some wet n dry sand paper, reinstalled it and will need to find a gasket...or make one.
 

Attachments

  • pic 1.jpg
    pic 1.jpg
    498.8 KB · Views: 211
  • pic 2.jpg
    pic 2.jpg
    796.3 KB · Views: 215
Front crash bars were next cab off the rank and were easy enough to remove. What was left behind was a 300mm threaded rod through the front of the crank case which the crash bars were mounted to. I've searched the interweb and my Haynes manual and there doesn't seem to be a bolt there. The learned people over at Virago Help Forums suggested I put one in anyway just to be on the safe side, at the very least if plugs a hole that can get gunk in there.
I'll leave the rod in for the time being until I get a proper fitting replacement
 

Attachments

  • 20200408_135635.jpg
    20200408_135635.jpg
    3.4 MB · Views: 226
I believe that front mount is just an accessory mounting point for some Genuine Yamaha Accessories. I think you can just leave it empty.
The bodywork looks to be in good shape. You may be able to sell it for a pretty good price and then buy another fuel tank for your project.
 
I believe that front mount is just an accessory mounting point for some Genuine Yamaha Accessories. I think you can just leave it empty.
The bodywork looks to be in good shape. You may be able to sell it for a pretty good price and then buy another fuel tank for your project.
Cheers. Makes sense, I had the crash bars mounted there and I'm pretty sure I've seen forward controls mounted there also.
 
I've been playing around with the carby tuning for a few weekends, cant seem to get it right. From what I understand that's pretty standard stuff with a single carby conversion. Have it reasonable enough now anyway so decided to take the front end off and remove the cracked and peeling paint job from the lower fork legs.
Took me a few hours to work out how I was going to jack the bike up safely and keep it there for a week or two sturdy enough that if the kids ride around it on the scooters it' not going to fall over on them. Ended up making a ramp out of 4x2 and putting it up on some besser blocks.
 

Attachments

  • 20200517_164859.jpg
    20200517_164859.jpg
    2.9 MB · Views: 200
Easy enough to drop the front forks out once the bike up off the ground and steady.
Forks on the bench and scratching my head about how to take the paint off. A scotch pad on a battery drill did the trick although it was slow going and the got the dremel out and wore out all the wire brushes I had getting into the tight spots. Still more tight spots to get into but I had to see what it would come up like with a polish straight after the scotch pad so a bit of polish on the buffer and it came up great. Still need to get some fine grade wet'n'dry on to it but very happy with the result so far.

I had planned on lowering these forks while they were out but a little concerned about the pitting in the stanchion. The bottom 2 inches that regularly get compressed into the lower leg are still perfect but the next few inches have some pitting and if I cut the springs it will be the pitted area that travels past the oil seal and pretty sure it will leak like a sieve so still deciding what to do there.
 

Attachments

  • 20200517_134925.jpg
    20200517_134925.jpg
    3.1 MB · Views: 201
  • 20200517_135102.jpg
    20200517_135102.jpg
    2.9 MB · Views: 181
  • 20200517_141758.jpg
    20200517_141758.jpg
    1.2 MB · Views: 191
  • 20200517_151154.jpg
    20200517_151154.jpg
    1.3 MB · Views: 199
  • 20200517_164822.jpg
    20200517_164822.jpg
    1.6 MB · Views: 195
Finished polishung up the forks and all back together. I dropped the forks through the triple clamps about an inch, can't say it made much of a difference but it made me feel better
 

Attachments

  • 20200524_154018.jpg
    20200524_154018.jpg
    1.4 MB · Views: 165
  • 20200531_141927.jpg
    20200531_141927.jpg
    1.4 MB · Views: 167
Decided I like polishing metal so though I'd take the painted exhausts off and polish them up
 

Attachments

  • 20200531_141525.jpg
    20200531_141525.jpg
    2.9 MB · Views: 174
  • 20200531_141944.jpg
    20200531_141944.jpg
    3.1 MB · Views: 174
Starting to get a little adventurous and wanted to get the swing arm off as had surface rust all over and needed to be polished....actually I planned to sand it back to bare metal, prime and paint.
I've since learned that swing arm pivot bolts tend to seize to the bearing inside and don't like coming out.
I spent 3hrs on the sucker and couldn't get it to move.
Used a rust 'dissolver' on it each day for a week and tried again the following Saturday.
The Virago frame has a removable lower section the bolts to the engine, Main frame, center stand and also attaches to the swing arm so I was able to remove the swing together with the lower frame section.
A full day and I managed to get the bolt out 1/2 inch and now it's no longer in the thread.
Think I'll enlist the help of a local mechanic or metal worker to help press it out.
If all else fails I'll cut the lower frame section and buy another one. The bearings and bushes are easily sourced bit the actual bolt is another story.
 

Attachments

  • 20200614_152446.jpg
    20200614_152446.jpg
    1.1 MB · Views: 172
  • 20200614_114915.jpg
    20200614_114915.jpg
    8.4 MB · Views: 176
  • 20200620_181224.jpg
    20200620_181224.jpg
    8.1 MB · Views: 174
  • 20200620_181233.jpg
    20200620_181233.jpg
    8 MB · Views: 177
With the rear end completley off it didnt seem right not to drop the engine out.:) so with a bit of swearing and some help from the kids got it out with only breaking a front brake lever..

So 2 weeks ago I wanted to just repaint the swing arm and now my bike is spread all over the garage, how did that happen.

Anyway now that the engine is out it's time to pull it apart and clean/polish/paint it. Check the valves and replace all the gaskets..may as well try the myriad of 'final fixes' for my box of rocks starter.
 

Attachments

  • 20200621_142757.jpg
    20200621_142757.jpg
    8.9 MB · Views: 170
  • 20200621_142334.jpg
    20200621_142334.jpg
    1.9 MB · Views: 174
Decided to loosen a couple of bolts and before I knew it I had removed the head and cylinder. I only removed the rear one so far which is the one which has been giving me all the troubles running rich and going through plugs every 50km's. Lots of carbon build up on the head and valves.
Barely any evidence of a head gasket and alot of gasket goo on the valve inspection covers.
All fits neatly in a plastic container keeping it all together. Front cylinder comes off tomorrow.
 

Attachments

  • 20200626_203054.jpg
    20200626_203054.jpg
    1.4 MB · Views: 167
  • 20200626_205332.jpg
    20200626_205332.jpg
    1.7 MB · Views: 176
  • 20200626_205323.jpg
    20200626_205323.jpg
    1.5 MB · Views: 170
  • 20200626_205622.jpg
    20200626_205622.jpg
    1.5 MB · Views: 158
Last edited:
Right on, I've been looking for a monoshock virago too for a while and would love to get hold of one one day. I'll be following along for sure - great that you're working on this with your son, what a great experience for him. Have it it! Greetings from Montreal mate.
 
Are you planning on swapping the gas tank for the Hageman typical Benelli? If not, I actually think the stock one can look awesome if it's lifted in the back.
 
I was originally planning on the benelli tank but have since gone off it. BIg reason is They look so much better with spoked wheels and im unfortunately not going down that path.....unless someone has a spare 1986 shaft drive spoked hub they want to part with.
I think the KZ tanks look better with alloy rims but they can be hard to find.
 
This is my favourite Virago build, by Moose Motodesign -

OSOzBk6l.jpg


I'm not sure what the tank is but it fits the new lines of the bike perfectly I think.
 
This is my favourite Virago build, by Moose Motodesign -

OSOzBk6l.jpg


I'm not sure what the tank is but it fits the new lines of the bike perfectly I think.

This one has won several awards, I believe they have just finished another couple of builds.
I like the colour scheme too, either the black and gold or black and silver.

I really need to have a plan to work towards, I just taking stuff apart and cleaning it now. The bike pretty much in pieces so really need to get my act together and have a finished product in mind.
 
Back
Top Bottom