We noticed you are blocking ads. DO THE TON only works with community supporters. Most are active members of the site with small businesses. Please consider disabling your ad blocking tool and checking out the businesses that help keep our site up and free.
You are using an out of date browser. It may not display this or other websites correctly.
You should upgrade or use an alternative browser.
You should upgrade or use an alternative browser.
Guzzi Cali Cafe - Build Thread
- Thread starter Bevelheadmhr
- Start date
Turnturtle
Been Around the Block
+1 on the shorter bump!
Yep that looks a lot better.. if only you could do the same to the real thing ")
I've been playing with scissors and a few Amazon boxes this evening.. (CAD = Cardboard Aided Design), trying out my ideas of how a new seat might look. Pretty happy with the result now, so in the next few days hope to have the seat base made in either steel or maybe alumlnium.. depends which is easy to roll into the curve I need for the seat hump.
CAD in action below..
Attachments
CarbsAndCylinders
Careful With That Axe Eugene
I like the shape of the second seat but I think it is a bit small. I think because this seat does not have the bright paint of the tank you need to make it a bit bigger to match the bike with the big alloy tank and the beautiful massive Guzzi engine.
stroker crazy
crazy as a fox
CrabsAndCylinders said:you need to make it a bit bigger to match the bike with the big alloy tank and the beautiful massive Guzzi engine.
+1
Crazy
CarbsAndCylinders
Careful With That Axe Eugene
Turnturtle said:+1 on the shorter bump!
+2
One point about Tonti framed Guzzis is that the seat rails are much lower than most bikes, which means to get enough leg room the seat needs to sit high above said frame rails. You only have to look at any Lemans to see how thick the seat is. That's ok but it makes things difficult if you want to fit a 'classic' cafe seat, as there is a compromise to be made between looking good and having enough leg room with rear sets to actually ride the bike.
In my case I had to mount the Ducati seat unit above the frame rails, so theres a gap between the two.. not ideal .. it looks bad and allows rain water into the electrics box. Also the Ducati seat is a little too narrow to fit over the frame rails, it doesnt really matter as it sits above them anyway, but it still doesnt look right to me.
So the new seat will be made a wider to follow the lines of the frame.. its wider at the back then the front, while also having deeper 'skirts' to fill the gap between the top of the frame rails and the base of the seat. As for the size of the seat hump, I've still not settled on the shape / size yet.
brad black
Been Around the Block
i like the full covered seat over the ss tail section, but i'd be concerned both are going to take a hit from the rear tyre.
brad black said:i like the full covered seat over the ss tail section, but i'd be concerned both are going to take a hit from the rear tyre.
The SS seat gives enough clearance over the tyre, though the YSS shocks on the bike now will be replaced with a pair of remote reservoir Progressive shocks which are a little longer, and so will give more clearance above the tyre.
pidjones said:Just make sure it is comfortable. Form follows function, you know. If it looks so racy but you can't ride it ten miles without cramps, what good is it?
Indeed, but if it looks awful I wouldn't ride it anyway. Also the seat will get quite a thick foam 'cushion' which will lift the riding position too.
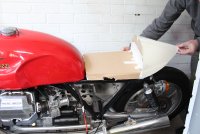
Here's my MK1 seat .. easier to cut cardboard than steel. Needs to be a little longer and the tail end of the seat needs to be a little less pointy. So will be making a MK2 and MK3 version before I'm happy and it can be made in steel or alloy. In the pic I'm holding the seat too high, but at the right level there is plenty of clearance above the tyre.
Attachments
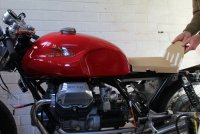
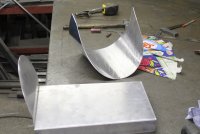
In the 'work in progress' pic below we made the seat base from one sheet of 2mm aluminium, which has been cut and folded. The curved seat back was made using my card template to cut out the appropriate shape on another flat piece of ally. Though we made the real thing a little larger in all dimensions. It was then curved in a set of rollers.
We made it larger than needed so that the lower edge (the part closest to the tyre) could be cut back and shaped once I'd seen it on the bike. Lower looks better, higher gives more tyre clearance and room for the rear light and plate to be mounted. Once that's done it'll also gain an under tray inside the seat hump, and all the welds need to be smoothed flat. Finally need to decide if its going to be painted or the whole thing covered in vinyl.
We made it larger than needed so that the lower edge (the part closest to the tyre) could be cut back and shaped once I'd seen it on the bike. Lower looks better, higher gives more tyre clearance and room for the rear light and plate to be mounted. Once that's done it'll also gain an under tray inside the seat hump, and all the welds need to be smoothed flat. Finally need to decide if its going to be painted or the whole thing covered in vinyl.
Attachments
stroker crazy
crazy as a fox
Bevelheadmhr said:Finally need to decide if its going to be painted or the whole thing covered in vinyl.
You have probably considered it already, but if you cover it with vinyl pad the hump itself with firm foam.
It will give a more rounded appearance and be kinder to the vinyl.
Crazy
I hadn't really thought the process through yet, but yes that sounds like a good idea.
pidjones said:Or, if covering with vinyl anyway, make the hump out of firm foam and shape that.
The hump has to support the rear light and plate, not sure foam would be strong enough?
pidjones
Over 1,000 Posts
Still have a strong seat pan (reinforced if desired), just build the hump on top of it instead of shaping aluminum. Foam is much easier to shape (coarse grinder). Mine is on fiberglass and still have a fender, but made a pretty mice seat for the old GoldWing.Bevelheadmhr said:The hump has to support the rear light and plate, not sure foam would be strong enough?

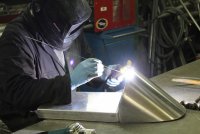
I prefer to work in metal than fibreglass, much less messy, and in this case it took less than an hour to make the seat. Also I've always found fibreglass by its nature needs a lot of filling and sanding to get a smooth finish. Much less so when working with steel or ally.
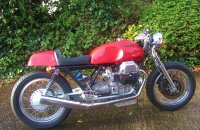
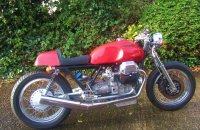
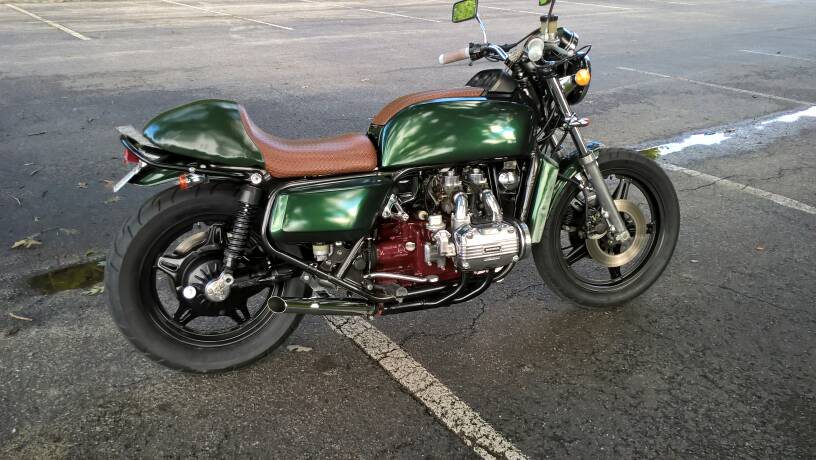
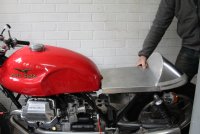
Here's how it looks on the bike when I was measuring what height the mounting brackets needed to be, though still haven't shaped the lower edge of the rear of the seat yet.
Here's how it looks on the bike when I was measuring what height the mounting brackets needed to be, though still haven't shaped the lower edge of the rear of the seat yet.
Attachments
stroker crazy
crazy as a fox
Proportions look about right ...
Crazy
Crazy


