
We noticed you are blocking ads. DO THE TON only works with community supporters. Most are active members of the site with small businesses. Please consider disabling your ad blocking tool and checking out the businesses that help keep our site up and free.
You are using an out of date browser. It may not display this or other websites correctly.
You should upgrade or use an alternative browser.
You should upgrade or use an alternative browser.
HollywoodMX's xv920/TR1 Cafe super-dupe!
- Thread starter HollywoodMX
- Start date
HollywoodMX
Coast to Coast
Re: Re: HollywoodMX's xv920/TR1 Cafe super-dupe!
No worries Bud. It's an automotive degreaser but I wouldn't recommend it. I think simple green would have been better. This stuff was too strong.
dualero said:Sorry, but I'm from venezuela (hope you've heard from us lately. Don't intend to hijack) what kind of products is super clean?
Dish soap? Thanks
Sent from my GT-I9300 using Tapatalk
No worries Bud. It's an automotive degreaser but I wouldn't recommend it. I think simple green would have been better. This stuff was too strong.
HollywoodMX
Coast to Coast
Carbs already for paint. Annoying work getting all the walnut shell bits out and re clean for paint.

Cuba Libre
Been Around the Block
HollywoodMX said:Carbs already for paint.
I'll appreciate it if you elaborate on carb painting when the time comes. What preparation do you have to do, what type of paint do you use, how do you apply it etc.
I've seen some super-nice painted carbs but nobody around me seems to know how to do this...
Thanks in advance.
M.
HollywoodMX
Coast to Coast
Re: Re: HollywoodMX's xv920/TR1 Cafe super-dupe!
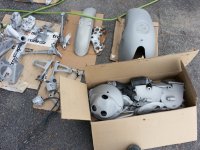
Well I put through a few stages of the vibrating cleaner. First with clr then the super clean then break cleaner then walnut Blasting, then back to the vibratory with dish soap.
That's where they are at now. Next is marine clean and Por ready. Then Por 15. I will polish the top covers.
Cuba Libre said:I'll appreciate it if you elaborate on carb painting when the time comes. What preparation do you have to do, what type of paint do you use, how do you apply it etc.
I've seen some super-nice painted carbs but nobody around me seems to know how to do this...
Thanks in advance.
M.
Well I put through a few stages of the vibrating cleaner. First with clr then the super clean then break cleaner then walnut Blasting, then back to the vibratory with dish soap.
That's where they are at now. Next is marine clean and Por ready. Then Por 15. I will polish the top covers.
HollywoodMX
Coast to Coast
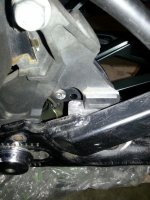
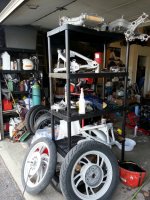
I have been doing things here and there but its all boring stuff, not picture worthy, just preparing my new frame mods, I build a better platform for the lower frame.
I have my custom decompression valve done. I also tackled the offset sprocket and found and issue. My trick of combining the two isn't going to work out so well unless I tap the shaft spline to accept a bolt. So was looking more into that.
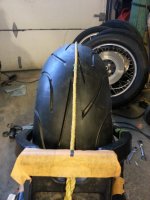
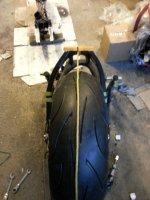
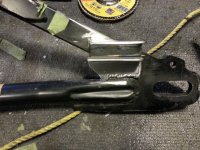
I took on the rear tire, centering, brake mount, chain clearance, custom spacers, etc. I have been battling the rear tire clearance and centering issues. I finally got it figure out today I widened the swing arm a 1/4" with a jack, lol, believe it or not that was all I needed to make everything work! Just need even more low profile bolts for the rear sprocket.
Brake mount will be a 30 min job so I'm happy. I'll post it when I get to it.
I have my custom decompression valve done. I also tackled the offset sprocket and found and issue. My trick of combining the two isn't going to work out so well unless I tap the shaft spline to accept a bolt. So was looking more into that.
I took on the rear tire, centering, brake mount, chain clearance, custom spacers, etc. I have been battling the rear tire clearance and centering issues. I finally got it figure out today I widened the swing arm a 1/4" with a jack, lol, believe it or not that was all I needed to make everything work! Just need even more low profile bolts for the rear sprocket.
Brake mount will be a 30 min job so I'm happy. I'll post it when I get to it.
Attachments
HollywoodMX
Coast to Coast
HollywoodMX
Coast to Coast
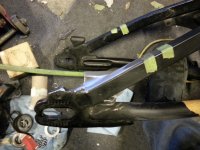
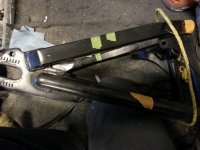
Well I fabbed up the rear brake slip stay.
My welds were pretty good this time but I wanted them them to appear more seamless. Just to let people know I can just weld these things up and move on but I spent a lot of time making things look more professional despite I'm a dude in his garage. I worry about imperfection in the paint, even though I even ended up smoothing some of yamaha's factory welds, lol..
Including the fabbing of brackets this was a 4 hour job.
Attachments
Patmanbbe
Been Around the Block
Rich Ard said:I must have missed it - why the compression release?
Viragos are notoriously hard to start due to the large bore of the pistons and v-twin design . This is a mod that was discussed several times over in the virago forums. Cool to see someone do it and document it. It is practically essential if you plan on increasing the compression.
HollywoodMX
Coast to Coast
Yup, not to mention the stupid smash starting design not being the best. Im going 11:1. The pistons are being made as we speak, should see them in 4 weeks hopefully.
My cams long duration should help with starting too.
My cams long duration should help with starting too.
HollywoodMX
Coast to Coast
FRAK! Arias just called today, they need a cast of the cylinder..There goes another few more weeks..
HollywoodMX
Coast to Coast
A quick update;
Still waiting (I'm mean screwed over) on my heads from the engine shop, and waiting for the weather to warm up so I can paint as the majority of my paints contain iso's including the frame paints.
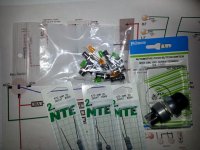
I also picked up another xv920 chain drive for the girlfriend to do a quick project with minimal modding and modernizing.
Still waiting (I'm mean screwed over) on my heads from the engine shop, and waiting for the weather to warm up so I can paint as the majority of my paints contain iso's including the frame paints.
I also picked up another xv920 chain drive for the girlfriend to do a quick project with minimal modding and modernizing.
HollywoodMX
Coast to Coast
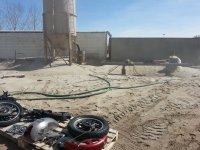
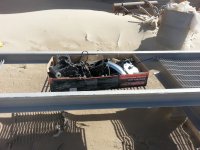
Still waiting on the engine work.... 
But I changed gears and discovered DYI sand blasting! Crazy experience. The hose was Stanley Spedowski size!
Now just got a wait for the right temp to paint. "Could be" thursday.
The extra parts are for the xv920 tracker on the express completion path.
But I changed gears and discovered DYI sand blasting! Crazy experience. The hose was Stanley Spedowski size!
Now just got a wait for the right temp to paint. "Could be" thursday.
The extra parts are for the xv920 tracker on the express completion path.
Attachments
HollywoodMX
Coast to Coast
http://www.youtube.com/watch?v=OXc5ltzKq3Y
wynand2000
Active Member
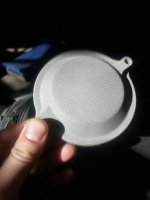
That`s all cleaner than clean! How`s all the aluminium parts looking?
Pretty rough I guess, because normally it`s more likely to use glass beads for that purpose.
Pretty rough I guess, because normally it`s more likely to use glass beads for that purpose.
HollywoodMX
Coast to Coast
wynand2000 said:That`s all cleaner than clean! How`s all the aluminium parts looking?
Pretty rough I guess, because normally it`s more likely to use glass beads for that purpose.
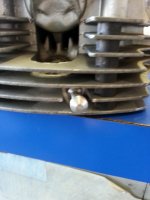
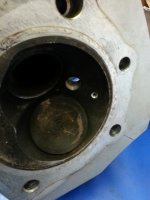
Ya they had the fire hose outside and inside they had the smaller box machines. I learned AFTER that's for the aluminum pieces.. Fak. I told the guy I had a bunch of small parts too.
So I'm not exactly sure what to do with the small bits. I mean they look clean and kinda cool but they are rough. Can I send them? Or Re blast them in the smaller machine? Can I get them chrome dipped as is?
I know I can paint them no problem as is I don't mind it there is a bit of texture.
I'll take a pic of it close up. Stand by.
HollywoodMX
Coast to Coast
wynand2000
Active Member
Pretty rough indeed.....IF you want them glass beaded than you should polish them first, guess you can paint them like this, for example with VHT Shrink
HollywoodMX
Coast to Coast
wynand2000 said:Pretty rough indeed.....IF you want them glass beaded than you should polish them first, guess you can paint them like this, for example with VHT Shrink
I have never seen vht shrink. Might be a USA only paint. We have many vht paints though. Do you mean wrinkle paint?
I have por engine enamel black and aluminum. I will just paint them with that. Por loves sandblasted material.


