Follow along with the video below to see how to install our site as a web app on your home screen.
Note: This feature currently requires accessing the site using the built-in Safari browser.
We noticed you are blocking ads. DO THE TON only works with community supporters. Most are active members of the site with small businesses. Please consider disabling your ad blocking tool and checking out the businesses that help keep our site up and free.
I've been keeping my eye out for a new project and recently one popped up on Craigslist. I had been looking for another older CB750, but for some reason everyone seems to think if it's older than 1980 it's worth it's weight in gold. When I saw this one come up it made me wonder if I could take a newer bike and give it the feel of something older.
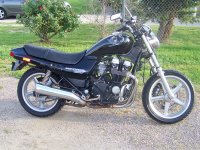
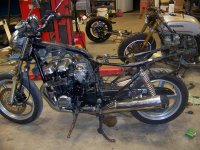
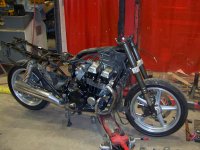
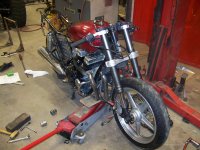
It's a 1996 750 Nighthawk, and I got it cheap cause the last owner rode it for roughly 50' before plowing it into the center divider in front of his house. The forks are bent, the tank is dented, and basically everything attached to the forks is junk, but it runs beautifully and I love a good fork swap anyways.
Speaking of fork swaps, and fools that cant ride, I also scored a complete front end from a new ZX10 that some kid wrecked. Last time I swapped the complete front end with wheel onto my 81 CB750, then figured out how to make a matching rear wheel fit that bike. This time I'm gonna do it the other way around. I'm gonna figure out how to make the stock Nighthawk front wheel fit the new fork. I dig the stock wheels, plus this will allow me to retain the stock rear drum brake as well.
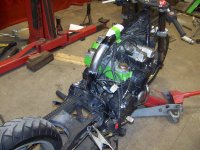
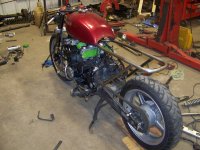
First step is to start stripping the bike down. Thankfully everything from the fork back, except for the tank, was in really good shape so I was actually able to make back a few bucks by selling off the plastics.
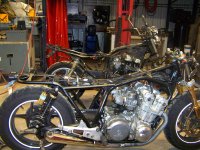
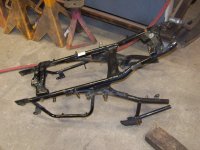
There are 2 major things I'm planning on doing to this bike. First of course is the fork swap. Second is to fix the goofy looking frame. Basically I'm going to cut the entire back half of the frame off leaving just the main backbone and lower section, then rebuild a cleaner, simpler and more traditional looking back half.
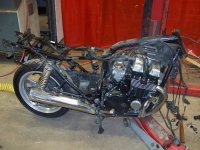
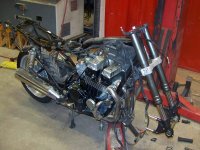
It just happened that I had a bit of work to do on the old Hooptie so I took a couple pics to compare the differences in the frame design. I'm waiting on the new tank to show up before I do any cutting, but I've got a pretty good idea of what's going to get done. While I'm waiting for the tank I started pulling apart the front end. Looks like the switches are still usable, but damn did he hit the curb hard. Both fork legs were bent, plus the handlebars AND the axle. I cant believe the wheel is still straight and doesn't have any damage.
cant wait to see how this goes together.itll be cool to see someone do something with a bike that appears to be not so easy to cafe.prices are getting ridiculous on anything more than 20 years old
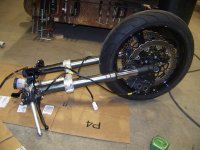
So here's the first mockup of the new front end. I haven't actually done all the machine work to make it permanent yet, but I'm following the same basic steps that I did on the Hooptie http://www.dotheton.com/forum/index.php?topic=42375.0 The only exception of course is the front wheel. I thought I was gonna have to do a lot of custom work, but it looks like I got lucky. I was able to find different wheel bearings that will fit both the wheel and the ZX10 axle, so I'll really just have to make some spacers to center everything up, which is easy. Also it looks like the stock brake rotor is the same diameter as the ninja, so I'll be able to use it just fine. The only catch is the offset. I'm not sure yet, but it looks like the rotor isn't spaced out as far as the stock kawi ones, so the wheel is slightly offset to the left. I'm still pondering what to do about that. I may end up cutting out a spacer to push the rotor farther out. I have to wait for the bearings to arrive to get good measurements first though.
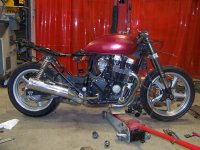
Parts have been rolling in, and I got a little motivation tonight. The new tank arrived today from the land of eBay, it's from a 1980 KZ750 and just by sheer luck it kinda fits. It goes right onto the front mounts, but it looks like I'll need to move them anyways cause it sits just a little too low and rests on the valve cover. Pretty easy fix there though.
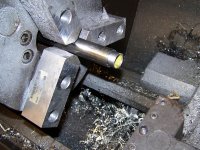
I also spent some time on the lathe tonight making the parts to convert the fork. It should have taken about half as much time as it did but I just kept on screwing things up. Oh well it's done now, or close enough for this stage at least. I'm still waiting on the front wheel bearings to arrive, so it's not quite ready to roll yet. Now that I have the tank I'll probably be doing the serious chopping and frame work soon.
Roughly an inch and a half from that lower crown. I say roughly because I still dont have bearings in that wheel, so it's just kinda flopping around right now. Regardless, there will be plenty of clearance to keep things from locking up when you hit a pothole.
Worked on the bike a bit more tonight, and I wish I had some interesting pictures for you, but I dont. Most of the time was spent turning very uninteresting spacers on the lathe. I got the new bearings for the front wheel today and they fit wonderfully. Now the wheel is riding on the kawi axle and just needs spacers made to center it. Unfortunately the spacing of the brake rotor isn't quite right, so I'm gonna have to figure out how to get the wheel to move over 1/4" and keep the rotor centered in the caliper. I have some ideas that will be picture worthy. We'll see how it goes.
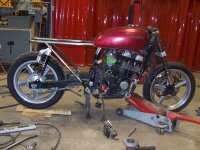
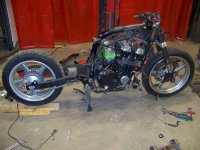
Ok so I spent some time carefully removing all evidence of the old subframe from the back bone before fine tuning the tank positioning. Amazingly the Kawasaki tank actually fit the front rubber mounts, but it was just a bit too low and actually sat on the valve cover, so I had to raise up the pins about 3/4" to get the angle right and have some clearance.
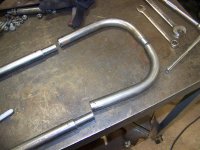
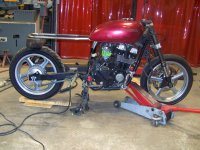
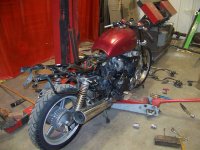
Once I knew where the tank would be I started working on the new upper frame section. I know most people do a single 180* bend at the back, but the 1" die I have for my bender is a bit too tight of a radius for that so I ended up bending 2 90* sections and joining them together like I did on the Hooptie. I actually like the look, and like having something a little different. The front half will join to the back bone with a couple gussets after I smooth out the welds.
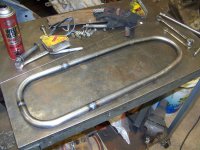
Today I have some much more dramatic updates for you all. After sanding down the welds on the seat hoop I got it tacked in place on the bike. I'm going for very flat, horizontal lines, so I leveled out the bike as well as I could on the centerstand before welding the hoop in place with a level on it.
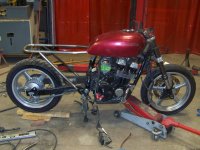
The side stays took a little more creativity. When I welded the sections of the seat hoop together I simply used 3/4" tube as internal sleeves to align and strengthen all the joints. For the diagonal supports I would be splicing into the original frame tubing, which is significantly thinner than the .120 wall that I'm using. In order to get everything to fit up tight I ended up turning down the ends of the new tubes to a light press fit inside the frame tubes before bending them. I then notched the ends and fit it all up.
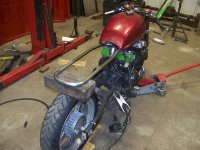
So here's what she looks like now. Obviously the rear triangle is a lot larger than most of the older bikes because of the angles they used on the nighthawks subframe, but I think this is going to give it a really open light weight look.
I also got the new rear shocks in and started figuring out how I'm gonna mount them. I think the studs are actually gonna run right through the new seat stays and be all tied together with some gussets.
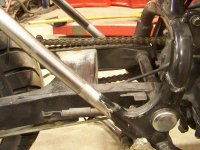
As mentioned before, are you going to have enough tire clearance at full compression? What are you going to run for a license plate, will it hit the tire under compression. To me it looks like it will be tight. Hate to find out when you hit that pot hole.
This site uses cookies to help personalise content, tailor your experience and to keep you logged in if you register.
By continuing to use this site, you are consenting to our use of cookies.

")