Race van

UK Mark

Been Around the Block
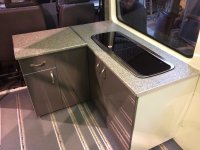
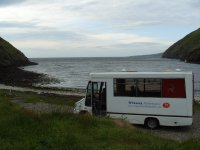
I've started this as the next project after my bike was finished. My dad fancied a van for travelling to spectate at weekend race meetings and it evolved from there. You know how it goes, if we buy this we can do that, and if we do that it can do this.

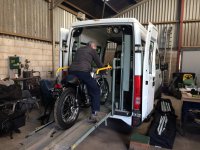
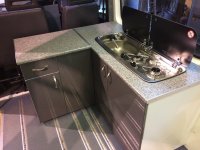
So, a comfortable van with creature comforts, plus it can take a bike whereaver for a thrash around.

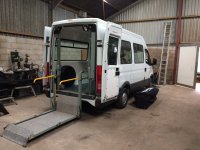
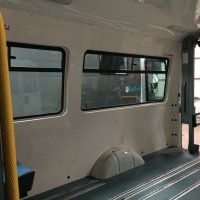
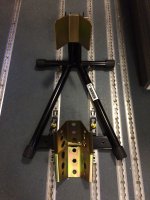
Bought an almost immaculate, but relatively old Iveco Daily minibus with 52,000 mikes having a big plus of a wheelchair loading ramp that folds up taking hardly any room in the back. All 9 minibus seats soon clip out or unbolt, leaving handy tracks in the floor to secure a bike down, plus it has windows and an inner skin lining kit that means there's little to do for a conversion.
 

Attachments

  • IMG_0270.JPG
    IMG_0270.JPG
    1.5 MB · Views: 312
  • IMG_0268.JPG
    IMG_0268.JPG
    902.9 KB · Views: 319
Rear lift is rated to 300kg, so can load any bike with ease. No more pushing a bike up a ramp on my horsebox and having to take the fairing off for clearance purposes.

Purchase price of said bus was less than £3k, including a full MOT and complete service history. Insuring a bus is expensive, but you can re-register the body type to that of a motor home and it's shit loads cheaper, plus its MOT class changes too.
 

Attachments

  • IMG_0297.JPG
    IMG_0297.JPG
    798.3 KB · Views: 302
To convert it, we bought a few kitchen base units from B&Q and cut the backs down so not to take so much space up. The carcasses where screwed onto 1.5 x 2" timber battens instead of the plastic feet you use in your home kitchen, so it dropped the worktop height to suit the windows. Also, coincidentally, about the height of a regular motorhome kitchen. Just need a few things to stop tins of beans and cereal boxes flying off shelves, but that comes later free from off-cuts from something else.

Add onto this a combined sink with twin gas burner, it's got basic creature comforts. Cost of Kitchen units : £360 plus sink / hob kit with regulator and fixings £279
 

Attachments

  • IMG_0309.JPG
    IMG_0309.JPG
    1.2 MB · Views: 312
  • IMG_0308.JPG
    IMG_0308.JPG
    1.2 MB · Views: 315
Bike fits onto the standard ramp with the aid of an aluminium extension channel I have lying around and it raises to the loading floor area by the push of a button. So, we do a trial run to see how much space we have for a bike to fit inside, with seating that can be used as a bed too. To change body type, a bed has to be a least 6ft.

Anyway, imagine loading a bike by yourself. You have to centre it and straddle off, while somehow propping it up onto its stand in what will be a fairly confined area. Dads Christmas present this year was a front wheel chock, which I modified to fit onto the removable chair brackets. Some cursing, chopping and welding needed, but this is great and can be stowed away when not in use. Wheel chock was around £40 on eBay and you couldn't make one for that.

Now, dad of myself just roll a bike inside and pop the front wheel over this and we can get off while the bike is self-supported ready to be strapped down.
 

Attachments

  • IMG_0318.JPG
    IMG_0318.JPG
    1 MB · Views: 301
A gas bottle for the hob / cooker needs a location and I mounted this towards the rear of the drivers side seat bench / bed / storage area. Access to it is from an external locker door and I can also fit 4 x gallon cans with engine oil and any odd and sodd that might be grimey.

Front section next to the kitchen units houses an electrical cumsumer unit or fuse board as we used to call them for an electric hook up and this will supply a couple of twin sockets, plus power an optimiser to top up a leisure battery that will power the living area lighting. This lighting being already there, so real easy and cheap to modify onto a separate supply 12 volt supply.

I used 12 metres of 30 x 30 x 3mm equal angle to make the frame for this and I dare say, its as light as what you'd use making it from timber while making the most of available space. I clad the front and rear of this with 15mm furniture board that was secured using counter sunk screws from the inside through that angle channel. The gas bottle area has a permanent lid, so is sealed from the inside of the van. The top was made from 3/4" Decent quality ply and can be raised for access to store clothing etc. I can fit enough clothes for 1 week and a set of race leathers with helmet and boots. It'll have the same storage space on the other side too, but that will hose a toilet in the gas storage area.
 

Attachments

  • IMG_0523.JPG
    IMG_0523.JPG
    923.2 KB · Views: 300
  • IMG_0525.JPG
    IMG_0525.JPG
    873.1 KB · Views: 312
Steel was £20 for that drivers side bench and electric hook up, boards and ply clocked up just under £190.

Next week, should have an upholsterer working on seating and I'll get the other bench made. Once that's sorted, I can set about re-finishing the outside of the van. Thought as it's so nice, with just a few little scrapes that I'd give it a re-paint.

Van will get used loads this year and it's first outing will be to Stafford, so have to get it finished for Mid April. We will be taking this over to the Isle of Man in August too, so it'll be a really handy thing to have around.

Not really a bike thread, but it's specifically being adapted for trawling a bike around and watching race meetings.
 
When can I move in !!!

Back in the day I did a conversion for a race van based on an Austin JU250 ( the fuggly one !) and with a tired old Sprite caravan bought for beer money and swapped all the innards into the van.
 
beachcomber said:
When can I move in !!!

Back in the day I did a conversion for a race van based on an Austin JU250 ( the fuggly one !) and with a tired old Sprite caravan bought for beer money and swapped all the innards into the van.

Hey Beachie

I looked at buying a caravan to rob the interior, but short of spending a lot of money for a decent one, it worked out cheaper doing it this way. Should have less than £4.5k in this when it's finished and I reckon it'll be worth that after a couple of years use, so dads money is well spent. I'm free, so my efforts don't count!!

I also looked at buying an old van to convert as that would be cool with my bike being so old, but jeez even the fuggly ones are way too expensive and I'd have a year restoring one.
 
Eh up mate looks like you gonna be travelling in style that's a real cool set up gives us all a bit of idea what can be done and the tail ramp is perfect defo takes the back ache out of getting the bike in, hope to see you and ya new project at the classic TT mate
 
yorkie350 said:
Eh up mate looks like you gonna be travelling in style that's a real cool set up gives us all a bit of idea what can be done and the tail ramp is perfect defo takes the back ache out of getting the bike in, hope to see you and ya new project at the classic TT mate

Yeah, should be handy and we're looking to use it for the Classic TT this year instead of the lorry. First maiden trip will be Stafford in April, so we'll see how it goes.
 
UK Mark,
excellent find with that Iveco, and nice work adding in a small kitchen. That is an awesome bike transporter, nothing better than having a small lift in the back of the bus

Cheers
 
That's a really nice looking van.
We have used a van for donkey's years for the annual TT trip. We found that a coach built minibus worked well, as the bigger body allowed us to get 6 bikes inside and all strapped down on the Unwin tracking. We mounted some extra tracking on the landing area, and managed to squeeze 2 more seats in the front. Good reliable old bus.....though 365 miles to Heysham at 55mph max was a bit epic.

Seen here at Fleshwick Bay Isle of Man.
 

Attachments

  • TT 2010 065.JPG
    TT 2010 065.JPG
    233.6 KB · Views: 282
Still plodding away at this. Got a load of tiny marks and stone chips all fixed, so will be hitting it with a new coat of paint in a week or so. Could have left it as it was, but it'll look so much better.

The crappy looking blue stuff is guide coat.
 

Attachments

  • IMG_0404.JPG
    IMG_0404.JPG
    1.4 MB · Views: 277
Got it painted yesterday. Used some decent 2k with a fast activator and it came out pretty nice. Touch dry in a couple of hours, which wasn't bad this time of year.

I added some matting agent into some gloss black and painted around the window sections on the sides today. Depending how much you add, you can make a satin or Matt finish. Loads better than aerosol cans as they wear off real easy and don't stand up to wear and tear.

Also re-fitted a load of trim and locks I'd taken out earlier, so got quite a bit done today.

Just needs a light nib off and a compound polish tomorrow and I'm on the home straight. thought I'd keep updating this as it will be a handy thing.
 

Attachments

  • IMG_0429.JPG
    IMG_0429.JPG
    1.3 MB · Views: 290
  • IMG_0436.JPG
    IMG_0436.JPG
    1.2 MB · Views: 283
Nice work Mark .................................... am I envious of your workshop as I sit in my 5 foot wide ex. wood store ?????? Of course I fargin well am !!!!!! ;) ;)
 
I bought my workshop building from an engineering company that closed down for £250. I had to take it down and transport it home, but so glad I got it. It was used as a pattern store and wasn't very old....... bargain.

I did my engineering apprenticeship with that company - Bryan Donkin Ltd after leaving school, so it has sentimental value too.
 
Back
Top Bottom