Time to Contribute! RD350 Cafe Build

Got an angle grinder for Christmas - detabbing and frame cutting ceremony tomorrow (pending weather). Any last words or tips?

Plan is to cut all tabs rear of stock footpeg mounts except passenger peg brackets, engine mount (duh), shock mounts, and rear brake light switch mount. Anything I might need later will be fabbed up and mig welded into place.
 
Tips:

Leather gloves
Good safety glasses
Hearing protection
Hold on tight
No fuel drums close by
No good painted bikes/cars/boats in the spark range
Take your time.
 
+1

also, most NON. . . . flammable-inflammable- explosive-etc things are sort of amazingly immune to 'sparks" except glass, which is equally amazingly ruined by the most distant "sparks"! So keep way far away from gas cans and windshields!

More usefully, get it close with the grinder, finish with a file. You can do the same damage with a file, but it takes longer! Less than perfectly round, straight, unmolested frame tubes are REALLY obvious once the shiny goes on, and "body work" to fix "accidents" are not the best plan for your structurally important chassis!

Mobius
 
Awesome - angle grinder came with safety glasses, ear protection and gloves!

I plan to drag the frame out to the back yard for the big stuff. It is amazingly light. Almost couldn't believe it, then I picked up the engine to haul downstairs...get it now.
 
Some pics for the first round of cutting. What I left on, but considered removing I labeled 1A through 10A (could have just used numbers, oh well) and there is one question mark. Please feel free to criticize, call out, or otherwise suggest where I went wrong or where I stopped short.

I am open to cutting off all of the subframe except the shock mounts, also had some questions about whether I could get rid of the lower part of the rear (lower) motor mounts (3A), which I believe were for the center stand? What about the stock footpeg mounts (didn't lablel them in the pics)? Thinking of keeping the left one for a kickstand stopper. Should I remove the frame bracing just forward of the shock mounts - the left side includes the seat lock mount - (5A & 8A)?

Last pick is of the 3D seat model in place with the tank and wheels, just to get an idea.

Thanks
 

Attachments

  • 1.JPG
    1.JPG
    1,006.8 KB · Views: 238
  • 3.JPG
    3.JPG
    1.2 MB · Views: 237
  • 2.JPG
    2.JPG
    1 MB · Views: 242
  • IMG_1027.jpg
    IMG_1027.jpg
    1.2 MB · Views: 234
I certainly would not cut out any of the joint gussets! If there is a tab, seat hinge, or other little bit you are not going to use, get rid of that, but don't sacrifice strength for a few lousy ounces of metal!
 
I figured as much. If I cut those out, I'd replace them, maybe with ones that are larger?/in line with the frame tubes rather than on the outside? I'm guessing it's not worth it...but they are ugly.
 
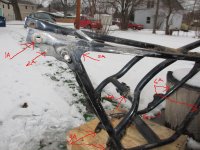
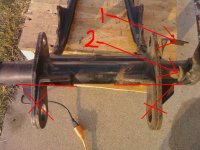
Wow! No time wasted with the ol' grinder! Looks like a great job so far. Id go ahead with 1A and 2A, as well as the seat latch mount, but be advised that you will almost certainly need to do some welding to put back some structure, and I would say the gussets at the shock mounts could be done away with providing the tubes are properly welded afterwards. I removed mine, but made new nicer looking ones and replaced them. You will see what I mean if you trim all that up, just be warned that you will have to replace some of those stampings with some welding and new metal. I never have figured out what the large hole is for, (fixture for the factory?) but the threaded hole for the grab bar you don't need unless you can use it for a fender mount or something. Pretty much everything else can also go unless you think you might use it for something else. 4A for the side cover, but you already took off the upper mounts so. . . 7A for the oil tank, but you already took off the upper mounts so. . .Don't know what the ? is either, so I cut those off. Hey, if anybody knows what the purpose of these things are, it would be interesting to learn. 3A centerstand mount probably not needed - most chambers can't use the centerstand. Make sure you do not disturb the lower rear engine mount if you cut off the centerstand portion!!! The buddy peg bracket tabs should probably stay. Rear sets can mount to them if you get rid if the brackets, and usually you will mount the chambers from the stock brackets or rear set brackets that mount to the frame the same. You can attack the buddy pegs with that grinder too, and clean them up, but you still need to mount your exhaust. Speaking of which, you can also remove the forward stock exhaust mounts. I don't know of any use for them except for the stock pipes.

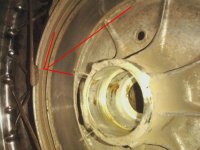
Don't understand what 6A is. I have at at least half a dozen frames here, and they are all just the tube there. ??

Looking good so far!
 
andrewlk said:
I figured as much. If I cut those out, I'd replace them, maybe with ones that are larger?/in line with the frame tubes rather than on the outside? I'm guessing it's not worth it...but they are ugly.

When bracing triangulated tubing (like on a motorcycle frame) you never want to weld the braces down the centerline of the tubing. They should always be on the outside. It's exponentially stronger that way.
 
jpmobius said:
That's where my oversized coils were located before I dismantled. The previous owner was the one that put them on, so maybe he put them there? Weird. Thanks for all the tips.
 
VonYinzer said:
They should always be on the outside. It's exponentially stronger that way.

Good to know. Hope to start an adult ed. welding class in January...to learn this kind of stuff.

Is it worth welding on the outside and inside?
 
andrewlk said:
Good to know. Hope to start an adult ed. welding class in January...to learn this kind of stuff.

Is it worth welding on the outside and inside?

You can but its overkill.
 
Almost done, took most of what I was unsure about off, based on all of your recommendations. I left the right side frame gusset (just forward of the shock mount) alone, and took the left one off (left side was bulky due to seat latch).

I have two remaining questions which can be observed in the photo. What are 1 & 2 as pictured? Could not find or see any reference to them in my shop manual.

I am considering cutting off everything below the red lines (stuff w/ x's through them) - seeing as they're part of the lower rear engine mounts, is this safe?

Will wait on advise to act. Thanks again.
 

Attachments

  • mms_picture.jpg
    mms_picture.jpg
    150.6 KB · Views: 201
#1 is for the battery vent hose to route through (mostly useless under any conditions, as the hose invariably comes off the battery letting acid ruin the fender and right side pipe), and that stud (#2) is for the center stand spring.
 
Done. I'll deal with the stud and battery tube ring with a hacksaw. Then work on smoothing out my grinding.
 

Attachments

  • frame 2.jpg
    frame 2.jpg
    421 KB · Views: 215
  • frame 3.jpg
    frame 3.jpg
    256.7 KB · Views: 197
Those bent portions (just above your line) on the doublers that mount the center stand can go too. The really aren't needed for mounting the engine. The center stand puts a major tweak on those little tabs, but what will be left will be plenty as the engine case keeps it all aligned solid once bolted up. If you look at your cut offs, you will see they are only spot welded to the engine mounts anyway, and now they are pretty much separate parts unless you weld them back together. You can also remove the heavy pads the stand rests on when the bike is on it, since you are on a diet!

While you are going to this much trouble, you may as well go over the whole thing with the fine tooth. RD frames have some pretty awful looking welds, spatter, and mig wire "sprouts", and a little time invested now will pay off hugely when the shiny goes on!
 
Been slow going lately, progress and activity have been replaced by seasonal affective disorder and hibernation, plus cartoons and daydreaming of alternative career options. Fear not, it's quite normal for February in N. Indiana.

Pulled my rear wheel assembly and hub completely apart this afternoon. Wheel bearings were a pain. I lost a lot of battles - all with the wrong tools - but I won the war. Also with wrong tools.

As I was looking things over I noticed a chip on the brake side of the wheel hub. Take a look at the pic. At first I thought I had done it, but the edge of the break wasn't clean and looks like it's been that way for a while. Is this something to be concerned about? I'd like to polish the front and rear hubs, but if this detail isn't a functional issue, I'll probably leave it. Thanks for any input - also, I did go ahead and take more of the lower engine mounts off, including the bent portions mentioned by jpmobius.
 

Attachments

  • hub.jpg
    hub.jpg
    117.2 KB · Views: 200
Back
Top Bottom