Time to Contribute! RD350 Cafe Build

I keep aluminum and wire wheels as far away from each other as possible. They can do an absolutely horrific amount of cosmetic damage. It may be possible to find something really "soft" that does not gouge, but I don't know what. You can get a pretty presentable finish with coarse glass beads followed by walnut shell blasting, but it isn't shiny like polishing, and I would not do that if I was going to polish. Just to avoid confusion, I am talking about actual coarse glass beads as apposed to any number of other glass blasting media. The real thing leaves a very smooth, fairly bright rinsable surface. 60 + grit. Counter intuitively, finer grits make a dull more porous like surface. the media is expensive and does not last long at all, so I save it for things like carburetors (I know, everyone is gasping) which I like to look as out of the box new as possible.

Maybe someone else can advise some specific wire wheel/brush type that can work, but I just wanted to offer the warning.

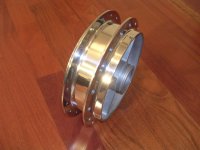
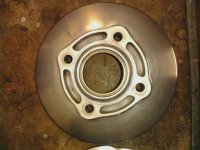
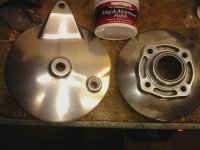
For me, hub interiors boil down to this: They are very hard to make presentable with the wheel disassembled. Virtually IMPOSSIBLE to do anything meaningful when assembled, so it is one of three (or four) finishes for me. 1) Polishing - looks great at first, dulls with age, (and my money says you will NOT be polishing it up as maintenance!) but still looks presentable years later. 2)Coarse glass beads and walnut shells. much the same as polishing but starts off 10 years old. 3)Glass beads and paint for inside, polish for outside flanges. This is without question the most bang for the buck, and has long life and is comparatively easy to maintain. If you don't have a media blasting cabinet, you could mask off the outsides and get someone to blast it for you. should be cheap, and surface finish does not matter because you are painting. The fourth option is as I think I previously mentioned, re-machine the hub smooth and polish. Changes the look of the hubs a lot, which may be disagreeable to some. (for the record, my OPINION is there is no structural issues in doing so, and removing the cooling fins just does not matter, for whatever it's worth. Opinions vary!) You can actually maintain this assembled if you have enough dedication!
 

Attachments

  • DSCN0549.JPG
    DSCN0549.JPG
    727.2 KB · Views: 221
Thanks for all the good advice jp. That hub is phenomenal. I don't plan to machine mine though, so I've settled on option 3. Glass bead and paint the inside, and polish the outside. Since I've already sanded the outside w/ 80 grit, I probably want to get the inside blasted now, before I finish polishing, correct? Then get it painted once the the polishing is done so I don't screw up the paint?

I'm planning to get it powder-coated black, along with the fork lowers, brake caliper, upper and lower triple trees, and the inside of the front hub. I've got a shop with decent prices so I'll just take groups of parts down as I'm ready.

andrew
 
Thanks much for the compliments guys.

If it was me, and I have been a victim of similar situations many times, I would finish the part nearly to completion, mask it off (your powder coater should be able to provide you with appropriate masking material), explain what you are doing to your powder coater, and hope for the best. Most powder coaters have a regimen where they media blast and paint right after, so you will have to make a relationship to get what you need. Plan on re-polishing to whatever end result you are happy with as the last person to handle the part. Unfortunately, you have to take the responsibility. Powder coaters are the same as chromers and anodizers, etc; They do an industrial process, and unless you are the big (continuing) money, they just want to "dunk your parts and ship 'em". The good news is that you won't have to do the media blasting independently.

More to answering your question(s), even crappy powder coating is pretty bad-ass, so don't worry about screwing it up. DO worry about the powder coater screwing up your part, which is the why behind the prep, masking and explaining. Hopefully, you will get back parts that are beautifully painted, that only need unmasking and hopefully only minor re-work of the polishing!

As far as painting the hubs is concerned, If you can get the media blasting done, I recommend painting them yourself. Go to your local pro automotive paint jobber store and get some self etching primer for aluminum in a spray can. Talk to them. It will cost $10 + . Go to your local auto parts store and get some engine paint (color of your choice.) Cheap. mask. Paint. unmask. Bake in your house oven while your wife is gone at 200 F for an hour. let cool to room temp. repeat (just the baking!). NOT as good as powder, but lots cheaper, will look good for nearly as long, and you have COMPLETE control, which means all the screw up are yours! ( or, in some alternate reality, YOU get ALL the credit for the fine work!)
 
A little progress...these parts are complete through #0000 steel wool. Probably have about 12 hours in these two pieces. They leave a bit to be desired...but I'm pretty happy with them for my first attempt and all by hand. Def. some courser grit scratches I didn't completely remove around the round edges. Comments welcome.
 

Attachments

  • #0000 brake hub.jpg
    #0000 brake hub.jpg
    407 KB · Views: 223
  • #0000 sprocket hub.jpg
    #0000 sprocket hub.jpg
    240.1 KB · Views: 227
Hey, looking great Andrew! Man, I don't know what condition your parts were in to begin with, but ALL of any damage looks to be gone. The drive hub is a pretty "in your face" part when disassembled, but it is really quite obscured (not to mention afflicted by chain oil) when put together, so you may wish to keep that in mind as you invest time. The brake backing plate looks really good, and, again, the reality is that it is very hard to maintain because it is somewhat hard to get to like the drive hub. Really bright polishing does get less bright as it oxidizes, and you might find that keeping it up like you have it now is the reality, even if you make it brilliant to start with. Just depends on how much you enjoy maintaining your ride. For myself, I usually start out with big ambition, but a year later, you hear me report something like "well, it's my driver, and I can only invest so much time in cleaning. But you should see my other bikes!"! (which, alas, are pretty much in "driver" condition as well!) Just saying, everyone has a personal threshold of when it's "perfect" enough. Figure out what yours is, and you will be a happy camper!

Just came in from doing another set of fork legs. Hack saw, files, and 80 grit. Nothing fancy. Yep, my parts start out pretty rough. (my next victim is on the right!) A bit over an hour to get here ( I have really good files), so I can appreciate how much work you have invested. So worth it when you get to see it finally on your machine!

Keep it going!
 

Attachments

  • DSCN0580.JPG
    DSCN0580.JPG
    651 KB · Views: 209
should have waited to post 'after' pic until after actual polish...
 

Attachments

  • hubs polished.jpg
    hubs polished.jpg
    430 KB · Views: 212
WOW!!! Hope you are thrilled, that looks GREAT! Your backing plate is REALLY flat and distortion free. Soooo easy to make awful with "power" tools. I almost always start with files and sanding blocks for that very reason. NICELY DONE!
 
I apologize for the lack of updates. I built a computer instead of a motorcycle. Haven't given up yet.

Also got my hands on a 140 mig welder...so starting to tinker with that.
 
Ancient thread revival...

Am in possession of mzb ignition, new wiring harness, seat and tank ordered...no pics yet. Most likely wont be ready for summer, but this Midwest deep freeze has me motivated.

~Andy
 
Took the carbs off and cleaned the engine. Usedwd40 cause that's what I had. Once I get the carbs disassembled I plan to dip in gunk carb cleaner and leave them unpainted.

I don't plan to paint the engine cases or refinish until next rebuild, but I'm worried that may come sooner than expected. New top end was only 250 miles ago, but it looks like I could have some cracks (see last 2 pics).

I've got all the parts I plan to get powdercoated ready. Just waiting on seat and tank so I can finish frame and send everything for pc in one shot.

Interested to hear thoughts on bottom end condition in pics. Thanks
 

Attachments

  • image.jpg
    image.jpg
    116.9 KB · Views: 230
  • image.jpg
    image.jpg
    228.4 KB · Views: 206
  • image.jpg
    image.jpg
    278 KB · Views: 224
  • image.jpg
    image.jpg
    140.3 KB · Views: 225
Light options...recommend pics 1 & 2 (all in 1 brake/tail/turn/plate bracket)?

Or

Pics 3 & 4 (tail/brake only, frenched in, plate and turn sigs mounted separately)

Seat will look like the one in pics 1 and 2 -tell me what you think.

Andy
 

Attachments

  • image.jpg
    image.jpg
    574.6 KB · Views: 222
  • image.jpg
    image.jpg
    624.4 KB · Views: 208
  • image.jpg
    image.jpg
    26.6 KB · Views: 859
  • image.jpg
    image.jpg
    38.6 KB · Views: 875
Couldn't you do both? Use the tail, brake, turn unit and french it into the tail? Sort of best of both worlds.
 
The clear lenses are part of the black cover. Take that off and it just a backing plate with an exposed circuit board and LEDs. The whole unit would have to be mounted up in there, maybe that's what I should do though.

I'll have to figure out a license plate light, which it has, but would get covered if frenched. And the seat is doubling as an oil tank so it's a tight fit, if at all. But I guess I'd need to figure out the license plate light anyway...good call.
 
Those spider veins are not a problem, but the chunk that a broken chain took out of the upper crankcase half is. That's where teh clutch cable sits and will need to be repaired.
 
Yeah, that's not good. It was like that when I was last riding though and there was just enough material for the clutch to be alright. probably will try and get it fitted better with quick steel or something when I get closer to finishing.
 
Thanks Teazer - I was happy with how my hub chip turned out when I got that welded up, so I'll take your advice.

Opinions on reed spacers? Bring my revs down for street use a bit?

I plan to add a crossover tube when I reassemble the carbs. Is it recommended to rejet for that?
 
For me, it depends on the motor. I have them between the cyl and reed block (with yz synthetic reeds (forget which ones at the moment)) on a stock port timing motor with 28mm carbs, banshee type boost tank, Moto Carrera pipes and stock intake boot and large K&N filter (no air box) which I am dialing in now for a customer. A very strong and easy to drive combination so far. I have decided to leave them where they are. Ultimately, they are very cheap, and very easy to move or remove to experiment, so it is a small risk. I do not feel they are a benefit on all motors, and I would not say they are a horsepower increase, but they can have an effect on driveability. I like them on this one so far.
 
Thanks JP - throttle response and ride-ability is what I'm after.

In other news, here are my carbs before and after. Waiting on EC shipment for new gaskets and such.
 

Attachments

  • photo (1).JPG
    photo (1).JPG
    248.8 KB · Views: 205
  • photo.JPG
    photo.JPG
    76.1 KB · Views: 206
Back
Top Bottom