
We noticed you are blocking ads. DO THE TON only works with community supporters. Most are active members of the site with small businesses. Please consider disabling your ad blocking tool and checking out the businesses that help keep our site up and free.
You are using an out of date browser. It may not display this or other websites correctly.
You should upgrade or use an alternative browser.
You should upgrade or use an alternative browser.
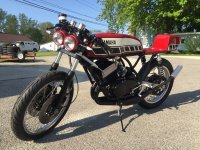
Time to Contribute! RD350 Cafe Build
- Thread starter andrewlk
- Start date
andrewlk
Been Around the Block
@mike: I ended up having CMR Racing Products make them, they had already done a few so it was simple to explain what I wanted, and the US/Can exchange rate was favorable, so that helped.
Today's progress:
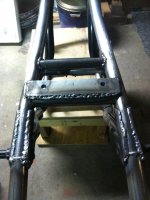
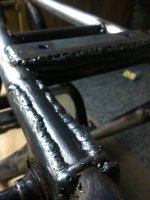
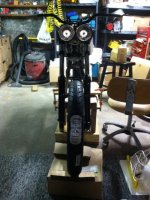
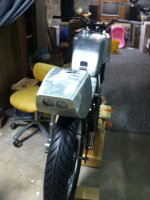
Finished attaching the rear gas tank mount and the front seat mount, also extended the frame rails. Take a look at my welds (pics 1 & 2) and tell me what you really think. This is the first time I've welded something I care about...I added plugs to reinforce where the tubes butt together, but still need to add frame gussets in front and behind the shock mounts.
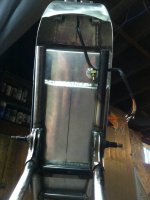
If you look at the underside of the seat (pic 3) you can see that I have a few options for how to tie the rails together, not really sure what I want to do here, so if you have a strong opinion please speak up. I can fit a small 12v6ah sla battery up in there, and it's about the only practical spot to hide a battery. With MZB I'm wary about Li-ion - and, I've already got the sla one. The tail light bracket attaches with allen bolts directly to the sides of the seat tail, so I'd like to use that to add support for the tail while leaving room for a battery box/tray. I'm also considering adding another crossbar to bolt the rear of the seat pan down.
The snail's pace continues...
Today's progress:
Finished attaching the rear gas tank mount and the front seat mount, also extended the frame rails. Take a look at my welds (pics 1 & 2) and tell me what you really think. This is the first time I've welded something I care about...I added plugs to reinforce where the tubes butt together, but still need to add frame gussets in front and behind the shock mounts.
If you look at the underside of the seat (pic 3) you can see that I have a few options for how to tie the rails together, not really sure what I want to do here, so if you have a strong opinion please speak up. I can fit a small 12v6ah sla battery up in there, and it's about the only practical spot to hide a battery. With MZB I'm wary about Li-ion - and, I've already got the sla one. The tail light bracket attaches with allen bolts directly to the sides of the seat tail, so I'd like to use that to add support for the tail while leaving room for a battery box/tray. I'm also considering adding another crossbar to bolt the rear of the seat pan down.
The snail's pace continues...
Attachments
andrewlk
Been Around the Block
Denis Curtis emailed to check in on my progress, mistaking me for someone who works quickly, and then sent me the following diagram to help. His customer service has been outstanding, along with the quality of work - I highly recommend.
Also, I destroyed my ankle Thursday in a softball game. Though no one deserves a blindside of that nasty hobbit foot, if demanded, I'll throw a pic up for ya. You won't believe it's not broke.
Also, I destroyed my ankle Thursday in a softball game. Though no one deserves a blindside of that nasty hobbit foot, if demanded, I'll throw a pic up for ya. You won't believe it's not broke.
Attachments
I would expect none of your welds to fail, though no doubt you wish they looked a bit better. The front cross tube is your tank mount? Looks to have the least penetration, but I imagine it will be fine for the tank. Not bad, it's pretty hard to weld around tubes. You can knock off the high spots with a file if you want to make them cosmetically better when you paint. Depending on the job, I "run over" a lot of the factory Yamaha welds and file them down to improve the appearance. Shiny paint is only friendly to the nicest welds. I do not think you need any additional bracing near the top shock mounts. In the "looking up from underneath" pic, you can see the gap between the shock mount stampings and the frame tubes. This is OK. Don't weld it over, or any similar condition elsewhere. The stamping is welded to the side and along the length of the tube, and in doing so keeps the tube from having an abrupt stress around its circumference which usually makes it more likely to fatigue crack there. Not especially likely at this spot, but there is a similar condition in many places, such as the front engine mounts. Weld around the tube there, and it is nearly certain it will eventually crack at the weld. However, the seam between the two stampings can be welded over. This particular spot usually shows with a new seat, and is one of the worst factory spots, so it is worth grinding it a bit smoother and straighter, welding it over and smoothing out the weld. That pretty seat and tail section will draw the eye to this area!
Before you go any farther though, I suggest you mock up your swing arm, the rear wheel (with the tire you plan on using), and a shock without the spring. From the pics, it looks like you need to check that the wheel has clearance with the shocks (shock) fully compressed. If you add a tube across the back at the end of the seat, in front of the oil tank, it might conflict with the tire. However, maybe a simple tab on each side will work instead. Best to check now than have to take the grinder to fresh paint! Behind the oil tank you likely will have more clearance, as it looks like it is pretty far back, but still good to check. Hate to see you punch mounting holes in the aluminum sides of your tail section, but it is an option and if you end up with the battery there, make the mount for it beefy. The specified 1/8" steel will be plenty!
Sorry to hear about the foot, but on the bright side, at least you can still work on your bike!
andrewlk
Been Around the Block
Haven't given up, still making slow but steady progress.
List of things done lately include:
- finishing seat mount/battery box
- wheels laced, tightened trued and tires mounted. (i took a stab a lacing and it was very doable, but took them to a shop for tighten and true and tire mount and balance)
- everything powdercoated that's going to be except frame.
There is a lot of obvious stuff to complete and I'm far from it, but a lot of my direction at this point is about getting back on the road, even if it's a bit mix'n'match. Eventually I would also like to:
- Upgrade rear suspension
- Alu +1 swingarm
- Get clipons
- Do the stinger mod to DG pipes
This is a [VERY] premature mock up to get a sense of fitment etc. My biggest barrier to finishing is, as it was before, the cost of remaining components.
Attachments
vandito.cb
Been Around the Block
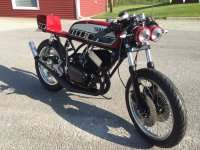
i see where this is going

wow nice work its beautiful .
what kind of chain tensioner do you run ? spring loaded or sa stationary unit ?
reason i ask is it llooks from nere the chain has not got much slack .so i assumedd there is a roller or slide ort some such tucked in, way up front underneath the bottom run
what kind of chain tensioner do you run ? spring loaded or sa stationary unit ?
reason i ask is it llooks from nere the chain has not got much slack .so i assumedd there is a roller or slide ort some such tucked in, way up front underneath the bottom run
thats not nearly enough slack you are going to break somethingandrewlk said:haha
@xb: just the adjusters on the back of the swingarm. there's about an inch of play in the chain up/down.
it is very simple to verify but you will be shocked at how much slack is needed with that severe swingarm angle right now at 1" the chain coming tight is trying to stop the rear shocks from compressing past a certain point
i am trying to help you out here this is very serious shit you have skipped over it could hurt or even kill you
Does look like a lot of swing arm angle. Easy to determine how much slack you need in the chain. Just prop up the bike so your rear tire is off the ground and simply remove the shocks. Lift up the rear tire through the point where the chain is tightest, which will be where the center line of the two sprockets and swing arm pivot fall into a straight line. The chain needs very little slack at this point, but you should feel zero resistance to the motion as you move the arm up and down through this point. Put the shocks back on and observe the slack in the chain for further reference.
jpmobius said:Does look like a lot of swing arm angle. Easy to determine how much slack you need in the chain. Just prop up the bike so your rear tire is off the ground and simply remove the shocks. Lift up the rear tire through the point where the chain is tightest, which will be where the center line of the two sprockets and swing arm pivot fall into a straight line. The chain needs very little slack at this point, but you should feel zero resistance to the motion as you move the arm up and down through this point. Put the shocks back on and observe the slack in the chain for further reference.
well said moby well said
do you agree with the premise i have promoted, that an overly tight chain can lead to broken shit or even catastrophic failure ? possibly causing some poor sap to need to hope to only be thrown clear and suffer a severe test of his/hers skin, flesh and bone for abrasion resistance ?
removal of the shocks is not really needed just the bottom bolts and they can be swung up rearwards to clear the motion test
warning though i have proven that a shock that is not lashed up securely will swing down when you are not looking and bust you in the back of the head wilst getting a close look at the 3 axis point
and a clevis shock end leaves a nasty boo boo like a puss filled snakebite
Beautiful bike. You could dump those heavy disks and cast iron calipers and use a modern sliding caliper and thin disk rotor with aluminum center to save about 10 pounds up front. I have that set up on a TZ and hated it. It was harder than stock to change direction and chattered at speed and the brakes were too touchy to modulate while trail braking.
A fork brace will help to tie those skinny fork legs together and please treat it to a TZ replica rear fender/stone guard. Airtech does its TZRD1 rear fender that slips between the rear frame rails and is just like a TD3 or twin shock TZ unit that keeps most rocks and dust out of the carbs.
A fork brace will help to tie those skinny fork legs together and please treat it to a TZ replica rear fender/stone guard. Airtech does its TZRD1 rear fender that slips between the rear frame rails and is just like a TD3 or twin shock TZ unit that keeps most rocks and dust out of the carbs.
i dont think you are grasping the conceptandrewlk said:I will double check. The chain doesn't need to be that tight for fit. I need to space out the left pipe a bit with some washers, but the swingarm and frame clearance is sufficient with a 17 tooth front sprocket (rear is 47).
 of what myself and then mob-bias chimed in
because this reply in quotes above is gibberish in relation to the point being made
its got absolutely nothing to do with cleareance you could swap the sprockets put the rear on the front the front on the rear
and it would not change the dynamics of what is actually happening and the point being made
you can no longer adjust the chain slack as you would stock shocks as per the manual , with the raised up rear/steep swingarm angle comes a change in how much the chain tension veries
at full droop its going to need to be loose as all getout so that it is still got a smidgen of slack through the 3 axis part of travel
if you give it same as manual says you could have very seroius problems, even breaking the chain
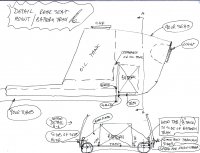
I found this concept quite hard to grasp but this diagram helps.
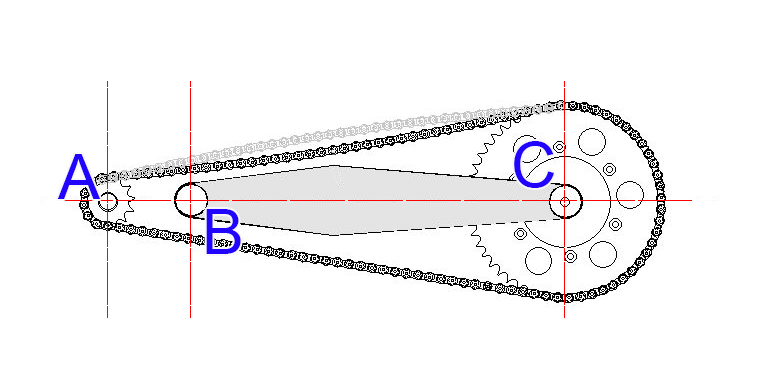
Quoted from "abovethebeast.com"
We're dealing with the geometric relationship of three points, two of which don't ever move in relation to one another, and one that moves constantly in relation to only one of the other two. The chain rides around a path that encircles all three of these points. You have the counter-shaft sprocket (point A) mounted to the engine, which is mounted to the frame. You have the swingarm pivot (point B) which is also mounted to the frame. Then you have the rear axle (point C), and as a result, the rear sprocket, which is not mounted to the frame.
The two points that are mounted to the frame, points A and B, never move in relation to one another. They are always the exact same distance apart, no matter what anything else on the motorcycles does. Because these two points are static, we can draw a line through their centers and call it the A-B Line that we'll use in minute. Point C rotates around point B. The chain is lashed around points A and C. Starting to sense where things might get funny for the chain?
As C moves in its arc around B, the distance from C to A changes. When C is aligned with the A-B line, such that all three points are perfectly aligned in a straight line, the distance from A to C is at its max. The further out of alignment with A and B that C becomes, the less the distance from A to C.
Now to apply that bit of sorcery to the chain tension adjustment on your motorcycle. You adjust the chain while the suspension is fully, or near fully extended. In other words, when C well out of alignment with the A-B line, in this case, C is below the A-B line. But this is not the point where the chain will be at its tightest as C rotates. It would be a pain in the ass to have to compress the suspension so that C in on the A-B line, and adjust the chain to just the couple millimeters of chain slack that it needs at it's tightest point. Rather, we adjust the chain with an amount of slack that will cause it to have only 2 - 5 mm of play when C passes through the A-B line; at its tightest point. This amount of slack when the suspension is unloaded might be 10 mm, 1/2 inch, two fingers between the chain and swingarm, whatever, that's not what's important in this article.
The critical part here is that there HAS to be enough slack in the chain at the top and bottom of the suspension travel, that when C passes through the A-B line, it does not get too tight and start pulling on things like the transmission shaft that is point A, or overloading the wheel bearings at point C. There are other, more subtle things that happen to the bearings at point B and to the chain when the tension is too high, but we'll skip that today. The other important point I want to make, is that none of this is effected by the load you are carrying on your bike. All this stuff behaves the same no matter what.
thats a good one i might add that with no excveptionsi can think of ,modern chain drive motorcycles have been designed specifically so the A B distance is minimized ,.yes they designed entire engines and motorcycles specifically to make that so
A B being as close as possible gives the lowest possible variation in slack
older bikes without any exceptions i can think of have an A B distance much longer twice as far or more on some old bikes
its not too bad if rear wheel travel is a small number and it is more or less split equally above and below the a b line this gives minimum slack change
when a swingarm is dropped on an older motorcycle so that the majority of wheel travel is on one side of ab line ,then you get the worst storm scenario because 1" longer shocks actually drop the axle more like 1.2" because of the ;leverage advantage the rear wheel has on the shocks and the further it is dropped the l;ooser the chain gets


