Follow along with the video below to see how to install our site as a web app on your home screen.
Note: This feature currently requires accessing the site using the built-in Safari browser.
We noticed you are blocking ads. DO THE TON only works with community supporters. Most are active members of the site with small businesses. Please consider disabling your ad blocking tool and checking out the businesses that help keep our site up and free.
Hey dude. Would you mind posting a few close up pictures of the rear brake set up? For some reason I didn't take many pictures of the tear down and can't seem to remember how this all goes back on. Thanks
I needed a rear brake light switch that would work with the rearsets and not look funny or hang down in a weird place. I had thought of reusing the stock switch or buying one from DCC, but decided none of those would look good. Drduke also brought up the point that I needed a way to stop the brake arm from from traveling up too high. What I decided to do was mill out a little section of the brake arm and attach a small piece of aluminum that would hit the bottom of the CB400 passenger peg mount (big triangle thing). It's held in place by a couple M3 screws and if I wanted to, I could add a set screw to it to adjust the angle of the brake arm. You can see it in this photo at the bottom right of the knurled foot peg.
For the switch, I looked and looked for the smallest possible switch and finally found one from McMaster at the right price. The switch is normally closed, but will be held shut most of the time by the brake arm. It's a quarter of an inch in diameter and fits nicely into the passenger peg. I soldered a couple leads to it and held everything in place with am M4 set screw and some silicone. The last photo is kinda crappy but you get the idea; everything is hidden unless you are looking for it. Best of all, it works.
Fresh C...now thats a really nice job on the rear brake light switch...I might borrow that design if you dont mind, as I had not figured what to do myself...great job well done.
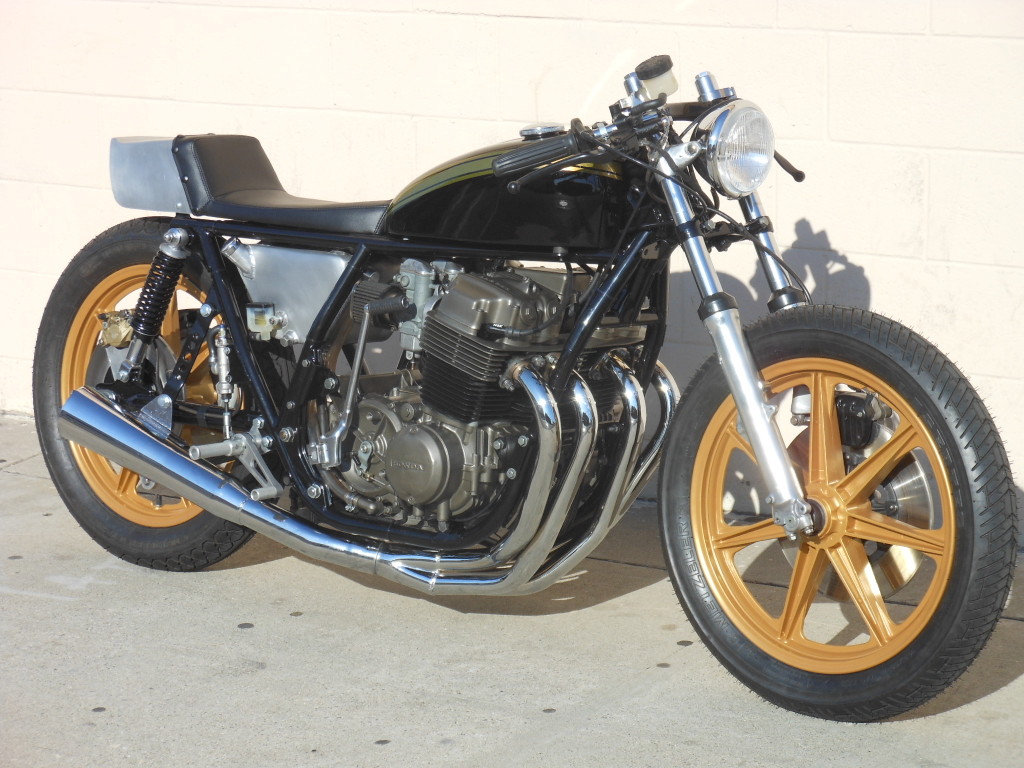
Not much to update. Bike has been running pretty good despite the pilot jets being slightly too large. Here is what it looks like, for now.
I'm starting to look at paint colors. The factory color is Varnish Blue, which is difficult to find unless you go the custom mixed route. I've been looking at a couple different Ford factory colors that I like. Royal blue is on the left and sonic blue on the right. The royal blue is a little dark and the sonic blue is a little purple. Decisions, decisions.
Royal blue with a mottled silver accent would look great. Sonic Blue is like HEY GUYS... Royal Blue is more "sup".
Nice freaking build thus far - just read the entire thread and it's making me excited to start. Good idea on the manual printout, dig the mesh in the triangle area under the seat and I actually said "freakin' sweet" to my coworker when I saw the seat padding unfold.
I like the Royal Blue as well. Duplicolor has most factory Ford colors available in their spray paint and they play really well with Spraymax 2k clear, in my experience. That's if you plan on doing the DIY route.
I've got to say I've been mighty inspired by the little CB200 twin texasstar and his son are building. Lots of solid technical information being shared over on that thread. If you haven't done so already, check it out. One thing that really sparked my interest was talk of porting cylinder heads. After asking nicely, my lady friend bought me a book this last weekend. Hopefully I can put some of its information to good use in the coming weeks.
I got another order of jets and managed to get my Mikunis tuned to a point I am happy with. The bike runs really good and the plugs look great so it's time to tear it down. Tonight's work yielded a box full of bagged and tagged parts. "That escalated quickly!"
I can't wait to see this all re-assembled with painted frame, engine, and tins.
I know you've made a decision on the sheet metal colors, but what about the engine? Are you still thinking of the bright 'cast' silver finish? If you're worried about the whole bike being too flashy with the bright tank paint AND bright engine, consider a more muted tone for the engine, or maybe add some variation in color between cylinders and head, or between the block and the valve & clutch covers, etc.
I like this 750 example a lot.
I dig those Yamaha XS / RD / SR etc wheels too. If you ever get the hankerin to equip the CM with something similar (and covert it to a rear disc) I have a set of these wheels out behind my shed.
Yeah going with shiny engine paint which VHT calls Nu Cast. I shot one of the side covers last night and it turned out pretty good. I know what you mean on breaking up the engine paint so it isn't one big silver blob. I really like what dothetodd did on his by spraying the jugs and head black, then sanding the outside edges. Might have to copy that.
My girlfriend was totally on board with me using the oven to cure paint until I walked in with some freshly painted engine parts and she was holding chicken to put into the oven. There was a stand off for a second or two while I waited for her to react. I guess she wasn't as ok with it when she realized that it was actually happening, haha. Good work on the paint, I was thinking the Nu Cast as well, it's a great looking color.
I opened up the top end of the motor and replaced gaskets, did some mild head porting, and painted. This photo makes the paint look worse than it is, but you get the idea. While I the side covers are off, I also added some EBC clutch springs to hopefully get rid of the slipping I'm getting when shifting from first to second.
Frame has been detabbed, welded, sanded, and painted. I used VHT epoxy paint on the frame; this stuff goes on smooth and should hold up over time.
Finally, hallin came over to help rebuild the front forks. He lowered them internally by 1" and added some preload to make the front end more consistent with the rear. I painted the fork lowers with VHT engine enamel in universal aluminum color and baked. New Leak Proof gaskets and wipers finished everything off.
This site uses cookies to help personalise content, tailor your experience and to keep you logged in if you register.
By continuing to use this site, you are consenting to our use of cookies.


")