Follow along with the video below to see how to install our site as a web app on your home screen.
Note: This feature currently requires accessing the site using the built-in Safari browser.
We noticed you are blocking ads. DO THE TON only works with community supporters. Most are active members of the site with small businesses. Please consider disabling your ad blocking tool and checking out the businesses that help keep our site up and free.
Made a new post, but im having an issue figuring out how to determine what front master I need to run. I will be running a single 2 piston caliper off a FZR1000. Found some poorly worded links, but noting very informative on the matter.
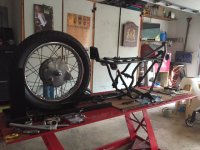
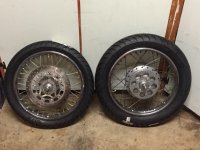
Not the most glamorous of things but the wheel bearings have been replaced, everything cleaned up. Front spokes and rim looks really nice, the rear spokes are pretty corroded and the rear rim has a few songs but still really good for being original. Depending on how things go I might end up with some stainless rims and spokes. Just cleaned and painted the sprocket for now, I'll get a new one once I have some time on it and I decided if I need to go up or down teeth. Tires are 90/90 and 110/90 avon roadwarrior
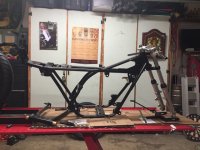
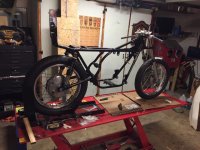
My timeline was destroyed as there was more fab work than I realized on the frame. However, im still planning for barber, just dont know about the body work.. Maybe Kiley can throw some paint while im down there
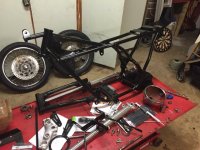
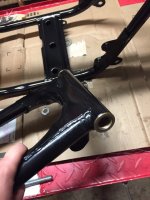
Tree built with new bearings, added some adjustable fork caps, got it all together. Tried to get the brass bushings in the swing arm with a rubber mallet but they were not having it. You can see them there 1/2 installed. I'll have to find a shop with a press to get them in.
Hey man! sorry to hear that the bushings didnt go in, is there a possiblity that you post some detail pics how you changed the bushings,I might go down the same road this winter on my RD!
things are looking good bro. If you got a length of threaded rod, flat washers and nuts. Just use that to "press" the bushings in. If you can get em back out. freeze bushings and warm up the swing tube.
+1 with trek a little heat will spread things a little and chilling will shrink things a little we've all been there (cold shower) haha. Hope you can get them back out use some lube too every bit helps, progress still been made mate keep us updated .
Just clean the seam off the ID of the swingarm tube using a die-grinder. Then a piece of all-thread, two nuts and washers, and about 3 minutes and they are together.
As mentioned, you could try putting the bushings in the freezer for a bit to contract them. I have also used threaded rod with washers and nuts to "press" bushings and bearings in.
I don't know why I didn't think about putting them in the freezer.... Miss on my part. I'll see if I can find a press quick if not I'll try to pop them back out
+1 with trek a little heat will spread things a little and chilling will shrink things a little we've all been there (cold shower) haha. Hope you can get them back out use some lube too every bit helps, progress still been made mate keep us updated .
So used the freezer/heat/allthread/nuts and got the bushings in. How tight should the inner bushings be? I had to give them some tough love to get them in.
I knew it was going to be the little things that would kill the build, just realized I don't have a thrust cover or shims, to Ebay I go, hopefully won't get raped to bad.
The inner steel bushings should spin freely with no perceptible slop. If they are too tight at just the end or ends of the bores (which seems to be common enough) I just take a fine round file and dress them as needed. You can get the thrust covers from Mikes XS. The ones that go to the 650 with the rubber seals will work perfectly. Try a bearing supply house for shims. I set my swing arms up shimmed for zero slack with light oil and then re assemble with grease. This may seem too tight at first but wears in perfectly in just a couple of miles.
The inner steel bushings should spin freely with no perceptible slop. If they are too tight at just the end or ends of the bores (which seems to be common enough) I just take a fine round file and dress them as needed. You can get the thrust covers from Mikes XS. The ones that go to the 650 with the rubber seals will work perfectly. Try a bearing supply house for shims. I set my swing arms up shimmed for zero slack with light oil and then re assemble with grease. This may seem too tight at first but wears in perfectly in just a couple of miles.
Alright, i'll have to push them back out then. They got tight about 1/2 way into the bushing. Ive read that some people use a hone on the bushings, if I can find one that small that seems like a good way to go. Is the XS650 swing arm bolt the same as well? I wouldn't mind replacing mine with one of the non tapered ones they sell at mikes http://www.mikesxs.net/parts/yamaha-xs650-pivot-shaft-swing-arm-bolt-with-nut-oem-447-22141-00
A brake cylinder hone should work fine and be easy to find and cheap. Be careful not to over do it. Realize that the assembled bolt, inner bushings, spacer and end caps are an integral structural component of the frame once tightened down. The swing arm simply pivots around the inner bushings which take up the tangential play and the shims take up all the axial play so the arm can't slide back and forth between the two sides of the frame. If you put it all together without the swingarm and tighten it down you'll see how all the parts make up a precision internal bearing for the arm and that the bolt simply clamps them all together. I don't know if the 650 bolt is the same length or not, but don't see any advantage using the larger same diameter nut. Also, don't misinterpret the two nuts found stock on the RD's. I've had people tell me that you are supposed to tighten the first one down to snug and then lock it with the second nut which is incorrect. The second nut is only a jamb nut intended as a safety feature to make sure the first one doesn't fall off. Rather silly I think as there is no likely hood that it should come loose - there is no rotation of the assembly and the swing arm bolt and nut get tightened fair down clamping everything together very tight to the frame. Yamaha makes a same pitch nut for a later model bike that has a spring plate insert making it a lock nut which I like to use instead of the two nuts (sorry I don't know the part number), but a bit of locktite on a single nut should be fine. You could also drill it for a cotter pin if you wanted. You will also need some spacers to take up the space normally taken up by the passenger peg/exhaust mounting brackets if you remove these parts.
This site uses cookies to help personalise content, tailor your experience and to keep you logged in if you register.
By continuing to use this site, you are consenting to our use of cookies.

")