Follow along with the video below to see how to install our site as a web app on your home screen.
Note: This feature currently requires accessing the site using the built-in Safari browser.
We noticed you are blocking ads. DO THE TON only works with community supporters. Most are active members of the site with small businesses. Please consider disabling your ad blocking tool and checking out the businesses that help keep our site up and free.
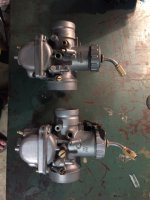
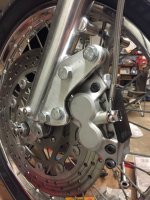
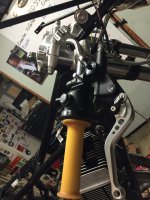
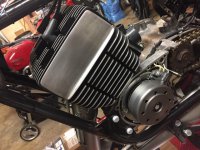
Front brake is buttoned up, carbs just rebuilt (waiting on some big jets), had to run modern style levers as I needed an external reservoir not to hit some of the brackets. Hopefully they won't end up looking out of place.
Need to take the clutch back off, lots of slop, need to see if there is a missing washer or something.
Not sure, taking it apart and will check. Brad and I built the bottom end after about a case of beer and a set of broken cases. So who knows. Need to get a socket big enough.
Need to get a 29mm socket to get the clutch back off. I have tomorrow off work so that's my plan, take it back off and apart. I did get the timing set as well as get the plug wires ran. Ordered a slew of jets for that long process.
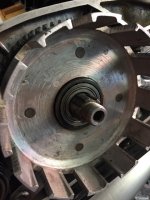
Sorted the clutch.. there wasn't a washer behind the inner basket. So I got that installed and now it's sitting pretty. When I installed the push rod the RD400 rod was perfect without the ball bearing, and the RD350 was to short, so I had to cut the 400 down the same length as the bearing. Once I did that everything went together smooth. The clutch lever is tight as shit though, need to figure that out, I'll try to lube the inside of the cable. It also need shortened by about 3-4", never don't that so I'll have to look that up.
Thanks for the offer, im guessing I could have 2x up on bearing with the 250 rod, but after cutting down the 400 rod with the one that I had it was all fine.
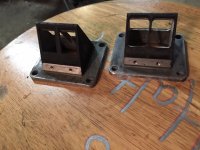
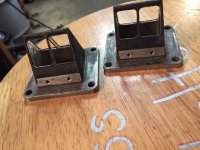
Got the reed cages done, never done them before but they seemed to have turned out pretty well. Kinda like everything on this build, it's either going to be great or a total fucking turd.
Also tried to shorten the clutch cable, watched an ichiebon video, can't get the new end to stick. Tried three times, keeps breaking off.
Went to put on the throttle cable and realized I bought the wrong one. FML not the type of issues to be having this late in the game. That and all of the threads on my gas tank have sealer in them, gonna have to get that out somehow if I wanna get this things together.
With that narrow center rib, you may want to look at one piece reeds just in case pairs don't close on that rib.
For the clutch cable, clean it clean it and clean it again. Push the end through the nipple and play it out then pull that splayed end back into the recess in the nipple and solder in place.
I'm running boyseen power reeds. I was originally going to cut it out all the way, but boyseen doesn't recommend doing that so I didn't. I also ran the stock reed stops instead of the flat bar boyseen stops. In case you have any recommendations against.
teazer said:
For the clutch cable, clean it clean it and clean it again. Push the end through the nipple and play it out then pull that splayed end back into the recess in the nipple and solder in place.
That's what I was doing. Maybe I'm not splaying out far enough? Maybe the solder isn't sticking properly... I tried to heat it up with my solder gun the first time but the end started to melt before the cable got hot enough to pull the solder so I made a solder cup on my grill and dipped it in there for 10 seconds. As soon as I pull hard it just pops and the cable pulls through. It was a brand new cable, and I cleaned it with denatured alcohol and a flame.
Yes. The trick is to have a nice recess to pull the cable end into and to be able to splay the end out into a bird's nest. That was the solder basically make a large triangular/conical lump of metal with wires spread through it lie concrete reinforcement. The end cannot pull through.
Check out waaay down this page. http://www.xs650.com/threads/xs650-clutch.143/
or this one http://bzisettas.blogspot.com/2013/01/soldering-control-cables.html
I invariably silver solder my cables. I use Sta-Silv flux and an oxy- acetylene torch with a small tip but a propane torch also works as the parts are so tiny. Getting the cable clean is by far the most important thing. I make up my own ends usually hacked from a stainless steel bolt which can take a lot of heat without melting but it is still tricky to not over heat the assembly and trash the wire. As in all soldering, the parts have to be absolutely clean, and you have to use flux and heat where you want the solder to be drawn to - challenging on such small parts. I clamp the wire between some aluminum blocks right up behind the end fitting to keep the cable from overheating and wrap the housing in a wet rag to keep the nylon (or whatever) liner from melting. Always remember that the part(s) you are trying to solder MUST be made hot enough to melt the solder on their own. Melting the solder itself with the torch will never make a joint. I used to have a massively huge iron (you could hardly wield it with one hand! used for sheet metal soldering like A/C ducts) that was big enough to solder things like a cable, but I doubt that a typical soldering gun has enough energy to do it. It may get hot enough, but likely lacks the quantity to heat the parts successfully. While splaying the wires is important, a silver soldered joint is so strong that it isn't required which is why I like them. I do splay the wires if it is practical.
This site uses cookies to help personalise content, tailor your experience and to keep you logged in if you register.
By continuing to use this site, you are consenting to our use of cookies.