YAMAHA RD CAFE SEAT

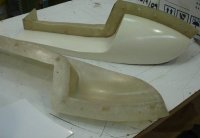
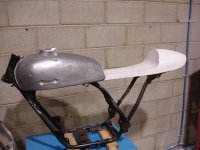
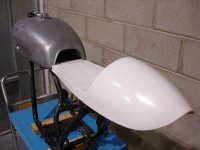
With the mould now ready I waxed and polished it and again sprayed a layer of PVA release into the mould. The PVA release agent does work very well but it leaves an inperfect surface as opposed to just wax which leaves a beautiful polished surface, because of this I painted 2 layers of white gel coat into the mould in order to easily sand out any minor surface inperfections.
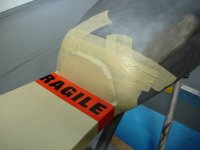
When the gel coat is applied it falls into the hairline crack of the 2 part mould, this shows as a proud line on the moulded part which cuts away very easily with sand paper.
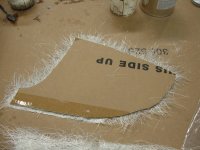
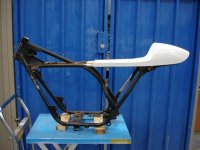
I made carboard templates of the matting sections needed to make the part, I then tore the matting useing the template, this method ensures that all the matting sections will fuse easily facilitating in easyer/quicker lamination.
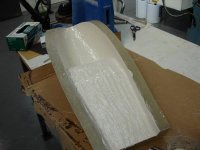
As the gel coat became green/tacky I sprinkled 6mm choppies into difficult places then proceeded to lay 5 layers of matt, 3 x 350gram as it moulds easily and 2 layers 0f 500gram matt to add strength.

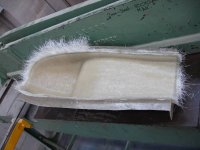
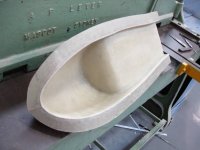
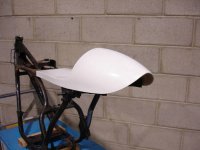
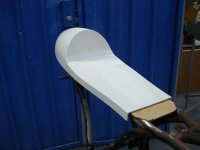
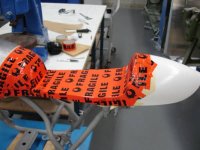
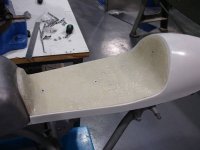
Whilst the fibre glass was green I trimmed it to the bottom flange with a knife, the part is now finished and will require minimal tidying.
 

Attachments

  • a1.jpg
    a1.jpg
    45.2 KB · Views: 197
  • a2.jpg
    a2.jpg
    40.2 KB · Views: 202
  • a3.jpg
    a3.jpg
    44.7 KB · Views: 191
  • a4.jpg
    a4.jpg
    40 KB · Views: 191
Very nice work. Do you own the cnc router or is that a perk of work? What is the final thickess of the seat?
 
When I built the surfaces for the model in Pro-engineer I put draft on all surfaces which means that I could have made the mould in one piece. However there is the risk that it would have stuck or been dificult to remove causing mould damage. This 2 part mould is designed to be re-used, the part releases effortlessly.
This picture shows one side of the mould released which popped off when the bolts were removed.
 

Attachments

  • a5.jpg
    a5.jpg
    32.1 KB · Views: 192
Here is the moulded part with minimal finishing, I sanded out the proud hairline gel coat and smoothed the bottom edge.
 

Attachments

  • a6.jpg
    a6.jpg
    43.9 KB · Views: 200
  • a7.jpg
    a7.jpg
    39.1 KB · Views: 204
  • a8.jpg
    a8.jpg
    31.2 KB · Views: 193
Next up is the seat pan, I masked all the surfaces with masking tape then covered it with parcel tape. Polyester resin does not attack the surface of parcel tape and it works very well as a cheap release agent. I then laminated 3 layers of 450gram matting over the taped surface, once dry I used a hand grinder to shape it to fit.
 

Attachments

  • a12.jpg
    a12.jpg
    32.8 KB · Views: 199
  • a13.jpg
    a13.jpg
    47.5 KB · Views: 194
  • a14.jpg
    a14.jpg
    38.6 KB · Views: 197
The seat pan is fixed from beneath through the seat with the use of 3 M5 nut inserts. I sprayed the surface of the seat pan matt black because I had some spare in the gun, it makes the surface easier to read. The edge of the seat pan has been finished with rubber edging to protect the vinyl seat cover from the fibre glass. The last picture shows where I am at currently with the build.
 

Attachments

  • a15.jpg
    a15.jpg
    35.4 KB · Views: 200
  • a16.jpg
    a16.jpg
    48.8 KB · Views: 196
  • a17.jpg
    a17.jpg
    36.8 KB · Views: 210
I hope you enjoyed the thread so far, I will post more as the seat is upholstered. The finished seat thickness is 4mm and it is solid, the seat pan is about 3mm thick and holds the fuel tank in place very well. Once my bike is re-built I will probably try and sell a few on ebay for beer money :p

Cheers 8)
 
That is excellent work Clueless. I wasn't doubting your skill or talent, It's just that your design seems to lend itself To a 1-piece construction. Mold-lock (which I think Chris was alluding to?) is only an issue in complex designs where the shape turns in on itself (most petrol tanks), and yours doesn't do that.


I still reckon that's a beautiful shape ;)


...and now you have your mold, and obviously plan to make more ;D let us know what you might sell them for?


cheers
ian
 
No worries guys, if there is one thing I have learnt with regards to making things there is more than one way to skin a cat! ;D
 
Really nice seat Clueless!

I think "Clueless" may have been a poor choice of forum name :D
 
I've heard about using the packing tape as a cheap cheap release agent :) Never tried it though. Also have you heard or tried using thermal shock as a release agent? If the part of really tough to get off the mold, stick the whole thing in an ice box for a few hours, take it out and pour boiling water on it. The thermal shock should break the bonds the polyester resin had made.
 
Hi HK, Parcel tape is cheap but effective, perfect for an unseen surface such as the underneath of the seat pan, no need for any wax as soon as you break the seal it popps off easy. Have not used the thermal shock method but will definately file it away for future use with a difficult mould.
 
I've tried the thermal shock method only once with a rather small product. It helps if you actually have an eskii or cooler box filled with ice. If not I would try a freezer but I'm not sure how well that would work. But I will vouch for the thermal shock method anyday :)
 
Back
Top Bottom