
We noticed you are blocking ads. DO THE TON only works with community supporters. Most are active members of the site with small businesses. Please consider disabling your ad blocking tool and checking out the businesses that help keep our site up and free.
You are using an out of date browser. It may not display this or other websites correctly.
You should upgrade or use an alternative browser.
You should upgrade or use an alternative browser.
Yes, another CB360 Project - BRGT
- Thread starter Wangofree
- Start date
Wangofree
Coast to Coast
The headlight assembly is finished. I know, I know, Steampunk! I really dig this thing.


The DCC bullet turn signals make it for me.
To do list is getting shorter:
And a few more items. I think I might be able to ride this baby this summer! ;D
The DCC bullet turn signals make it for me.
To do list is getting shorter:
- Paint the tank and seat pan
- Finish wiring
- Install front fender
- Reinstall 3rd generation of Pham Viet Bac's new and improved electronic ignition (more photos later)
And a few more items. I think I might be able to ride this baby this summer! ;D
quadracer351
Coast to Coast
Subscribed.
Sent from my SCH-I535 using Tapatalk 2
Sent from my SCH-I535 using Tapatalk 2
Wangofree
Coast to Coast
Re: Yes, another CB360 Project - Great EI News!
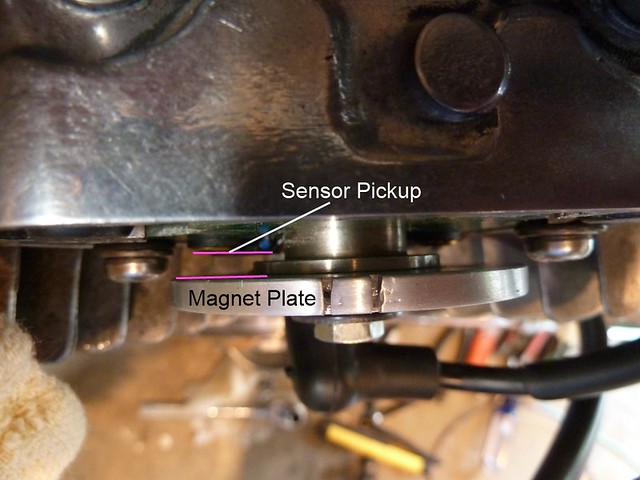
Viet has sent me version 3 of Acacia Vintage Motorcycles electronic ignition for the 360. The biggest problem I had with earlier versions was the narrow spacing between the sensor and magnet plate that ended up damaging the sensors. Well, that problem has been taken care of. The new version has plenty of space between the plates, and a stronger magnet. The timing is spot on for both cylinders.
I can't fire the bike up yet because I'm in the middle of painting the tank and seat. Once these items are clear coated I will be giving the EI a full test run.
I'm happy to finally see some color on the bike besides the black frame. With the wiring almost finished, I think I see daylight up ahead.
Viet
Been Around the Block
Dear Mike,
It is great, I am waiting for your seat to complete. Wish all the best.
@ crazypj: it is 2 pickups located 90 degree and single magnet. The control module is dual HEI module ( 4 pins) that allows no limit on rpm. The advance is stock advance mechanism. I added a small piece of steel on the rotor to make it more concentric to the center.
Thanks
Viet
crazypj
Split personality, I fake being smart
Cool Viet, thanks for info
That should work real well, only 'problem' could be over revving 8)
I had my CB550F1 up to 13,500rpm with electronic ign, stock was 9,300 rpm ;D
It was a little modified though")
Not to hijack thread, but, has Brendon been in touch about making a fairing for his 360?
That should work real well, only 'problem' could be over revving 8)
I had my CB550F1 up to 13,500rpm with electronic ign, stock was 9,300 rpm ;D
It was a little modified though
Not to hijack thread, but, has Brendon been in touch about making a fairing for his 360?
Wangofree
Coast to Coast
jeff4uk said:Cool looking bike and in British racing green, mega
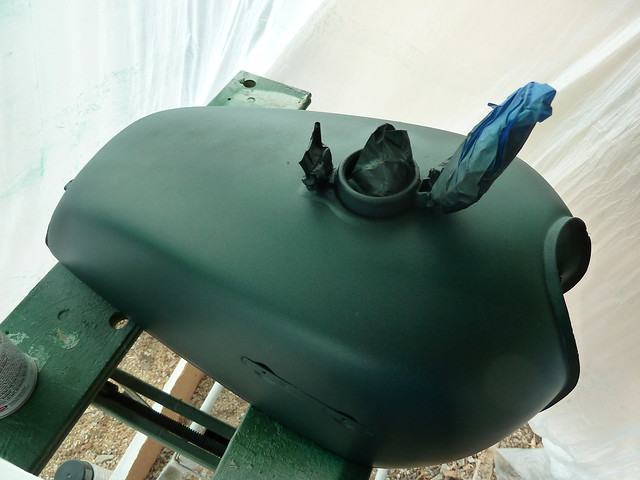
Thanks Jeff. Here's the clear coat on it. As we all know, it's hard to capture the color the eye sees, but the bottom photo comes closest to the actual "green".


Seat and tank aren't perfect, but not bad for a first effort out of a rattle can. ;D
The last of my wiring is figuring out how to get my LED turn signals to play nice. I bought a flash unit from DCC, but I might need resistors, or a dedicated LED flash unit. After that it's on to seat construction.
Ooooo the bottom pic, thats really a nice color.
Heres Sonreirs write up on LEDs, scroll down til you find the LED section adding the diodes.
http://www.hondabrat.com/2013/04/leds-batteries-resistors-oh-my.html
also heres the flasher I am using. Add the ground wire and it plugs into harness. Well maybe not your harness.
http://www.harrisonspecialties.com/led-turn-signal-flasher/
Wangofree
Coast to Coast
This green came from an auto paint specialty store. It was the closet thing I could find to British Racing Green with a little bit of bling sparkle in it.
Trek - Thanks for the links. Working midnight to 8 am last night. I'll check these out after I wake up later today.
Trek - Thanks for the links. Working midnight to 8 am last night. I'll check these out after I wake up later today.
cbcafejunkie
Been Around the Block
Love this build thread man! Your putting alot of detail into it, somthing I need to get better at in mine I may hijack your electronics setup to an extent for my CJ360t rat bike I will be starting in the next 6 months. Keep up the goods work!
I may hijack your electronics setup to an extent for my CJ360t rat bike I will be starting in the next 6 months. Keep up the goods work!cbcafejunkie
Been Around the Block
ThanksWangofree said:Thanks for the kind words CBCJ. Your project is too cool for school. That color combo is hot. Your bike is going to be a real standout. And the RFID ignition switch is the bomb!
Well see how this switch works out, I may put the same on all my vehicals so same key works for all 

