
You are using an out of date browser. It may not display this or other websites correctly.
You should upgrade or use an alternative browser.
You should upgrade or use an alternative browser.
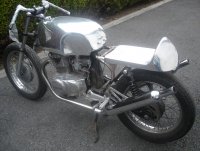
CB400T Café Build...but be patient this will take a while!!
- Thread starter drduke
- Start date

drduke
Been Around the Block
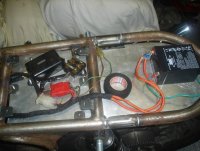
Managed to steal some free time this weekend and get stuck into the bike, mainly working on the wiring loom, when I was getting the tank made, I forgot to leave the Cdi unit fitted hence, not enough room now on the opposite side of the frame to the coil to fit the Cdi, so that now has to be moved back down under the saddle, no major problem just extended the connector block, soldering the joins to be sure to be sure, as they say here in Ireland.....I also found some cloth tesa tape on fleabay and have finished off the loom from the headstock back to the battery....some pic attached...I also managed to get the engine running over the weekend albeit badly,and on used oil...ran for about 15 minutes very very rich,,,exhaust note is nice...but lots more work to be done..oil dropped now.....so need to concentrate on the build again....I have worked out a mechanism for the rear brake...and intend to get that fabricated up this week sometime....if that works, I will need to then figure out how to run a brake light switch...
Attachments




drduke
Been Around the Block
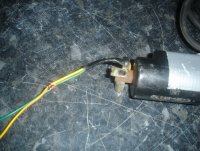
Dime City Cycles delivered these little beauties today...the wiring instructions for the tacho were incorrect....green wire goes to positive on the coil or cdi, not ground as stated in the instructions, I have informed the guys a DCC, so hopefully they will save the next customer the extra work in trying to figure it out....the tacho is pretty cool all the same, on power up it cycles from zero through to eight and back to zero again...just like a superbike...wow my café racer will have some street cred.
The wiring is still a mess, but at least now everything is connected up and working, so I can starting tidying it up now...and remove all the un-wanted and un-needed clutter.
The wiring is still a mess, but at least now everything is connected up and working, so I can starting tidying it up now...and remove all the un-wanted and un-needed clutter.
Attachments


drduke
Been Around the Block
I have a brake rod made up...with a spring used in the same way as the original set up, I'm not 100% sure how I'm going to rig up a brake light switch at the moment, I need to find some more time and get stuck back in, have not done any work in a while...I will try and get some posts up in the coming weeks.

Anthiron
Active Member
My Bike uses the same frame as yours.
I have a generic plunger style switch mounted to a tab on the rear hoop section of the frame. A spring attached to the brake lever at one end and the plunger switch at the other activates the brake lights. The switch is adjustable for sensitivity by screwing it up or down in the tab.
I am running side covers though. I don't know how neat you could make it on your setup with an open frame.
Nicko
I have a generic plunger style switch mounted to a tab on the rear hoop section of the frame. A spring attached to the brake lever at one end and the plunger switch at the other activates the brake lights. The switch is adjustable for sensitivity by screwing it up or down in the tab.
I am running side covers though. I don't know how neat you could make it on your setup with an open frame.
Nicko
drduke said:I have a brake rod made up...with a spring used in the same way as the original set up, I'm not 100% sure how I'm going to rig up a brake light switch at the moment, I need to find some more time and get stuck back in, have not done any work in a while...I will try and get some posts up in the coming weeks.
Anthiron
Active Member
I am away for work untill the 23rd. When I get home I will snap a pic for you.
The switch is very similar to this.
http://www.ebay.com.au/itm/Emgo-Universal-Brake-Light-Switch-Rear-Stop-Spring-Pull-Motorcycle-New-K-S-/300953374566?pt=Motorcycles_Parts_Accessories&hash=item4612380f66&_uhb=1
Nick
The switch is very similar to this.
http://www.ebay.com.au/itm/Emgo-Universal-Brake-Light-Switch-Rear-Stop-Spring-Pull-Motorcycle-New-K-S-/300953374566?pt=Motorcycles_Parts_Accessories&hash=item4612380f66&_uhb=1
Nick


burnicarus
Oliver
HOLY SHIT THAT TANK! If that was mine Id use it as a pillow. ha
drduke
Been Around the Block
78HawkII said:DrDuke,
Great build!! I been in the process of building my own 78 HawkT2 and I was wondering about replacing the Keihin Carbs as well. Can you tell me a little more about the model and the set up that you are running.
Thanks,
Sorry for the delayed response, just don't seem to be getting much free time these days, and to top if off, I broke my finger last week, so that will delay the project even further....I purchased my carbs from Lossa engineering, they are Mikuni VM32, they are working very well, but will need to be re-jetted, as I have changed the exhaust system completely, and the carbs out of the box are set up for a 350cc not a 400cc...see link below to the website.
http://www.lossaengineering.com/shop/mikuni-vm32-carb-kit/
Eoin
drduke
Been Around the Block
got some time this weekend, wow this is turning into a epic build, I managed to finish the wiring, totally stripped down of unwanted stuff, indicators, ignition substituted for a 30amp on/off switch, fitted a break in the loom under the the petrol tank, this keeps the wiring around the headlight to a minimum, battery, regulator and cdi all located under the seat, will try and get the seat covered next, and still need to sort out a rear brake mechanism to work with the universal rear sets, then I should be ready for powder coating, and a final built.
Attachments


xholaday40x
Active Member
We're did you find that exhaust and gank
Sent from my iPhone using Tapatalk
Sent from my iPhone using Tapatalk

To be sure ya build gonna be a head turner this summer 8) sure you'll get it finished up for then , real clean look goin on  ya got class mate
 ime a fan of this one all the way :
 keep goin mate , always here for Q & A's doubt ya need inspiration

ya got class mate ime a fan of this one all the way : keep goin mate , always here for Q & A's doubt ya need inspiration 

