
You are using an out of date browser. It may not display this or other websites correctly.
You should upgrade or use an alternative browser.
You should upgrade or use an alternative browser.
Father Son 75 CB200T Rise From the Ruins
- Thread starter Texasstar
- Start date

Texasstar
Can't is a four letter dirty word
sorry there was a brand new set and they are spoken for..by my soncrimson ghost said:Will you have some decent air box covers for sale ?


crimson ghost
New Member
Thanks. Keep up the good work. 
Texasstar
Can't is a four letter dirty word
Will we benefit by having a copper gasket that is thinner than the stock gasket with the typical oil leaks that people have with copper gaskets. Here are the instructions from Lani at Coppergaskets after the annealing process.
Copper Gasket Installation Instructions
While copper is an excellent gasket material, it does require special attention to achieve a long lasting seal. For best results, follow the installation instructions detailed below.
1.Check the fit of the gasket. If any dimensions are out of tolerance, don’t hesitate to notify us. We at Copper Gaskets Unlimited urge our customers to help us maintain our high standards as to the fit and design of our product.
2.Make sure all the sealing surfaces are very clean and dry. Once you are ready to install your CGU gaskets, be careful to touch only the edges. An oily fingerprint on the sealing surface can cause gasket failure.
3.When the surfaces are properly prepared, apply gasket sealer to both sides of your gasket only. We recommend Permatex Ultra Gray3294 sealer or Copper coat. Wait ten minutes for the sealer to cure.
4.Assemble the engine following OEM specifications, again making sure not to compromise the seal with oil or grease of any kind. During assembly, pay special attention to the condition of the threads on all nuts, bolts and studs. Dirt, rust
or other contamination can cause torque specs to be reached before proper bolt stretching occurs. Torque the head bolts to the recommended setting and in the proper sequences. After assembly, allow the sealer to fully cure for 24 hours, then start the engine and allow it to reach operating temperature. Then shut it down and recheck the torque on all the fasteners. When everything has again cooled, check the torque for a third time.
5.After the first time out with your machine, recheck the torque to be sure nothing has settled and lessened the pressure on your CGU gasket.
Follow these instructions, and your CGU gasket should last as long as the engine.
COPPER GASKETS UNLIMITED
515 E. Carefree Hwy., #673
Phoenix, AZ 85085
(623) 340-4300
www.coppergaskets.us
Check us out!!!
Copper Gasket Installation Instructions
While copper is an excellent gasket material, it does require special attention to achieve a long lasting seal. For best results, follow the installation instructions detailed below.
1.Check the fit of the gasket. If any dimensions are out of tolerance, don’t hesitate to notify us. We at Copper Gaskets Unlimited urge our customers to help us maintain our high standards as to the fit and design of our product.
2.Make sure all the sealing surfaces are very clean and dry. Once you are ready to install your CGU gaskets, be careful to touch only the edges. An oily fingerprint on the sealing surface can cause gasket failure.
3.When the surfaces are properly prepared, apply gasket sealer to both sides of your gasket only. We recommend Permatex Ultra Gray3294 sealer or Copper coat. Wait ten minutes for the sealer to cure.
4.Assemble the engine following OEM specifications, again making sure not to compromise the seal with oil or grease of any kind. During assembly, pay special attention to the condition of the threads on all nuts, bolts and studs. Dirt, rust
or other contamination can cause torque specs to be reached before proper bolt stretching occurs. Torque the head bolts to the recommended setting and in the proper sequences. After assembly, allow the sealer to fully cure for 24 hours, then start the engine and allow it to reach operating temperature. Then shut it down and recheck the torque on all the fasteners. When everything has again cooled, check the torque for a third time.
5.After the first time out with your machine, recheck the torque to be sure nothing has settled and lessened the pressure on your CGU gasket.
Follow these instructions, and your CGU gasket should last as long as the engine.
COPPER GASKETS UNLIMITED
515 E. Carefree Hwy., #673
Phoenix, AZ 85085
(623) 340-4300
www.coppergaskets.us
Check us out!!!
Texasstar
Can't is a four letter dirty word
i am thinking about using the hondabond ht because I have read the clean up is easier when you go to remove it later.teazer said:Sounds like good advice. How often do people put new gaskets onto old scarred lumpy gasket faces. Matching faces should always be cleaned up and the holes slightly countersunk.
Texasstar
Can't is a four letter dirty word
We have our first sponsor! Zach Jones of RD Valve Springs turned us some titanium retainers and washers. The first picture is the cb200 stock valve springs and retainers and you can see where we ended up with R/D Valve Springs! Thanks to Zach Jones. A big shout out to Teazer and Sonreir for telling us about R/D!
Attachments


pacomotorstuff
Coast to Coast
Don't know if you've checked steering damper clearance with the motor installed or is your reduction in steering lock enough that the damper rod doesn't hit the cylinder head?
I was going nuts trying to mount mine and just left it off for now, but my frontend is different than yours and my steering lock on the baby tracker is bound to be a lot greater anyway...
Pat
I was going nuts trying to mount mine and just left it off for now, but my frontend is different than yours and my steering lock on the baby tracker is bound to be a lot greater anyway...
Pat
Texasstar
Can't is a four letter dirty word
i will let you know we mounted our damper just below our coilpacomotorstuff said:Don't know if you've checked steering damper clearance with the motor installed or is your reduction in steering lock enough that the damper rod doesn't hit the cylinder head?
I was going nuts trying to mount mine and just left it off for now, but my frontend is different than yours and my steering lock on the baby tracker is bound to be a lot greater anyway...
Pat
Attachments


Yes and no. On the top and bottom, go in the long direction to eliminate lines across which are stress raisers. At the threaded end, you can remove a lot more from the lower end so it's tapered - wide at the top for the lock nut and narrower at the bottom.
Texasstar
Can't is a four letter dirty word
thanks Teazer. Do we need to worry about shot peening them when we are finished?teazer said:Yes and no. On the top and bottom, go in the long direction to eliminate lines across which are stress raisers. At the threaded end, you can remove a lot more from the lower end so it's tapered - wide at the top for the lock nut and narrower at the bottom.
Texasstar
Can't is a four letter dirty word
We ground our valve guides flush and took them to David to have the guides reamed to remove the burrs. We blended the seats with the bowls and used some old valves to protect the Serdi cuts and blended what needed to be done in the combustion chamber.
Attachments


Texasstar
Can't is a four letter dirty word
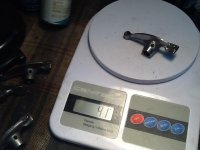
This is the lightest of our rocker arms. It was 45 grams with a tappet and nut. 42 without. We tapered the end and removed casing marks. We are trying to match all other rocker arms to this one.
Attachments



Texasstar
Can't is a four letter dirty word
We only removed a gram from this rocker arm. It was 2.71mm at the top and...the barrel of some of these rocker arms are substantially bigger and are carrying more weight than our model rocker arm.
Do we need to worry about this weight at the barrel?
We are matching dimensions from rocker arm to rocker arm toward the tappet...
Do we need to worry about this weight at the barrel?
We are matching dimensions from rocker arm to rocker arm toward the tappet...
Attachments


Texasstar said:Do we need to worry about this weight at the barrel?
Short answer, no. Most of the movement happens at the ends (especially above the valve stems), so that's where the efforts should be focused.
Texasstar
Can't is a four letter dirty word
thank you!Sonreir said:Short answer, no. Most of the movement happens at the ends (especially above the valve stems), so that's where the efforts should be focused.

