
You are using an out of date browser. It may not display this or other websites correctly.
You should upgrade or use an alternative browser.
You should upgrade or use an alternative browser.
small CL 360 project
- Thread starter troybilt
- Start date

Got a good bit done over the past few days. Lots of cleaning, stripping, sanding, prepping and painting. I'm not too sure of the frame color yet but it is part of a plan. I wanted something different but want it to look natural. I've been known to work on something for a month then tear it apart and do it again. We'll see...
My thoughts here are reverse of what you see alot of. I'm doing the frame in silver and will use black spareingly. I love the look of mechanical workings and think they are sexy, so I figured everything I paint black would really stand out against the silver. However, I don't want things to look out of place and figure the black and silver still look good together.
So far I'm really liking it. I may end up painting the rest of the wheels black to knock down on some of the chrome.
Shifter, brake linkage, and frame painted. I used three cans of epoxy silver on the frame alone. I lost count after about 6 coats. LOL

Lots of odds and ends got painted as well. I used the indoor clothes line to let them dry.

swing arm painted (1 can of epoxy silver LOL) The black looks like glass. Man I love this epoxy paint!

Forks being prepped

forks painted. Again, the black turned out like glass or ceramic.

Rear wheel comming together

front wheel needs a little tlc. I plan on polishing the cover like the back wheel

Today I tore apart the rear shocks (again). I had prevously painted them using regular enamel and they had already taken on some scratches. So I'll hit the springs with epoxy too.
Still need to work on the motor/carbs. Lots of prep work to do there. Tank and tail will need painted as well. I should be able to start some reassemble soon ;D Plans are to polish bolts and fasteners as I reassemble. I'll try to replace what The budget allows. I still plan to have less than $750 in the entire build including inital cost of the bike. I just hope it doesn't look it. I do realize that a few things will have to keep its original patina to be swapped out later.
I would like to introduce a third color into the paint scheme. Not sure what color though.
Sorry for the large freaking photos but I've worked my ass off and anything less I feel, wouldn't do justice. Peace, Troy
My thoughts here are reverse of what you see alot of. I'm doing the frame in silver and will use black spareingly. I love the look of mechanical workings and think they are sexy, so I figured everything I paint black would really stand out against the silver. However, I don't want things to look out of place and figure the black and silver still look good together.
So far I'm really liking it. I may end up painting the rest of the wheels black to knock down on some of the chrome.
Shifter, brake linkage, and frame painted. I used three cans of epoxy silver on the frame alone. I lost count after about 6 coats. LOL
Lots of odds and ends got painted as well. I used the indoor clothes line to let them dry.
swing arm painted (1 can of epoxy silver LOL) The black looks like glass. Man I love this epoxy paint!
Forks being prepped
forks painted. Again, the black turned out like glass or ceramic.
Rear wheel comming together
front wheel needs a little tlc. I plan on polishing the cover like the back wheel
Today I tore apart the rear shocks (again). I had prevously painted them using regular enamel and they had already taken on some scratches. So I'll hit the springs with epoxy too.
Still need to work on the motor/carbs. Lots of prep work to do there. Tank and tail will need painted as well. I should be able to start some reassemble soon ;D Plans are to polish bolts and fasteners as I reassemble. I'll try to replace what The budget allows. I still plan to have less than $750 in the entire build including inital cost of the bike. I just hope it doesn't look it.
I do realize that a few things will have to keep its original patina to be swapped out later.I would like to introduce a third color into the paint scheme. Not sure what color though.
Sorry for the large freaking photos but I've worked my ass off and anything less I feel, wouldn't do justice. Peace, Troy
dude that silver looks amazing!!! i have never shot anything with it... wow! may have to use that on a future endevor some time! very nice!!!
i totaled mine up last night i am at 683.48 so far... including the cost of the bike! not bad... we are doing great at this budget build deal man! ha ha ha
man i love how that silver and black looks!
i totaled mine up last night i am at 683.48 so far... including the cost of the bike! not bad... we are doing great at this budget build deal man! ha ha ha
man i love how that silver and black looks!

Flugtechnik
My bike is not transportation, it is a respite
Yes, definitely looks great. Keep us posted to how it holds up to gas and getting banged around. Most likely going the appliance paint route when I do my rebuild.
Thanks JRK. I'm not 100% sure on my paint scheme yet. I'm not sure how the chrome (motor and wheels mainly) will look with the silver. If needed I can go back and paint the rims to knock down some of the chrome. I plan to see what it all looks like first. However, I thought that if I left the dust covers chrome the black linkage etc. would stand out. We'll see how it looks. If it calls for it I'll change/paint as needed.
And I'm yet to decide on paint for tank and tail and headlight bucket. Guess I'll wait until it comes together.
Yeah, with low bucks you've gotta be creative, chuckle.
The silver has a ton of tiny metal flake making it a little harder for me to paint than the black. Over spray was a problem (the flake is very fine and would float onto other painted surfaces). Guess that could be a problem with all fine metal flake ??? It was also very hard to keep it mixed but, unlike the black, it dries super, super fast.
Flug, Thanks man. There are a few guys on here that have used it and swear by it. I learned about it from JRK but I've also read great things about it on other forums. I had planned to only do a half assed job on this build (hence the title 'Small CL...project') then ride it for a season. Then tear it apart and powder everything. Now I'm trying to do it right the first time, only using the epoxy instead and I'm hoping it will hold up. Time will tell. Troy
Flugtechnik said:Yes, definitely looks great. Keep us posted to how it holds up to gas and getting banged around. Most likely going the appliance paint route when I do my rebuild.
it will hold up decent to the gas... i have stuff that was shot with it years ago and still looks great! as far as banged around man... why you going to bang your bike around? hell i get pissed when people sit on my ride without asking!
Flugtechnik
My bike is not transportation, it is a respite
I just meant stuff kicked up from the road, tie-downs, random tools flying out of your hands. You know.
manchestermichael
hello
you have got to get some more pics up as i am in the same place i dont no to go black or sliver to i have done my motor sliver so might be to much cantwate to see it built up if i can ill wate to see how yours looks it looks gr8 sliver make a change
I hear ya. I'm so bad about scratching stuff. I painted the springs on my shocks with regular paint and they already looked like shit. That's why I stripped them down. Plan to hit them with epoxy. I'm betting this stuff will hold up to my minor oops moments, ha ha.Flugtechnik said:I just meant stuff kicked up from the road, tie-downs, random tools flying out of your hands. You know.
I'll try to keep posting as I get things done.manchestermichael said:you have got to get some more pics up as i am in the same place i dont no to go black or sliver to i have done my motor sliver so might be to much cantwate to see it built up if i can ill wate to see how yours looks it looks gr8 sliver make a change
LOL, I was afraid I was posting too often with too little to show, if you know what I mean
. The fact that someone wants to see it finished may motivate me to get more done. Right now I'm loving the silver. It's very different. That could change as the bike goes back together though. Seems like for the past two days I've been cleaning and prepping the motor, but things should start happening pretty fast after I get it shot. Let the assembly begin...
Getting the engine knocked out of the way. I'm painting it right now but thought I'd kill some time between coats and post some pics.
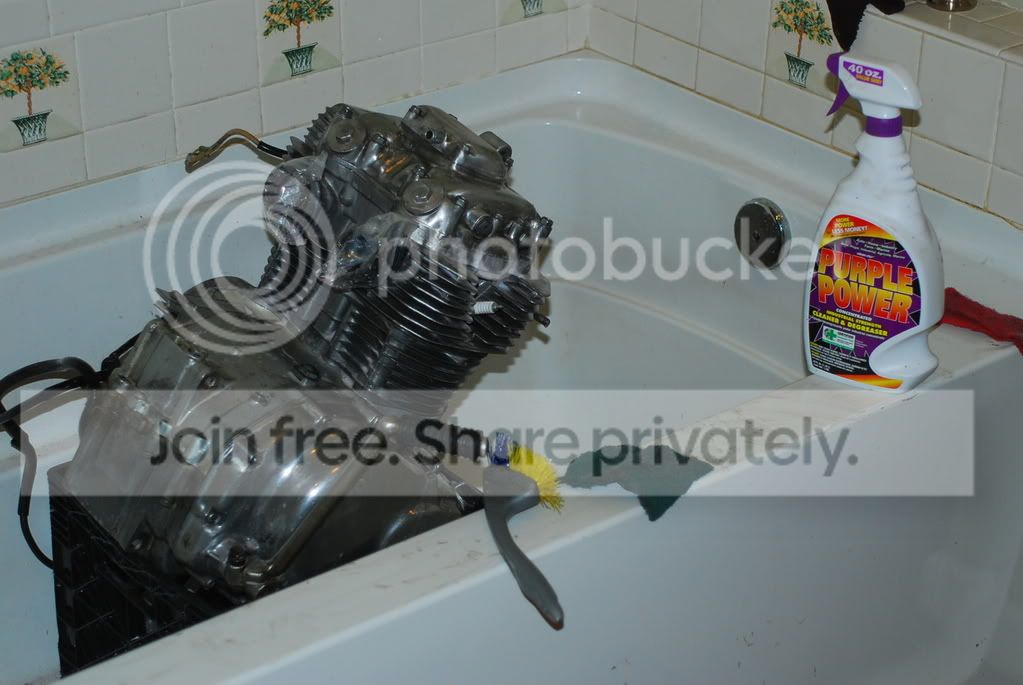
I have to be honest. I had no idea how much time this would take. I'd say a good 10-12 hours anyway. First cleaned the hell out of it with purple power. I used wire brushes, scotch brite pads (the red one) many soft brissle brushes and just about any thing else I could find. I finished with 400 grit and another bath of dish liquid then wiped id down with denatured alcohol twice. Here I'm using an appliance brush.

Removed the carbs and the starter (think I'll do something different with the starter) and moved t the bath tub
Taped up and primer applied.

applied a coat of gloss black ceramic with many more to come. I plan to sand the fin edges.

I have to be honest. I had no idea how much time this would take. I'd say a good 10-12 hours anyway. First cleaned the hell out of it with purple power. I used wire brushes, scotch brite pads (the red one) many soft brissle brushes and just about any thing else I could find. I finished with 400 grit and another bath of dish liquid then wiped id down with denatured alcohol twice. Here I'm using an appliance brush.
Removed the carbs and the starter (think I'll do something different with the starter) and moved t the bath tub
Taped up and primer applied.
applied a coat of gloss black ceramic with many more to come. I plan to sand the fin edges.
Today I learned a big lesson about repainting too soon. I noticed a couple of spots on the hub (almost under a few spokes) that never got any paint. It was pretty much unnoticable. I hit the areas with 400, cleaned with mineral spirits. It stood up nice and figured I was safe to paint. It looked good at first then the paint did all kinds of crazy things. It crackled and kind of scrunched up. It really looks bad in those areas. I know that I tried to repaint too soon. Figure I'll wait about a month and try it again.
You really can't tell in these photos but its there. So anyway, here is a teaser. The silver (swing arm) with the black and chrome.

The motor is painted. It turned out kick ass. I'm real happy with it. How long before I can sand the fins and can I do it after it is back in the frame???
Also, I plan to swap out bolts with black head allen heads or what ever they're called

You really can't tell in these photos but its there. So anyway, here is a teaser. The silver (swing arm) with the black and chrome.
The motor is painted. It turned out kick ass. I'm real happy with it. How long before I can sand the fins and can I do it after it is back in the frame???
Also, I plan to swap out bolts with black head allen heads or what ever they're called
BigBSBusa said:Silver and black look great together even with chrome! I'm using a similar color scheme (silver frame and assorted black and polished bits to set it off).
So good to hear. I was a little vervous. Now I can't wait to se it standing on its feet!
JRK5892 said:looks great! i see you used the "bath tub" tenique huh! ha ha ha
Yeah, I stole your idea. The ole lady caught me though. Told me she didn't mind but just make sure I clean it up when done and "get that grease off the wall bfore it stains". ha ha. guess she is getting use to my busted up greasy hands and all my other 'bad' (bike) habits.
Stripped the clear from the starter and polished it. Hit it with high temp clear and got it installed. Gonna have to spend a hole bunch of time on those covers!

I ordered BMX pegs $7.99 +$3 shipping on close out. They were out of black so I took what they had. Figure I'll strip the powder and leave them clear.

Hey Chris, Thanks for the props. The paint is amazing. My father stopped by to check my progress and said he couldn't believe his eyes. The stuff is crazy. Has a deep shine and looks like glass. I've been very lucky with the paint so far. I've never used any of the paints that I'm now using on this project, ie: epoxy and enamel/ceramic...but I have to tell you I'm blown away.
Here is what I've used on the motor. I used the clear only on the starter. Springs and tree were painted with epoxy(just ended up in the pic) I just looked at the picture and the cap on the primer is not right. It's the cap from silver epoxy. It is pretty close though.

Hey Joe, thanks for the tip. Gasket stripper it is.
I'm thinking about not doing the fin edges on the motor. It looks so good the way it is and I dont want to take a chance to f it up. I'm not sure it would be worth the time anyway. What do you guys think?
Here is what I've used on the motor. I used the clear only on the starter. Springs and tree were painted with epoxy(just ended up in the pic) I just looked at the picture and the cap on the primer is not right. It's the cap from silver epoxy. It is pretty close though.
Hey Joe, thanks for the tip. Gasket stripper it is.
I'm thinking about not doing the fin edges on the motor. It looks so good the way it is and I dont want to take a chance to f it up. I'm not sure it would be worth the time anyway. What do you guys think?
Flugtechnik
My bike is not transportation, it is a respite
Lookin good. This is only my opinion, so please take it that way. If it were me, I would take the tappet covers off, polish them and clear them. Will add a little sparkle to the top and you won't have to worry as much later when you take the wrench to them to adjust the tappets. If you do, make sure you cut the paint around the edge of them so the paint doesn't get messed up on the head when you take them off. A razor blade or hobby knife should work.
Hey Flug, That's why I'm here. I love getting ideas from others! Polished tappet covers might be the icing on the cake. Wish I would have thought of that before. I'll take a look and see what it will take. Besides it might keep me from sanding those fins... I figure I need to wait a couple more days before putting it back in the frame anyway. TroyFlugtechnik said:Lookin good. This is only my opinion, so please take it that way. If it were me, I would take the tappet covers off, polish them and clear them. Will add a little sparkle to the top and you won't have to worry as much later when you take the wrench to them to adjust the tappets. If you do, make sure you cut the paint around the edge of them so the paint doesn't get messed up on the head when you take them off. A razor blade or hobby knife should work.
Ok I need a little help. I want/need new tappet covers. Decided I would change them out and purchase new ones. Mine are pretty chewed up by the PO. Anyhow, I decided to remove them and strip the paint. Removal was very easy but the gaskets look pretty bad. They will need replaced as well. I can't seem to track anything down. Many of the parts places that I've searched skip my cl 360 model. Are their any other models that will/might work? How about resources?? I'll probably want new gaskets before I put the motor on its side to go into the frame, so I really want to get this taken care of asap. By the way, I cleaned the old ones up to see what it will look like. Looks tits!!