Rat_ranger
Over 1,000 Posts
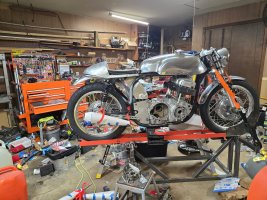
Slow progress is happening. Koni shocks are rebuilt and installed. Tail light is mounted and garage is cleaner with more to go.


I'm planning on the battery and fuse box being under the hump, so I figured tool free access might be important.Man, that is a clean machine! I like the way you mounted the rear cowl for easier access.
Woodcraft stuff isn't cheap, but they have setups you can't get anywhere else. I had driven racing clipons on the bike, but it felt like too long a reach. I changed to some super cheap amazon 1" rise clipons to test the position. I liked the rise, but wanted the bars further back. That meant woodcraft. Nice thing is if they sellthe parts to make what you want, but not as a set you can call and make a set. I wanted sidemount with the rise, but fixed rather than adjustable.Nice. I have similar Woodcraft bars on my KZ1000, except I have the higher rise version. I love the bar position.
Thanks, it's been a learning curve to get here. Before this I had never used an english wheel or bead roller. I've also gotten a TON of aluminum welding practice. I'm still glad I bought the tank from Tabclassics, I still couldn't manage a tank that nice.With how you fabricated the M.Mounts, the oil bag and the air filter setup.. it looks like that frame was engineered to hold the 750lump.. looks good man
Thanks, it still has a fair bit left to do. I just modifiedthe oil return from the head similar to cyclex, I'm waiting on a piece of aluminum to finish cutting down the stator cover, and a gl1000 clutch to modify for a 6 spring setup. I need to get a little more practice withthe boring bar before I do the cylinders.What a build I'm impressed, it's really that style I like
Footpegs are aluminum. Should be plenty strong.I like the 4-4 exhaust systern on thoose old Honda engines, even if a 2-2 looks more clasdic with the Norton frame would I go for a 4-4. If it was mine build i would do the mufflers straight as the megaphones was on the vintage Hondas like the RC166.
I like the pegs nice work, are the footpegs in aluminium or steel?
Footpegs are aluminum. Should be plenty strong.
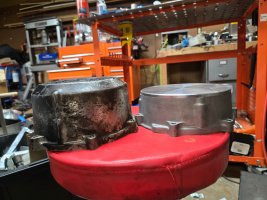
I'm really thinking about hydroformed cones now. I made a DXF and 2 pieces to test it, so now that I know it works I can get the parts cut by sendcutsend out of stainless for a little more than material would cost.
View attachment 242290View attachment 242291View attachment 242292View attachment 242293View attachment 242294
Final form is controlled by the pattern. So I made my pattern, first I layed out a straight cone and got the diameter every 2 inches. Then I figured out how much curve I wanted. The diameters were then converted to circumference minus 5% for stretch and then divided by 2. The resulting numbers were used to lay out line perpendicular to where they fall on the curve and the outside was connected to match the curve with the taper included.How are you doing the hydroforming? Have you just weld the two plates together and then pressurised with fluid or do you have some template (mabye not correct name) to put it in before you pressurise to get the right outside form?