DreadRock said:
Can you explain in lil more detail how your making those ? Again man there sweet and very nice work ..
Here's the long and the short of it:
Start with your piece of copper. Go ahead and shape the badge itself before you do anything else.
Once I have my shape I give it a decent sanding. I usually go 220/400/600 grits. You really just need to be concerned with the front side.
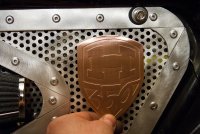
Next I lay down a resist. There are lots of things you can use to resist the etching solution. The method I have been using involves coating the entire piece and then scratching the resist away in the area you want etched down. The key is- you want to be able to lay down the resist easily, be able to scratch into it fairly easily (without tearing chunks of the resist away) and ultimately when you are done, you want to be able to remove all the resist completely and easily without ruining your design. I made some test pieces using different things... I have been using spray paint lately for these badges. I coat the whole thing front and back. Remember, if you don't coat the back, the whole backside gets etched away... I have found that the resist comes off the edges too easily, so I have been coating the edges with nail polish (liberally). The edges take abuse sometimes when you drop it in and out of the etching solution, so the nail polish or some other kind of brush enamel is a little beefier in these trouble spots. Once everything is coated, start scratching away. Remove the resist and expose the copper in any areas you want etched down. The covered areas will remain as they are. If you make a small mistake, touch up you mask resist with some of that nail polish, and then scratch back into it. I have a few copper etching tool from art school, but my favorite tool has been a simple exacto knife. Go slow take your time. You need a bit of drawing skill, but it depends on the complexity of your design. Now your ready for the bath.
There are several recipes for the etching solution. Various acids and chemicals, pool chemicals etc... You can google it. But the one I use, I chose because it is cheap and I initially had all the ingredients at home already. I do not use any specific measurements. But it goes something like this: plain old white vinegar (this makes up the bulk of the solution). Mix in enough salt so that it is saturated (until no more salt will dissolve in the vinegar). Then I add some hydrogen peroxide (the stuff right out of the first aid kit). I eyeball it... But basically it is roughly 1 part hydrogen peroxide to 10 parts vinegar. (again just ball parking). Now put the piece in a glass or heavy plastic container and cover with solution. You want the copper piece situated in such a way as to allow particulates to fall away. Ideally face down, suspended in the solution... Or as in the case with the Honda lettering badges, I put them in a glass jar standing up. As the copper dissolves away you want particles to be able to fall away and not block further etching. Put the piece in and leave it over night.
Next day, take a look at it. First thing you will notice is that the once clear solution is now bright blue. If you want the etch deeper and the relief to pop more, leave the piece in longer. The Honda letters were in the solution for roughly 2 days. As the solution gets bluer it gets less potent. Oxygenating the solution helps. I stir it up or shake it up, I have even blown bubbles into it with a straw. Someone can probably better explain the chemistry involved. I just know what works. When I start a new piece, I usually make a new batch of etching solution, because it just works faster.
To finish up you need to remove all of your mask (spray paint). If you have your copper sanded smoothly the paint should scrape off easily with your fingernail, straight from the solution. If the paint is a little stubborn, you can use some steel wool. In the end you can polish it to whatever degree you wish. Just keep in mind that the more you polish, the more you are rubbing away the relief you just created. Do the minimum you are happy with. I just use a superfine steel wool over the whole thing.
Hope this makes some sense LOL
~chris


") wink wink nudge nudge.
wink wink nudge nudge.