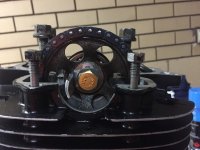
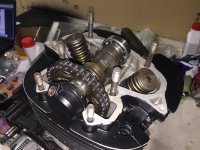
1980 XT500 BUILD

MCKAY34 said:
Finally got a new bolt to hold the Camshaft on,
and realised something is horribly wrong with the camshaft. its missing or has snapped off a guide that holds the sprocket on straight. its not there.
So the sprocket doesnt sit on and has heaps of movement. Wish i have know this ages ago.
So now its time for a new camshaft. sucks. more delays!


That's weird - looks like the shoulder snapped off and the PO dressed the face to run it with just the bolt and the pin.


A bit ghetto, but probably worked OK....
 
Yeah mate, your spot on. I tried putting it back together with just the bolt, just to see if it worked , I would never run it like that, but just out of interest, and the sprocket moved side to side. So needless to say I need a new camshaft.
Thanks for the reply! Hasn't been much conversation on my posts so far. So I appreciate it.


Sent from my iPhone using DO THE TON
 
Been thinking about pulling out my old XT and re-doing the top end (it's been in the corner of the garage patiently awaiting it's turn).


Your thread is giving me some inspiration 8)
 
Hahah!!! Woooooo!!! Get it out man! Xt's are sick!! Fire that thumper up!
I can't wait till mine is done.
My thread will start to get less boring now as I do the rebuilt with shiny new parts


Sent from my iPhone using DO THE TON
 
Thanks mate!
Going a little more slowly than I wanted because waiting for parts take a while, but it should get more exciting this week, I'm picking up the wheels today, they have just been re-spokes and powder coated! Can't wait


Sent from my iPhone using DO THE TON
 
Hi I just found this. I rode a bike just like your's when I was in OZ 20 years ago. I have been a fan of XT's ever since. Looks like you are doing a great job. Enjoying the build, keep posting the pics please
 
Awesome Popeye!
Thanks for the feedback. Be ready for some pics this week.


Sent from my iPhone using DO THE TON
 
Hey everyone, Just picked up the wheels from being re spoked with new spokes.
powder coated the rims and hubs. looks pretty good.

Shopping for tyres tomorrow! yay! im going to try and get a dual tyre. Something i can ride on road and off road. For some adventures and exploring. Stay tuned to see what i come back with!!!
 

Attachments

  • IMG_0752.JPG
    IMG_0752.JPG
    2.4 MB · Views: 432
I had the forks painting gloss black,
got some new fork gaiters and i have just drained all the old fluid and replaced with new fluid.
 

Attachments

  • IMG_0763.JPG
    IMG_0763.JPG
    3.2 MB · Views: 422
So well at least its starting to look like a motorcycle again. Im currently waiting for a new cam shaft to arrive, so while im waiting i might as well put some of the steering head and forks back together.

I put new tapered bearings in the steering and it feels great, very very smooth. New risers and to be honest im super happy how its starting to look. nice and clean. Cant go wrong with black on black

I bought some new Renthal bars (silver to break up all the black) and could not resist putting them on and start making motorbike noises!!! braap! braap! braap!
 

Attachments

  • IMG_0772.JPG
    IMG_0772.JPG
    1.3 MB · Views: 428
  • IMG_0771.JPG
    IMG_0771.JPG
    1.5 MB · Views: 432
  • IMG_0770.JPG
    IMG_0770.JPG
    1.3 MB · Views: 434
  • IMG_0769.JPG
    IMG_0769.JPG
    1.4 MB · Views: 427
  • IMG_0760.JPG
    IMG_0760.JPG
    783.1 KB · Views: 445
ok great news.
the new camshaft has arrived, so i will be reinstalling the new one today.
everything went well and installed with no issues.
 

Attachments

  • IMG_0787.JPG
    IMG_0787.JPG
    1.1 MB · Views: 422
  • IMG_0789.JPG
    IMG_0789.JPG
    1.2 MB · Views: 427
  • IMG_0791.JPG
    IMG_0791.JPG
    2.2 MB · Views: 417
Ok so i need some advice please.

I am not sure how to install the cam chain tensioner, perhaps im over thinking it. im not sure how tight it needs to be.

so i just screwed the smaller one all the way in.
please have a close look at the pic, you will see what i have done. what is the general rule when installing these cam chain tensioners.

Any help would be great, thankyou in advance.
 

Attachments

  • IMG_0793.JPG
    IMG_0793.JPG
    1.1 MB · Views: 420
The smallest part in the very center is a floating rod. The 10mm nut outside of it is the adjuster. The big nut is the lock nut. You're not going to over tighten the 10mm to start, but when the bike is running you adjust it until the floating rod bounces 1 - 2mm.
 
Hi miller , that's great thanks for the info.
When you say "bounces" do you mean it will twist back and forth 1-2mm? And then I just adjust the 10mm nut either in or out until the rod does this?


Sent from my iPhone using DO THE TON
 
When the motor is running, the center rod bounces in and out like a sewing needle. If it's loose enough, it almost looks like it's going to shoot out. So, you're adjusting until it protrudes no more than 2mm. You can stick a wrench over it and it will tap the wrench.
 
Ohh ok. Awesome, that is very helpful and a Great description. Thanks mate. Wish me luck!


Sent from my iPhone using DO THE TON
 
Ok here is todays update:
I installed a new upgraded oil line today, its suppose to feed more oil directly to the rocker arms.

I set the valves at:
Inlet valve: 0.09mm
Exhaust: 0.15mm

(Instructions from the oil line packaging say that because the engine will be cooler. Exhaust should be 0.12mm but i dont have a 0.12 feeler guage. mine skips from .10-.15)

If anyone has any thoughts on these valve clearance settings please let me know.

(ignore the gasket silicon, when it dries i will be pulling the excess off)
 

Attachments

  • IMG_0799.JPG
    IMG_0799.JPG
    2.2 MB · Views: 419
Spec is .07mm - .12mm on intake and .12mm - .17mm on exhaust. So, you're in the wheelhouse. I'd get one of these so you always have it to check.

http://www.ebay.com/itm/Motion-Pro-Tappet-Feeler-Gauge-004-005-10mm-13mm-08-0053-/182455268719?epid=917019082&hash=item2a7b2e756f:g:wpIAAMXQlgtRoAsd
 
Back
Top Bottom